reusable wall calendar
Instructions & tips
Here you will find important instructions and tips for our reusable wall calendars!
VERY IMPORTANT
- You should only use white or silver liquid chalk markers on our erasable calendars. Other colors or types of markers may leave residual color behind (also called "ghosting").
- You can find our chalk marker recommendations below.
- We are not responsible for and cannot issue refunds for damage caused by the markers you choose to use.
- Traditional pens and markers will not write well on the smooth, coating surface and are not erasable.
- If you choose to use any other color or type or marker, we highly recommend that you test it in an inconspicuous area to ensure it erases cleanly and completely before writing all over your calendar with it.
- To clean liquid chalk off your calendar, wipe it gently with a damp cloth and then dry it immediately with a dry cloth. Do not use a magic eraser, scrub pad or anything else that is abrasive on your calendar as it could damage the special coating.
Agruso Enterprises, LLC d/b/a Kaleidoscope Living is a participant in the Amazon Services LLC Associates Program, an affiliate advertising program designed to provide a means for sites to earn advertising fees by advertising and linking to amazon.com.
Writing on your calendar
Liquid chalk wipes off cleanly with a damp paper towel. We recommend wiping the writing off your calendar with a damp paper towel and then immediately drying it with a dry paper towel.
Liquid chalk markers are perfect for writing directly on your reusable calendar AND for writing on glass or plexiglass if you choose to frame your calendars.
For our rainbow and navy blue calendars:
We recommend these white liquid chalk markers . White liquid chalk is opaque and highly visible against the dark backgrounds.
For our white calendars:
We only recommend using silver liquid chalk markers--a set of 2 markers is included with each white calendar.
Recommended Chalk Markers


White Chalk Markers
Our own white chalk markers are coming soon! In the meantime, we recommend these.
More FAQs
We do not recommend using anything but liquid chalk markers on your calendar because the matte surface of our calendars is very different than a dry erase board or a typical glossy laminated surface. You should not use dry erase markers on your calendar.
We have tested several wet and dry erase markers on our calendars and have found that many leave a little bit of “ghosting” (residual color) on the surface after they are erased, so we do not recommend them.
We are not responsible for and cannot issue refunds for damage caused by the markers you choose to use.
Liquid chalk markers are wet erase, not dry erase:) We recommend wiping liquid chalk (that has completely dried) off your calendar with a slightly damp paper towel and then immediately drying your calendar with a dry paper towel.
Liquid chalk wipes up much more easily and cleanly if you allow it to fully dry before attempting to erase it.
Do not use a magic eraser, scrub pad or anything else that is abrasive on your calendar as it could damage the matte lamination.
The special coating on our paper calendars is VERY different from typical dry erase or laminated surfaces that are thick and shiny. Our coating has a beautiful, matte finish and adds very little weight to the paper (which is nice and thick--250 gsm). The coating does not make the paper stiff or rigid like traditional dry erase calendars.
HOW TO HANG YOUR WALL CALENDAR
By far the most frequently asked question we get about our large wall calendars is "how do I hang them?!" The short answer is that you can hang them however you would hang a thick art print or poster.
Hang them directly on your wall. Thumb tacks, push pins, are all great options--be sure to watch the video below for some of our favorite inexpensive and easy hanging options.
We do NOT recommend using museum putty (it can leave grease marks on the paper), poster dots, or any tape, etc. that could cause paper to tear when it is removed.
Put them in frames. If you are only going to hang 1 to 4 months at a time, I love the idea of hanging them in 16 x 20-inch frames. The same erasable chalk markers work great on glass or plexiglass! You can find some of my favorite frame options listed below.
- These affordable IKEA frames (seen below)
- These super inexpensive magnetic poster hangers are another great option
- I also love this even less expensive option from Target
- This is a great price for a set of 4 acrylic frames
5 awesome
hanging ideas
Check out this video for 5 inexpensive options for hanging our monthly wall calendars. Click HERE or on the image below to shop all the options shown :)


More hanging FAQs
Many of the photos of our calendars show them hanging in these DIY magnetic poster hangers that our founder and creator of the calendars, Tasha, made herself! You can find the tutorial on her blog here: https://kaleidoscopeliving.com/diy-oversized-magnetic-poster-hanger/
No, there is no adhesive on our calendars so they will not stick to any surface on their own.
It depends.
- If you plan to hang them in a high traffic area and/or where little hands might touch them frequently, the most durable option would be to hang them in frames.
- If you plan to hang them in your office where you only touch them when you need to add an appointment or deadline, frames should not be necessary.
Let us explain a bit more...
Our monthly wall calendars are made from thick 250gsm paper that has a special coating on the front. The thickness of the paper is similar to what you might find a high-quality greeting card printed on.
The thickness of the paper makes them far more durable than similar products you may have seen. But they are still PAPER, so how they hold up over time will depend on how much and how gently or roughly you handle them.
The special coating on our paper calendars is VERY different from typical dry erase or laminated surfaces that are thick and shiny. Our coating has a beautiful, matte finish and adds very little weight to the paper. The coating does not make the paper stiff or rigid like traditional dry erase calendars.
HOW TO ARRANGE YOUR WALL CALENDAR
The possibilities are endless depending on how much wall space you have and what your preferences are.
Hang all 12 at a time, 4 at a time, 3 at a time (perfect for businesses who are focused on quarterly goals), or even 1 at a time.
No matter what arrangement you choose, your wall calendar will double as art.
6 at a time
If you have a smaller wall, corner or even a cubicle, display 6 at a time and rotate them as needed.
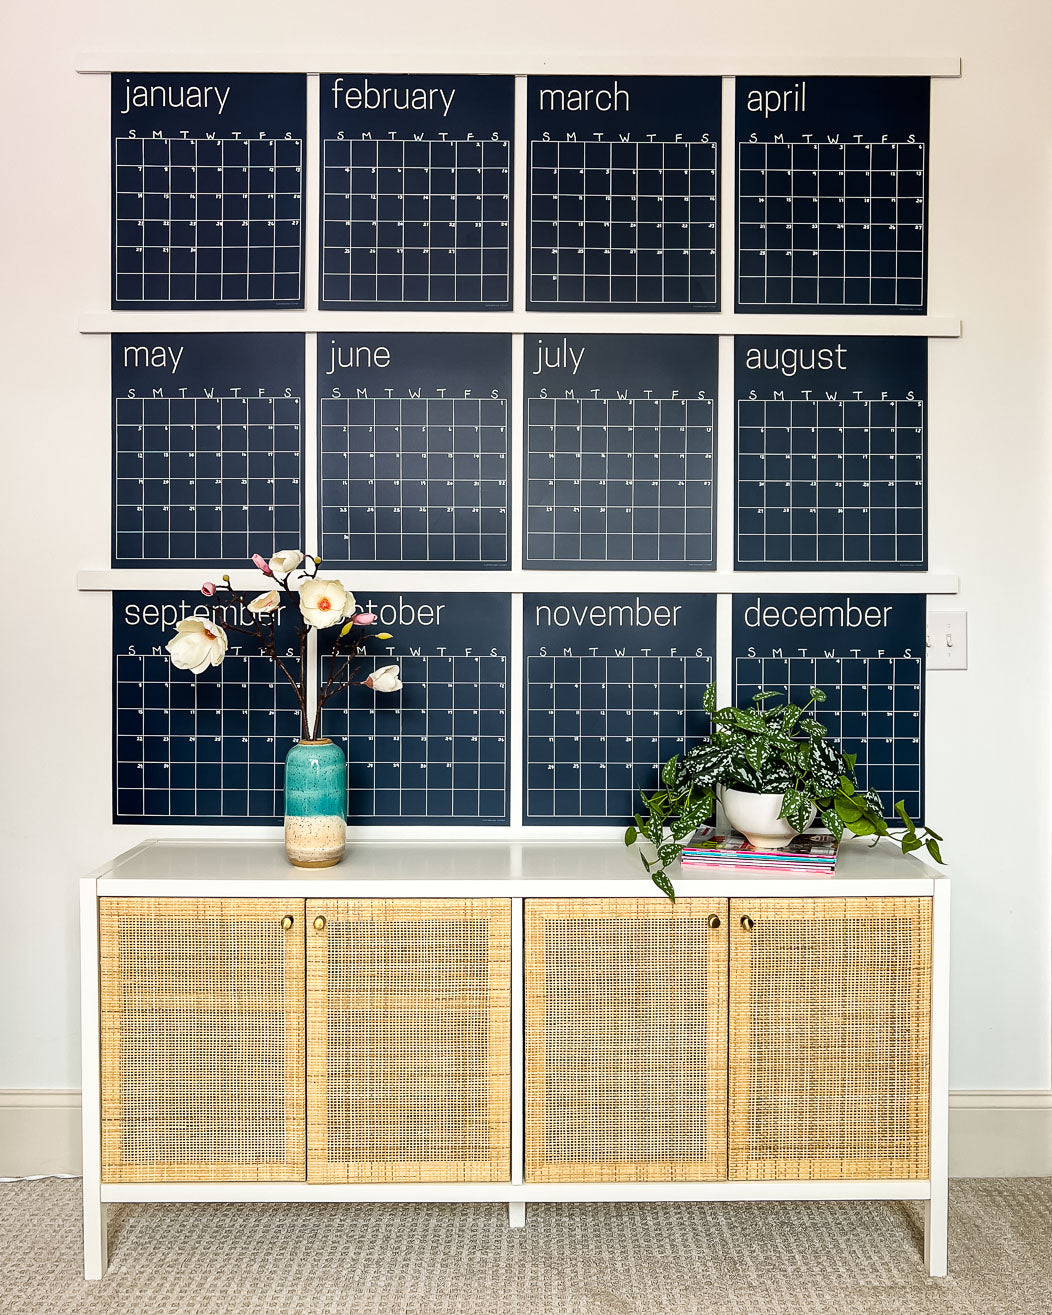
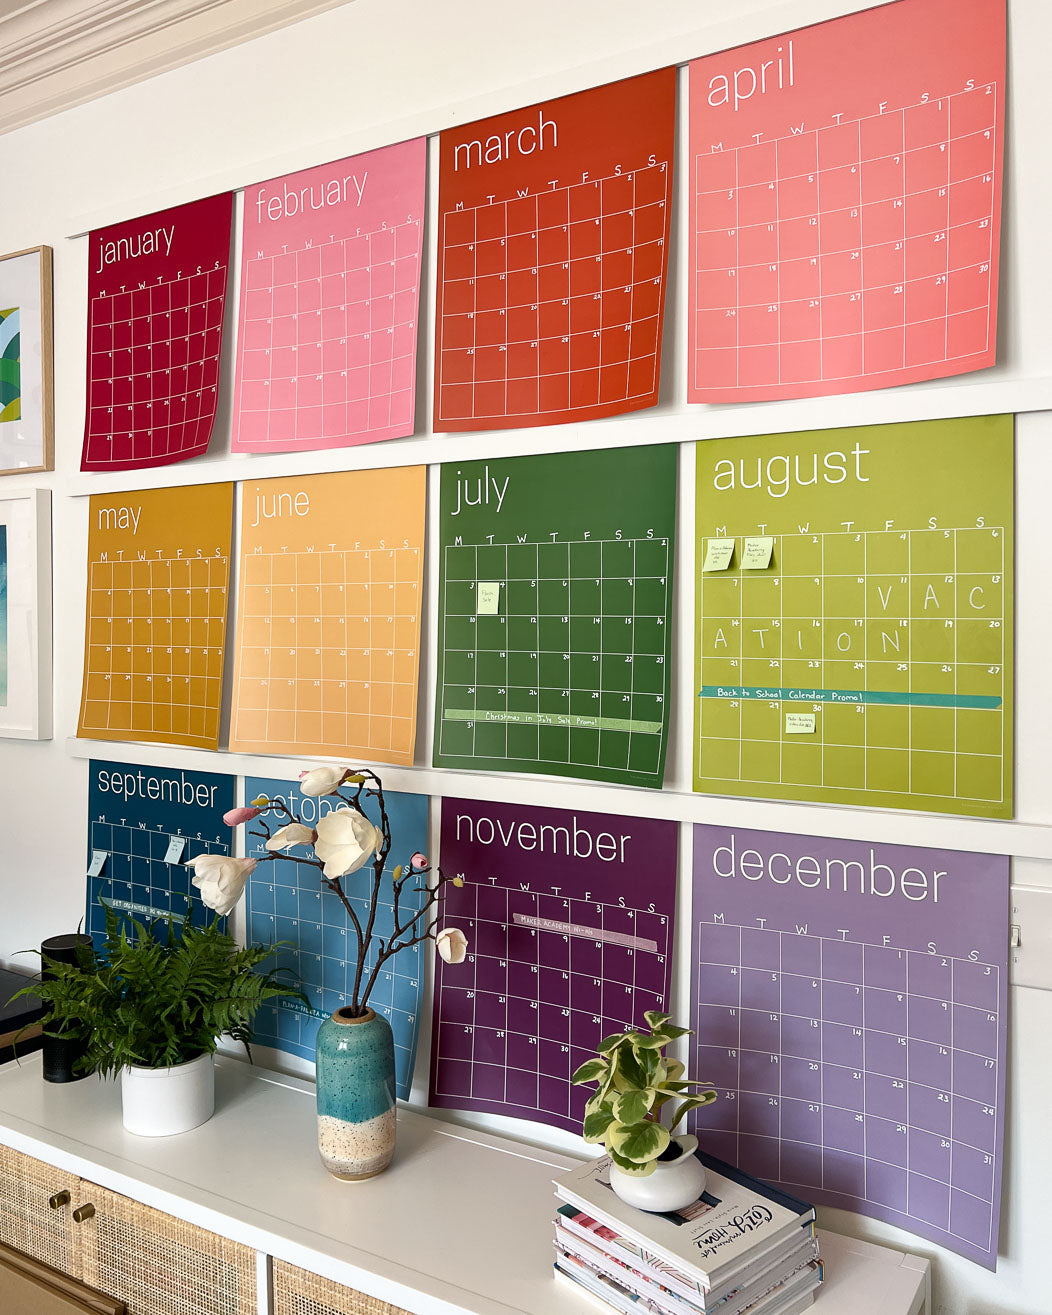
All 12 at a time
If you have the wall space for it, you can fill an entire wall for a beautiful display and practical way to see your entire year at a glance.

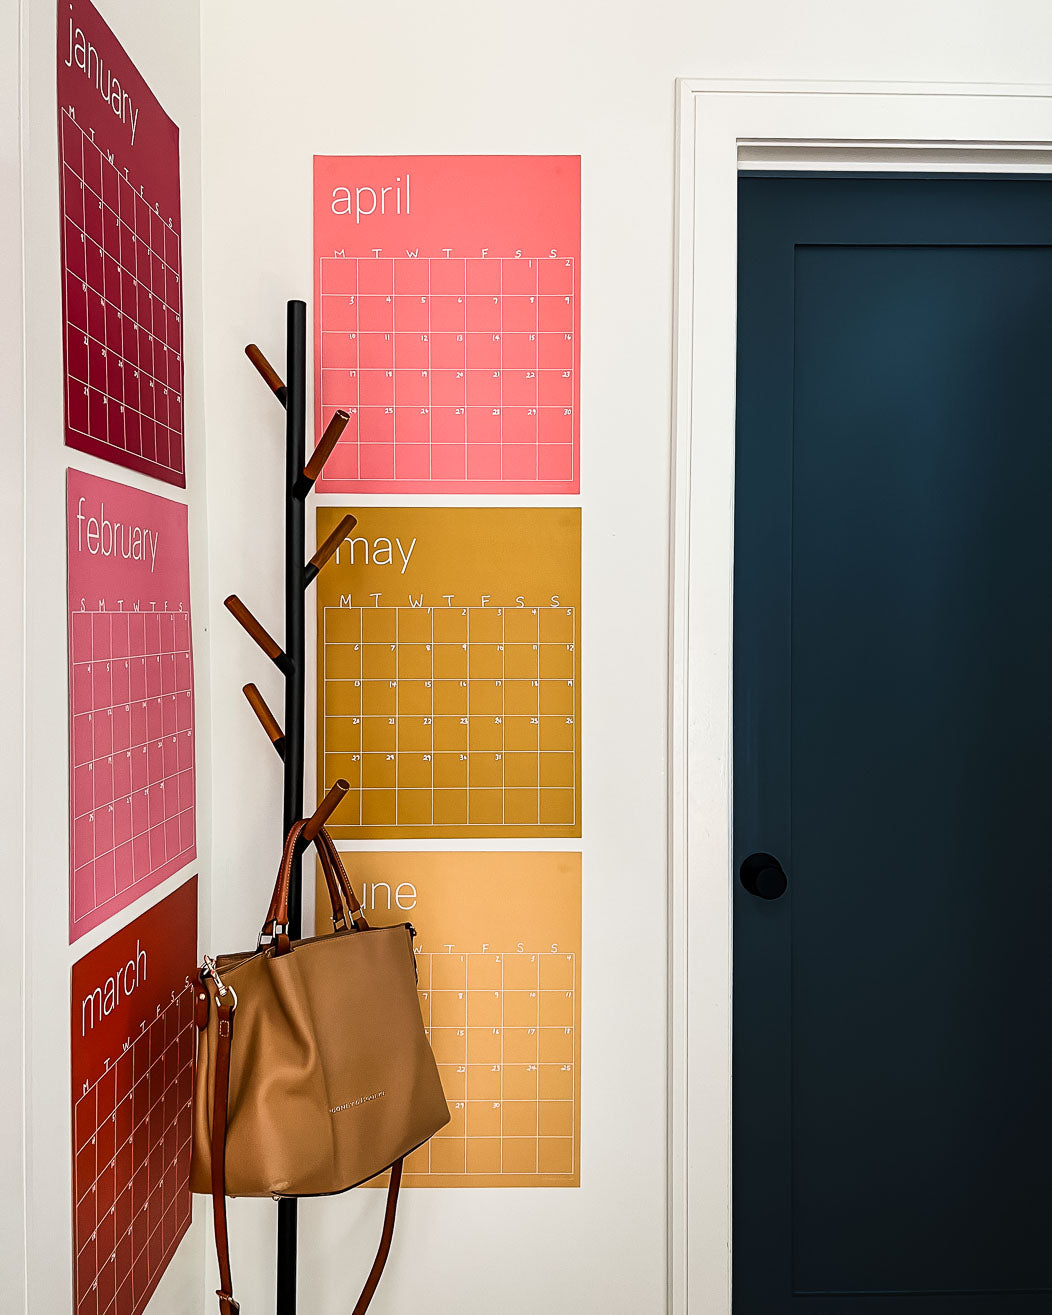
3 at a time
If you are short on space or want to include your calendar in a gallery grouping, displaying 3 at a time still makes and impact and helps you plan in advance.
Those are just a few ideas! You can see how our amazing customers are displaying their wall calendars below.


Adding Things to Your Calendar
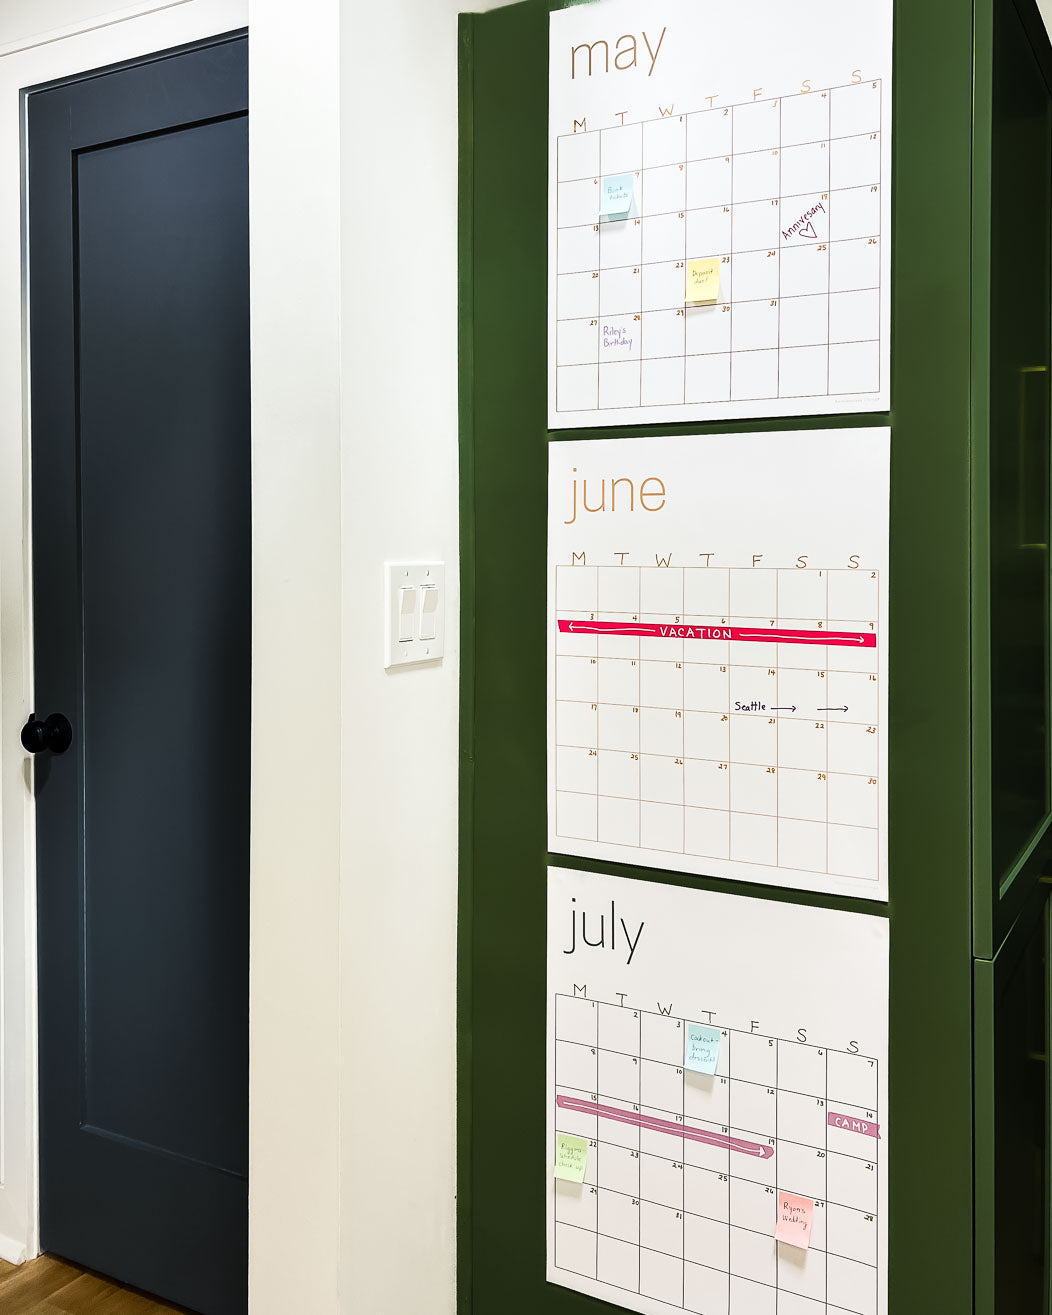
In addition to writing appointments/birthdays/deadlines directly on our calendars with liquid chalk markers, we also love using sticky notes and washi tape. Learn more about each option below.
We like dating using 1.5" sticky notes to add appointments, etc. Each square on our calendars is roughly 2" x 2" so 1.5" sticky notes work perfectly without covering up the date.
We also love these transparent sticky notes! They allow the colors of the wall calendar to shine through.
Why do we like post-it notes? You can use different color post-it notes to signify different things and can write on them with any pen you have handy at the moment. They are also great because you can easily move them around if things get rescheduled or change!
Another option we love is using solid color washi tape. We love this option when adding things like vacation or summer camp dates that stretch across many days. Washi tape should easily peel off without damaging your calendar, but again…TEST it first in an inconspicuous area of your calendar since the strength of washi tape varies from brand to brand.

Have another question?
If you have a question that isn't answered here, we want to help! Ask away using the form below and we will respond ASAP.