The BIG GIRL Room Reveal {all princesses welcome}
As promised, I am back to blogging after a break to migrate my blog from Blogger to WordPress {more on that here}! I hope you enjoy my new blog design and find it easier to navigate. I am pleased with how it turned out. I would like to extend a HUGE thank you to all of my returning readers! If you are new, thank you for being here. I hope you stay for a while.
As some of you already know, my twin girls turned 3 just a few days after Christmas. Our “big” present to them was their big girl room. Now, let me tell you that I was NOT a girly girl. I just wasn't. Perhaps it's because my big brother was only 16 months older than me and I did whatever he did. In any event, it seems I gave birth to two VERY GIRLY girls. They love all things princess.
Generally, I am not one for “theme” rooms. If you had told me a year ago that I would design a princess room for them, I would have laughed in your face. But, it occurred me that that my girls should love their room, so that meant incorporating some princess things. I set out to do it in a tasteful way and I hope I succeeded. Without further adieu, let me share with you the reveal!


Ahhhh, I LOVE it! Let's review what I did to make this room in my head come to life. First, you should see what this boring box of a room looked like before I began.
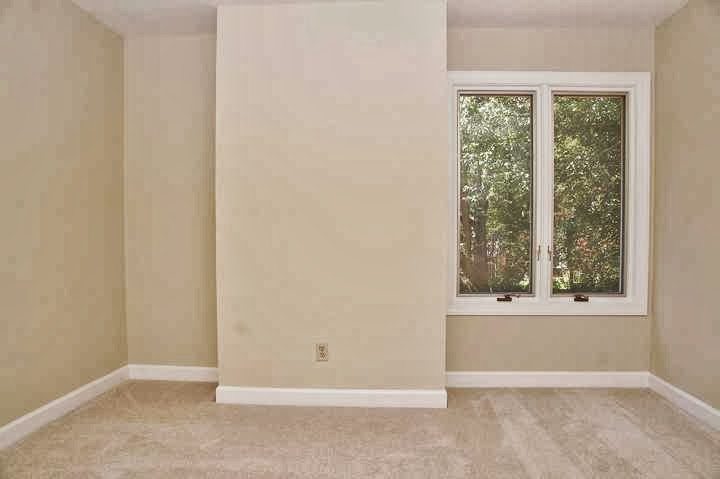
Can you say BORING and BEIGE?! Plus, the bedroom has this awkward bump out {which houses our chimney}, creating an even more awkward niche in the left corner.
We started by picking out the bedding. NEVER pick your paint color first. Trust me, I could tell you lots of disaster stories about doing that. The only princess bedding I could find that I liked is the Grace sheeting made by Pottery Barn Kids. EXPENSIVE. The duvet covers alone were $129 each. I don't think so. The funny thing is that I actually preferred the sheets to the duvet covers themselves, so I ordered two sheet sets for $50 each {I got them on sale}, as well as two flat twin sheets from Macy's for $9.00 each and made my own duvet covers {which will be the subject of an upcoming post}. By using one flat sheet from each set on the top and one of the inexpensive Macy's sheets on the bottom, I had the duvet covers I wanted! Plus, I also had a pillowcase and fitted sheet for each daughter. I did not want to use flat sheets under their duvets because in my experience kids get twisted up in them. In short, for $120.00 I had two complete bedding sets. Not too shabby.
I used two additional flat sheets from Macy's to make the girls' no-sew, tailored bed skirts {check out that tutorial here}. I also purchased two plain white, ruffled shams from Bed Bath and Beyond for $15.00 each with a gift card that I had on hand. But you can find a MUCH better deal on them on Amazon: Fresh Ideas Ruffled Poplin Sham 2 Pack King, White {affiliate link*}. I then personalized them with my girls' names and some ric rac trim {check out that tutorial here}. I made the wide-striped pillows with $2.00 kitchen towels from Ikea {you can find the tutorial here}. Finally, we made the DIY upholstered headboards ourselves {the DIY headboard tutorial can be found here}.


After picking the bedding, we decided to paint the room a very, very light shade of green. Picture the color of real key lime pie {not the scary fake stuff that is mint green}. We also repainted the trim to freshen the white up a bit. With a neutral green base {yes, green can be neutral}, we set the space up for pops of color :)
I had some old DREAM wall letters that were gold {and outdated}, but I am glad I held on to them. I reinvented them with paint and used them as the 3D portion of the Cinderella wall quote—“A dream is a wish your heart makes.” If you have seen the movie recently, that song is probably now going to be stuck in your head all day. Sorry! I made the remaining wall decals myself. A detailed tutorial on how to create your own washi tape wall decals can be found by clicking HERE. I LOVE how it turned out. I also love how the shelves that Joe built to fill that awkward niche turned out {the DIY floating shelves tutorial can be found here}. It's funny how much I hated that niche before and how much I love it now.


We re-used their existing chests of drawers and bookshelves that sit atop them, but I did add some hand-painted details to them for their new room. The full tutorial for how I created these custom looking pieces with basic Ikea furniture, paint and some imagination, click HERE.


Every princess room needs a chandelier, right?! So, we hung a lovely chandelier that was previously used in their nursery. We also placed a sweet lamp with a smocked lamp shade on the little table in between their beds {which was made by my maternal grandfather decades ago–I simply painted it blue}. We also hung some Ikea picture ledges to add some interest to the wall opposite the wall quote. I am still in the process of accessorizing those ledges.


Finally, I made some princess silhouette art for my little princesses. These were SO easy and inexpensive. Details coming soon, so be sure to check back.

So….what do you think?! Do you love it as much as me and my little princesses do?

![]()

* This post contains affiliate links, which means I may receive a (very) small commission if you click a link and purchase something. It does NOT result in additional charges to you or cost you anything extra. The small amount of affiliate money I earn per month is how I pay the fees to keep this site up and running. Thanks so much for your support!
Follow my blog with Bloglovin
[mv_create 1 11 200 2016 key=”1″ type=”list” title=”Most Popular Projects” thumbnail=”<a href=” https designertrapped com wp content uploads diy home decor projects blog jpg a]
Last Updated on March 3, 2022
That`s stunning girl room i like it ♥
Thanks so much!
Simply gorgeous! 2 very lucky little girls.
Thanks so much Christy!
I just found your blog today (courtesy of pinterest) and love it! I’m also a twin mom in NC, my girls turned two back on Nov. 29. They’re in toddler beds now, but of course that leads to figuring out what to do for bigger beds/room re-do in the nearing (too fast) future. So, thank you for sharing your tutorials, especially for the headboards!
Hi Sonya! Thanks so much for your sweet comment. I hope you have subscribed so that you receive updates on future posts. Aren’t twin girls FUN?! The time does fly by way too quickly. I still can’t quite believe my girls are out of diapers and cribs :( So glad you enjoyed the headboard tutorial. I hope you have as much fun planning their big girl rooms as I did! Nice “meeting” you!
Tasha, The girls room is really beautiful. I love how you mix the old with the new and I think the green paint choice is more soothing then a pink would be. You have some really different ideas.
Thanks, Kathy! I will tell the girl that Gran loves their room :)
LOVE your ideas and blog!! Just learned about it! I was wondering where you found your chandelier? No you live in NC?
Thanks so much, Katie. Yep, I am a proud resident of the great state of NC :) The chandelier was a gift given to us before my girls were born. I believe it was purchased from Pottery Barn Kids. I hope that helps!
It makes me so happy you make this room look so amazing! It gives me hope to do my little girls room! I love how you made that awkward wall the focal point, and the shelves are awesome! I love it all!! Don’t for get to add our feature button from the wowza weekend link party! I can’t wait for all the tutorials!
Hugs!
Mindi
Awww, thanks so much, Mindi! I added the feature button. Thanks for the reminder. Have a great weekend!
What a beautiful room! If only I had seen this while my girls were still in their princess phase. Now at 7 & 9 they are starting to grow out of if ;( And now I totally have that song stuck in my head.
Thank you, Kelly! Sorry about the song getting stuck in your head :)
I found your blog on Pinterest. I have to say this is the cutest Princess room I have seen that isn’t over the top commercial Disney. I love it! So excited to explore your blog! So creative! Happy 2014!
Hi Tracey! I am beyond flattered that you like my girls’ princess room so much {and that you agree it is not over-the-top}! So, so, so glad you stopped by. I hope you will be back often!
Beautiful!! And love their names, different and adorable. I’m pinning this project on our talent board! Thanks for sharing on DIY Sunday Showcase!
Shelly
minettesmaze.blogspot.com
Hi Shelly! Thanks so much for your sweet comment AND for the pin! I appreciate it! And thanks for the compliment on my girls’ names :)
Tasha,
Conratulations! The BIG GIRL Room Reveal will be featured at Thursday S.T.Y.L.E. tomorrow! I just absolutely love the girls’ room and think you did a fabulous job! Thank you so much for linking up with us! Can’t wait to see all of the amazing things you do in 2014!!
-xo, Angela
Oh my goodness, THANK YOU Angela! You are so sweet and thanks in advance for the feature!
Wow, so many beautiful details! Girly girl and all! Love it! Thanks for linking to Whimsy Wednesday – I featured your room today in my roundup! You can see the post here…
http://www.ohmy-creative.com/kids-crafts/everyday/7-craft-project-girls/
Hope to see you tomorrow night for this weeks Whimsy Wednesday Link Party!
Susan
Oh my goodness, Susan, THANK YOU! I am completely overwhelmed by the positive reaction to my sweet girls’ new room! It means the world to me. Thank you! I will definitely see you at the party tomorrow night!
Holy cow! That room looks awesome. I love the shelves, it makes the bump out fit perfectly! My twins are turning two soon, and I am already brainstorming their big kid room!
Hi Megan! THANK YOU! And YAY for twins! I hopped over to your wonderful blog to see your ADORABLE twins. I have to say, I loved your post. Having twins is hard, but so, so much fun. I love to listen to my girls talk to each other when they think no one is listening. They have so much fun. I wish I had a twin :)
Love-love-love! My #1 goal this year is to finish my daughter’s big girl room. She loves Cinderella and I am planning to use that same quote somewhere in her room.
I’m following along so I don’t miss any of the creative, fun projects you have planned!
Happy blogging!
Ashley
Hi Ashley. Thank you SO Much for your sweet comment and for following my blog. I really appreciate it! I would love to see how your little girls’ room turns out!
Hi Tasha,
Your project is one of my top 3 favorites from The Diy’ers party last week. Come link your latest project again with us! Congrats!
huggies,
rea
ps: this project is now on my pinterest board
Hi Rea! Thank you so much for letting me know and for the feature! I am beyond grateful. Happy Monday!
I love the way the room looks, especially the quote. The girls must be so happy. I’m also wanting to change to Wordpress so I’m looking forward to hearing of your experience.
In October, I transformed my great-nieces’ bedrooms as a surprise while they were on holidays. If you have time you might enjoy the read …
http://llibbyslifestyle.blogspot.com.au/2013/10/how-tee-pee-grew-into-surprise-new.html
Thank you, Libby! I bet your great-niece LOVES her room, especially the lights on her bed. What a fun idea! Thanks for stopping by and for your sett comment.
What a gorgeous little girl’s room! You’ve been featured on Sunday Features {Give Me The Goods} and will be on my FB page today ;)
Hugs,
Jamie @ somuchbetterwithage.com
Hi Jamie! I cannot thank you enough for the feature and for taking the time to stop by my blog and to leave your sweet comment. Thank you!!!
Awwww That is a super sweet girly room! It’s so inspiring, Love it. and what I love the most is the wall Cinderella quote! =D Pinning!!!
XOXO
Cami
Thanks so much, Camila! The quote is my favorite part also :) Thanks so much for the pin!
Hello! Your girl’s room turned out so beautiful! The dresser is such a wow factor! Visiting from Pinkwhen linky ;)
Come visit me ;)
Ursula at kraft&mint {modern crafts}
http://kraftmint.com
Hi Ursula! Thanks so much for stopping by and for your compliment :) Heading to check out your blog now!
Great project !!
I would love you to come and share @ Craft, Create & Inspire linky party !!!
Look forward to seeing you there :)
http://livel0vecreate.blogspot.co.uk/2014/01/craft-create-inspire-linky-party.html
Claire x
Hi Claire! Thanks for the invitation. I just linked up a few minutes ago! Thanks for stopping by!
Such a beautiful space! Love what you did with the awkward space. Love the colors and everything in this room. If you get a chance, please link up to my link party: http://suburbsmama.blogspot.com/2014/01/sunday-linky-39.html
Hi Rita! Thank you so much for stopping by and for taking the time to leave your sweet comment. Heading over to link up to your party now! Thanks!
So pretty!! Thanks for linking up with us at Thursday STYLE!
Thank you, Amanda! I am excited to join your party every week!
I would have LOVED this room when I was little. Its just the perfect amount of princess without being overboard. I love that you used green instead of a more traditional pink like colour. So much of this will definitely grow with your girls – great job!
Jaclyn
teacupsandcake.blogspot.ca
Hi Jaclyn! Thank you–I am glad to hear that others think it hits the right note as well and is not “too princessy.” I can’t wait to check out your blog!
Hi Tasha, I love that you incorporated the three dimension dream letters into the quote – such a great idea! Thanks for linking up at Thursday Style.
Oh my goodness, Melissa, it is my pleasure. I am so excited that you all have started a new party! Thanks for stopping by to check out my room reply and for the compliment. I was happy to have a way to re-use the 3D letters for something after having them stored in a box for years :)
Hi Tasha, stopping by from Pinworthy Projects party. Your princess room turned out beautifully and those shelves make that odd little niche look great. They totally changed the way the room looks and it looks amazing now. Thanks so much for sharing. :)
Hi Meg. Thank you so much for stopping by and for your compliment on the shelves. I love them, too! Have a great weekend!
What a sweet room for your girls!! I love all your special touches, but the nightstand your Grandfather made is a treasure I’m sure!
Thank you so much, Pam! I am so happy we could use a family piece in their room :)
I am always telling my girls that what makes a room look so “picture perfect” is when it’s clean and cluttered. I love the quote you did on the wall. It’s a great way to reuse the “dream” you had and add something new. Very creative!
Thank you, Jeri! I am so happy you stopped by to check out my girls’ room and thanks so much for taking the time to leave your sweet comment!
I love the wall quote! The whole room looks fantastic, but that really stood out. I have two girls also! I love girly decor ideas!! Thanks!
Hi Amberly (beautiful name, by the way!). Thank you so much. The wall quote is definitely my favorite part of the room. Are your girls also twins?
Tasha, The room is adorable and I bet your girls love it! Thanks for linking their pretty bedroom to the Open House party.
Hugs,
Sherry
Thank you so much, Sherry! I really appreciate you coming by to check it out and for your sweet comment :)
Such a sweet room. I love the colors you have used and all the handmade items you have included. The wall quote is amazing!
Hi Robin! Thanks so much for stopping by to check out my girls’ room and for taking the time to comment :) The wall quote is my favorite part–just earlier today I put up a detailed tutorial of how to make the wall decals out of washi tape. It’s SUCH a fun project!
It looks adorable Tasha! I love all the details… We had the name Avery selected for a girl as well but ended up with boys both times:) great job- pinning it!
Hi Krista! Thank you :) That’s funny. Avery is the first girl name we settled on–I have loved it for so long. But we had selected Attley for a boy. When we found out we were having twin girls, we decided to go for it and use Attley as a girls name. I am so glad we did!
Love how you saved so much money and made your own bedding…so NIFTY THRIFTY! I’m sure your girls will enjoy it for many years to come. Happy New Year!!!
Blessings,
Linda
Awwww, thank you, Linda! I really appreciate you taking the time to stop by and for your kind words!
Such a beautiful girl’s room, Tasha! I love all of the tasteful details.
Thank you so much, Mary Beth! I appreciate you stopping by and for your kind compliment!
What a beautiful room, Tasha! I’m sure your two little princesses love it! Congrats on the migration, too! Your site looks great! Hope you have a wonderful New Year!
~Abby =)
Hi Abby! Thank you so much, I really appreciate it. I hope you and your family have a wonderful New Year, too!
Very cute! I bet the girls love it! I need to know how you made the no-sew bed skirts and striped shams!
Awww, thanks sweet Amber! Don’t worry, those tutorials will be coming later this month :)
Gorgeous! Great job! I love everything about the girls’ room :)
Hi Angela! Thanks so much for stopping by and for your sweet compliment. I hope you are doing well. Happy New Year!
First off, your new blog design looks great! Good job on the migration!
This room is so adorable! We made the mistake of painting my daughter’s room a Pepto Bismol pink and it’s not as soothing as this room! I love what you did & I’m pinning it for some future inspiration!
Oh, thank you so much Carrie! I truly appreciate you taking the time to stop by and check it out and for pinning it!
I love the new room. You did a beautiful job. So glad you’re back, love your blog.
Oh, thank you so much, Glenna! I really appreciate you stopping by to check it out! Happy New Year!
In LOVE with the room! The girls must love spending time in their room, I would.
Thanks so much, Chrissie! The girls are pretty darn in love with it. Their reaction makes me love it even more than I already did!
Your blog look fabulous and your room redo is so beautiful. I love the colors and you did an amazing job pulling it all together. Hugs, marty
Thank you, Marty. You are so sweet! I really appreciate you taking the time to stop by and comment. Now that I am back up and running, I can’t wait to start linking up to your party again. Thanks again!