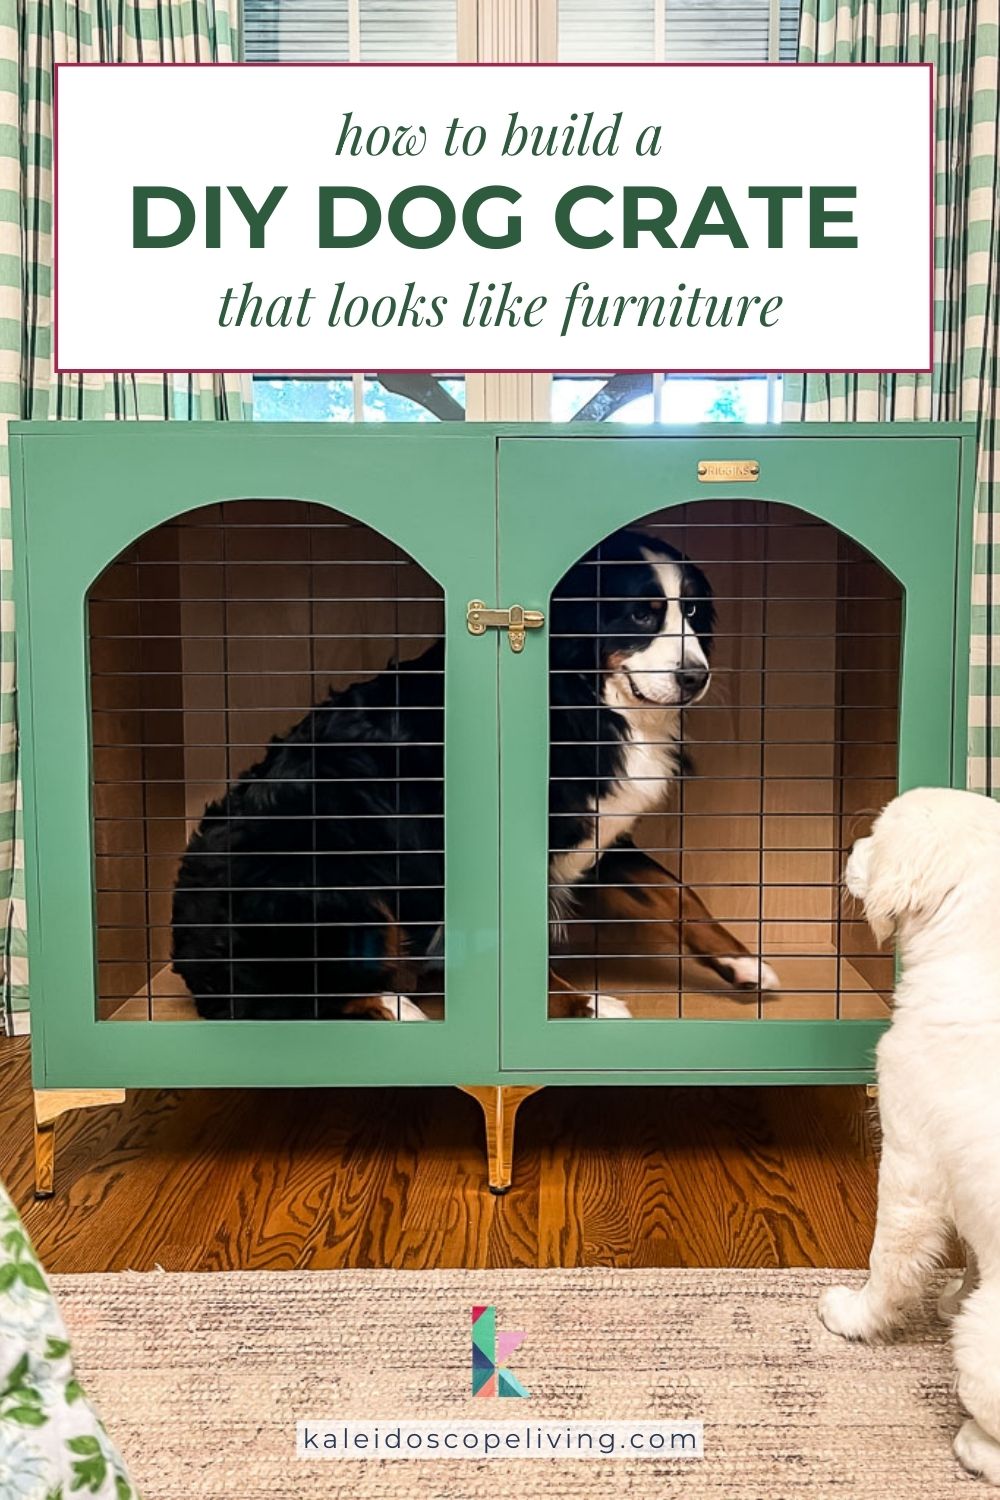
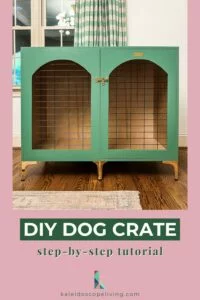
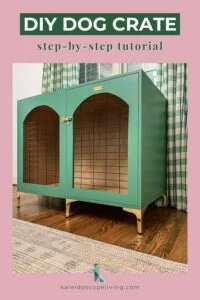
How to Make a DIY Dog Crate that Looks Like Furniture
Let's face it… Typical metal dog crates are functional, but they are not pretty and they don't exactly fit the design aesthetic of most spaces. I was finally sick of the ugly dog crates in our bedroom. So, we built custom DIY wood dog crates that look like beautiful pieces of furniture and blend in seamlessly with our decor. In this post, I'm sharing the step-by-step tutorial so you can build a dog crate that's just as cute as your dog!
Thank you to DAP Products for sponsoring this post. This post contains affiliate links for your convenience. Click here for my full disclosure policy.
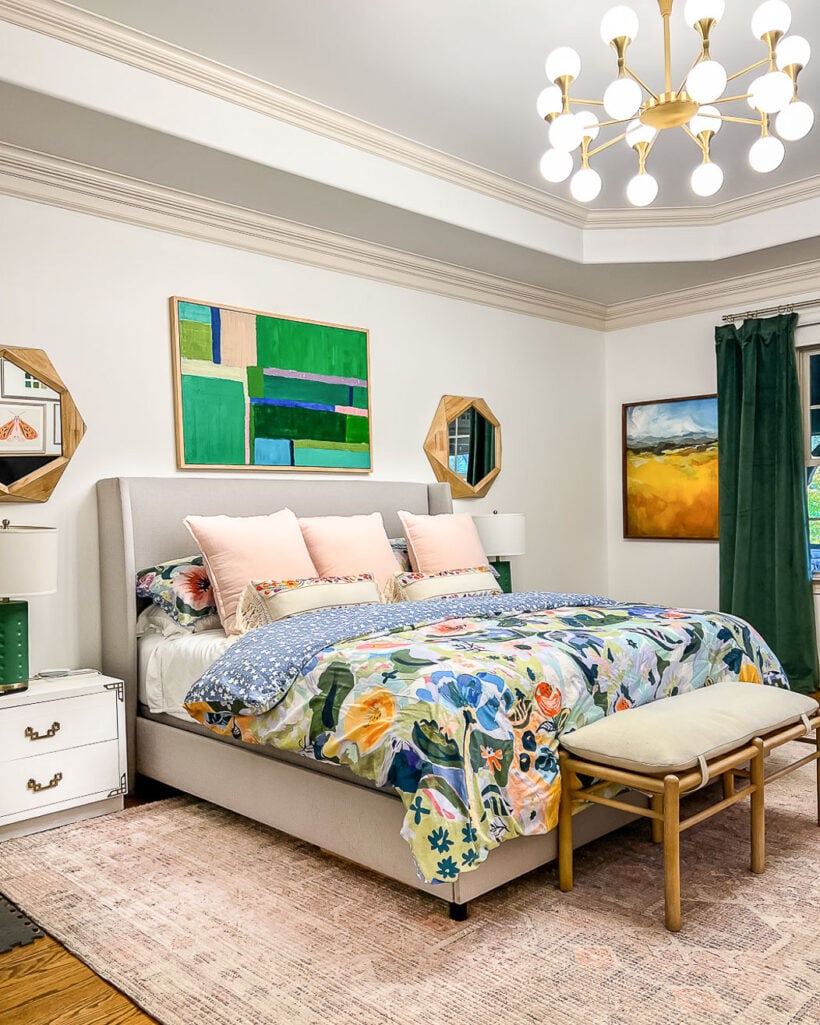
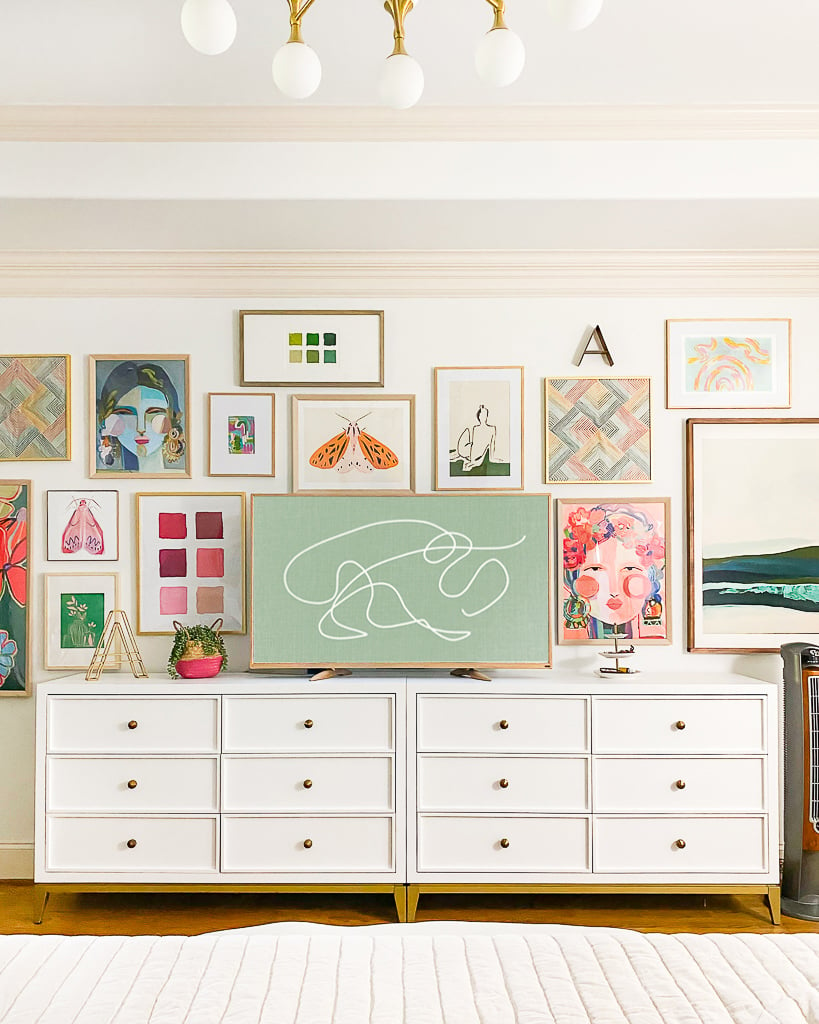
I can't be the only dog lover who doesn't love the look of standard metal dog crates, right?! In our current home, the only place it makes sense for us to have our dog crates is in our primary bedroom. For the past 4 years, we've had Riggins' HUGE eyesore of a crate in our bedroom. Then a couple of months ago we added our puppy, Chief 👨🏻🚒, to our family. So now we have two dog crates in our bedroom and they really detract from the design elements in the space, like our colorful gallery wall. Here are the “pretty” views in our bedroom…
And here are the dog crates that did not fit the vibe of our bedroom (to say the least).
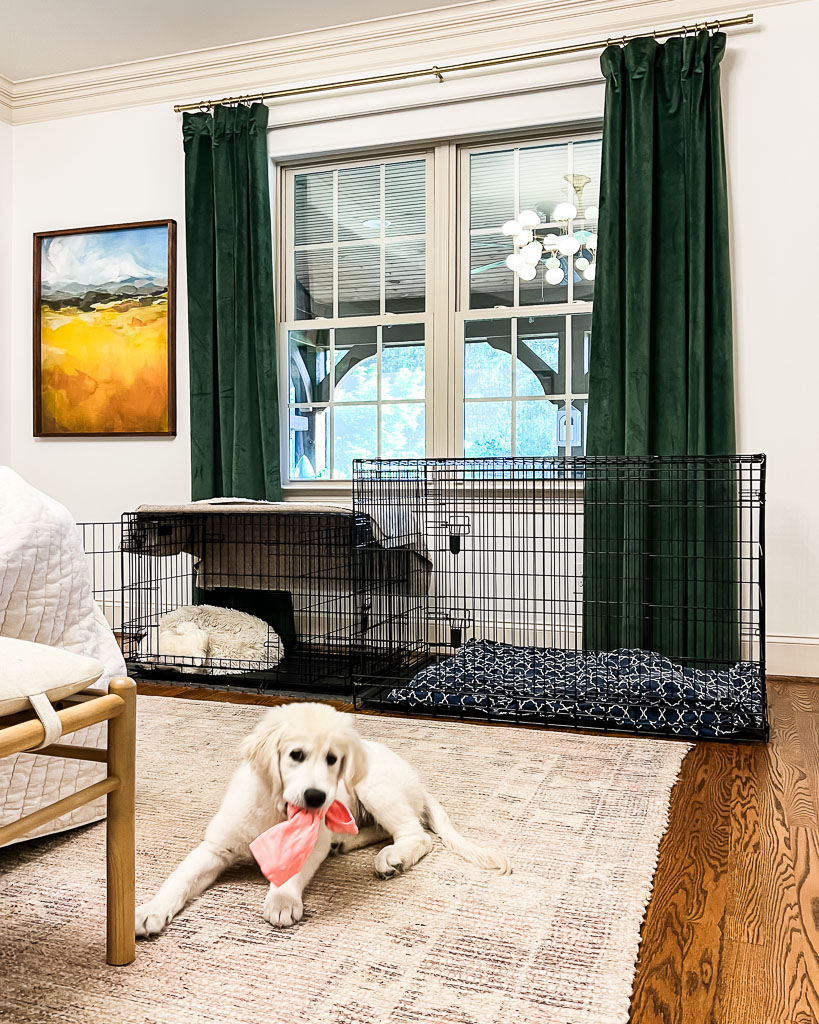
See what I mean?! Now let's dive into the tutorial so you can see for yourself just how beautiful dog crates can be!
Level of Difficulty
This step-by-step tutorial is fairly long because I've tried to include important details and there are a lot of steps. Building a dog crate that looks like furniture is not super complicated, but it's also not what I would call “beginner-friendly.” I would recommend that you have at least one or two simple furniture-building projects under your belt before tackling this project.
I highly recommend watching the short (it's only 1-minute long) video below for an overview of this project before reading through the instructions so you have some frame of reference for how everything comes together. It will play after a short ad.
Tools/Equipment Needed
- Circular Saw (this is the one we have and love)
- Circular Saw Guides–these are optional but very, very helpful. These are the two we use regularly for DIY projects like this:
- Kreg Pocket Hole Jig (there is a newer version, but we still use this one that we've had for years)
- Jig saw
- Metal grinder or hack saw
- Iron
- Drill
- Measuring Tape
- Speed Square
- Safety glasses and ear protection
- Sandpaper
Materials Needed for One DIY Dog Crate
The amount of materials you need to make this wooden dog crate will highly depend upon the size you decide to make your dog crate. Since Riggins is a giant breed dog (a Bernese Mountain Dog), the dimensions of our crates are 34″ tall (without the legs) x 48″ long x 28″ deep. Your crate(s) will probably be smaller.
Though our new puppy is a Golden Retriever and won't be nearly as big as our Berner, we wanted both of our crates to be symmetrical so we made both crates the same size.
- ¾ inch x 4 ft x 8 ft sheets of plywood (we used birch plywood from Home Depot)
- 6” furniture legs (we used 6 legs per crate, but if yours is smaller 4 legs should be plenty)
- (1) brass cabinet latch
- Hand-punched brass name plate (optional)
- (2) inset concealed hinges
- DAP Premium Wood Filler
- DAP Plastic Wood All Purpose Wood Filler
- 3/4 inch edge banding to match your plywood
- Edge banding trimmer or utility knife
- Sandpaper
- 1.25″ softwood Kreg screws
- Wire clamps
- Steel fence panel(s)
- Clear Polycrylic (optional–to finish the inside of your dog crate)
- Stain or paint to finish the outside (we chose Jadite by Sherwin-Williams)
Steps to Build a Wooden DIY Dog Crate
Time needed: 8 hours
We worked on our DIY dog crates (as well as a bench to place in between them) over the course of several days. I would estimate that a single crate would take a total of about 8 hours to build and paint/finish.
- Cut the top and sides of your crate to size.
We cut everything down using a combination of our Kreg Rip Cut and Kreg Accu-Cut cutting guides. Again, the dimensions of your pieces will depend on the size of your crate.

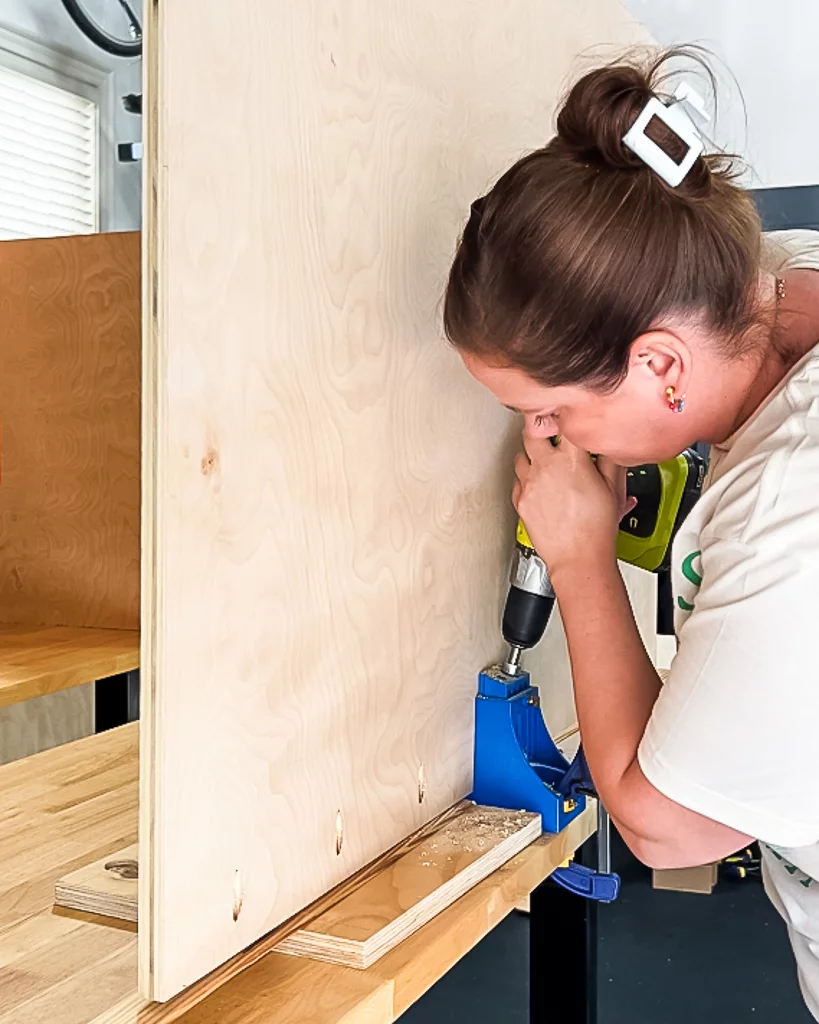
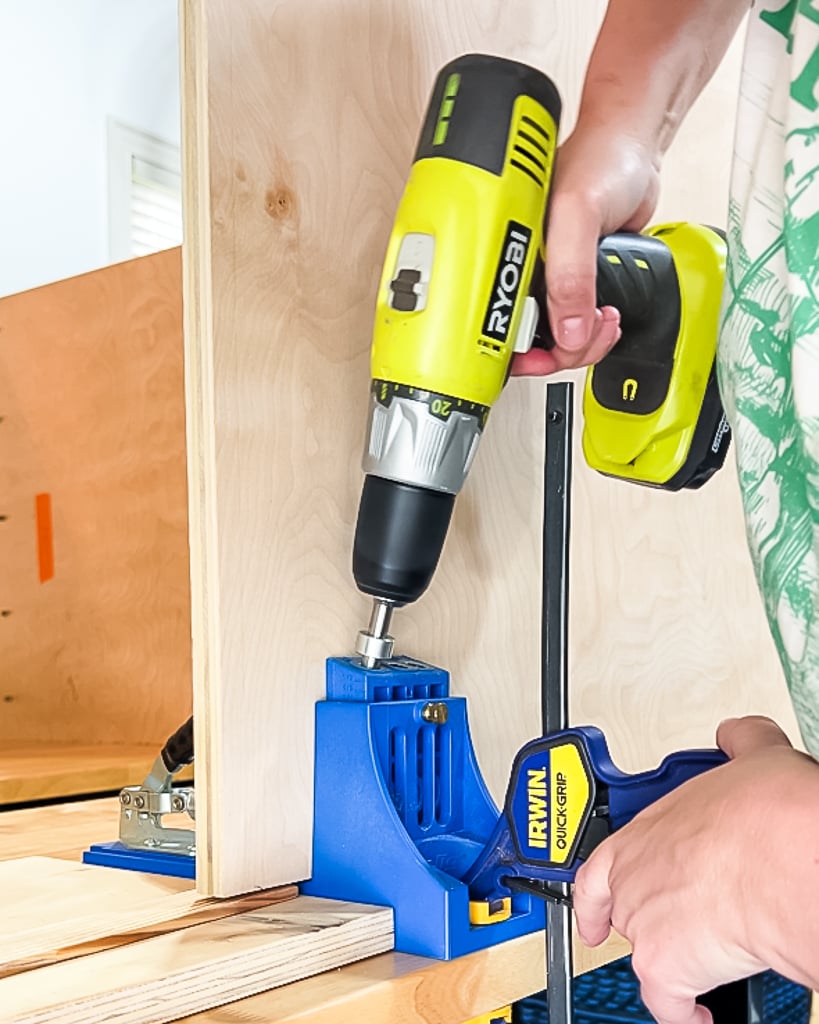
- Drill pocket holes.
Using the ¾” settings on your Kreg Pocket Hole Jig, drill pocket holes into ONE short edge of each side panel. The top panel does not need any pocket holes.
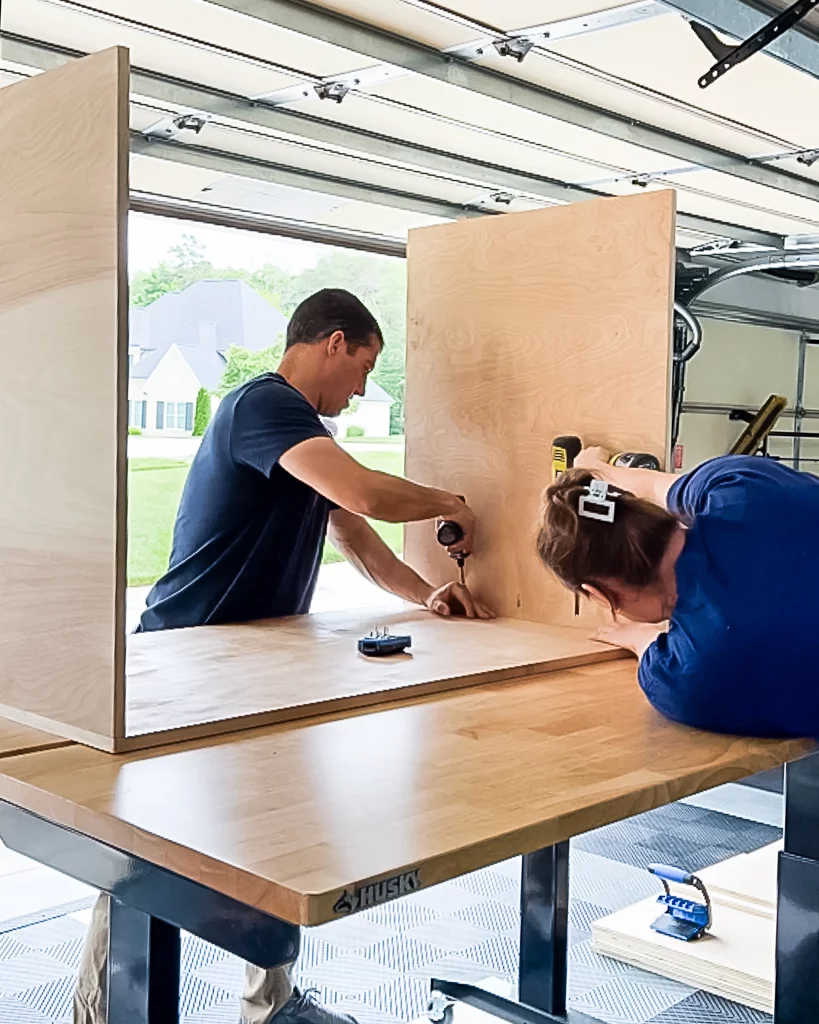
- Attach the side panels to the top panel.
Use your Kreg screws to attach the side panels to the top panel temporarily–do not use glue yet because you will need to take it apart again!
- Measure for the bottom and back panels of your dog crate.
The bottom panel will sit in between the two side panels, so measure accordingly (it will be smaller than your top panel, which overlaps/sits on to of the side panels). The back panel should be measured so that it fits inside of all the other panels. Once you have your measurements, disassemble the top and sides pieces again.
- Cut the bottom and back panels to size.
Again, we cut the panels using a combination of our Kreg Rip Cut and Kreg Accu-Cut cutting guides.
- Drill pocket holes.
Using the ¾” settings on your Kreg Pocket Hole Jig, drill pocket holes into:
– BOTH short edges of the bottom panel
– ALL edges of the back panel - Add edge banding.
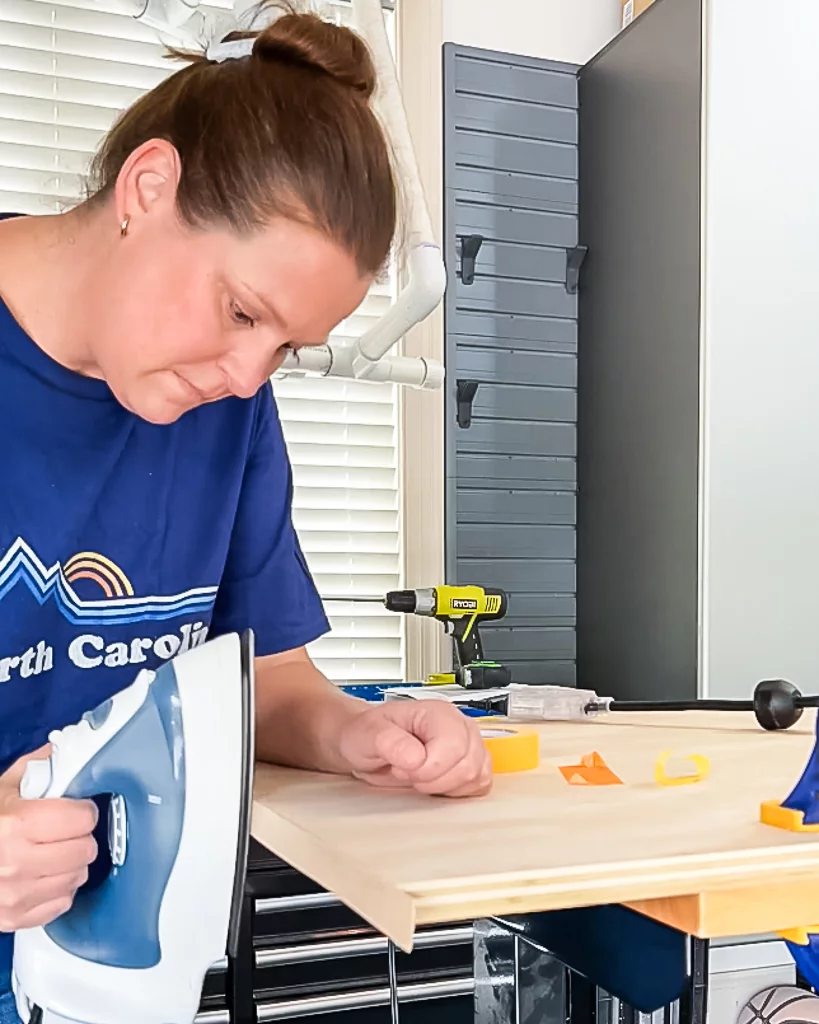
Add iron-on edge banding to all edges of the plywood panels that will be exposed/visible once assembled.
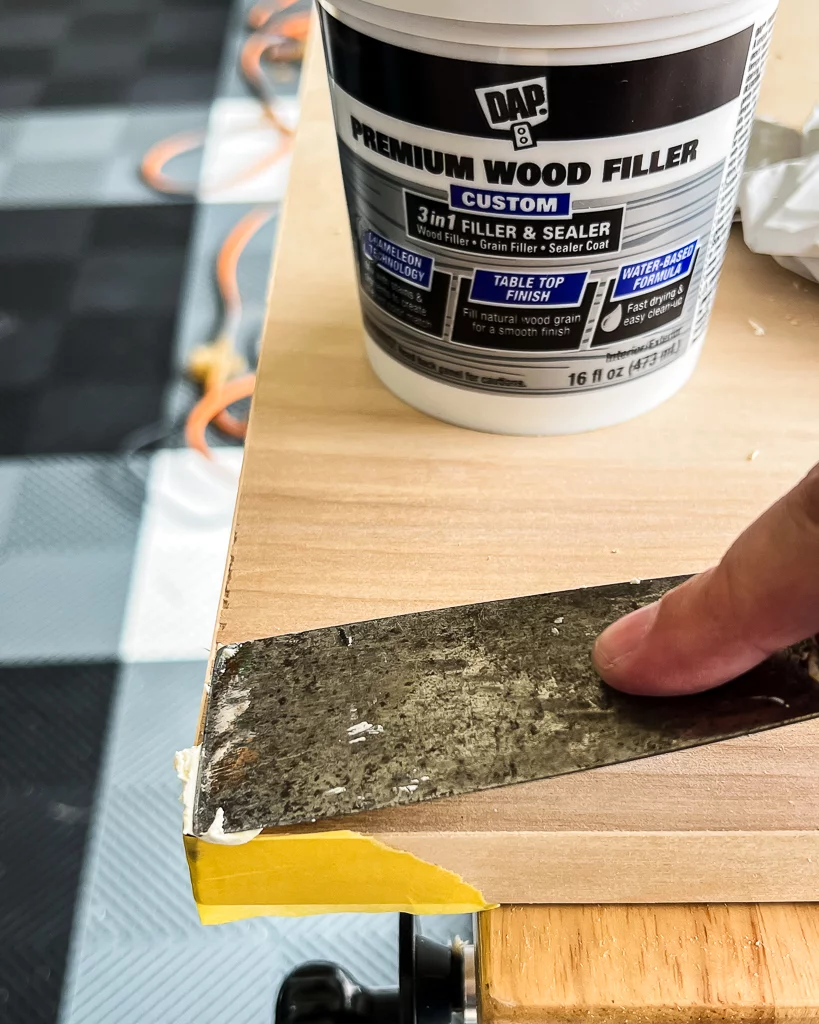
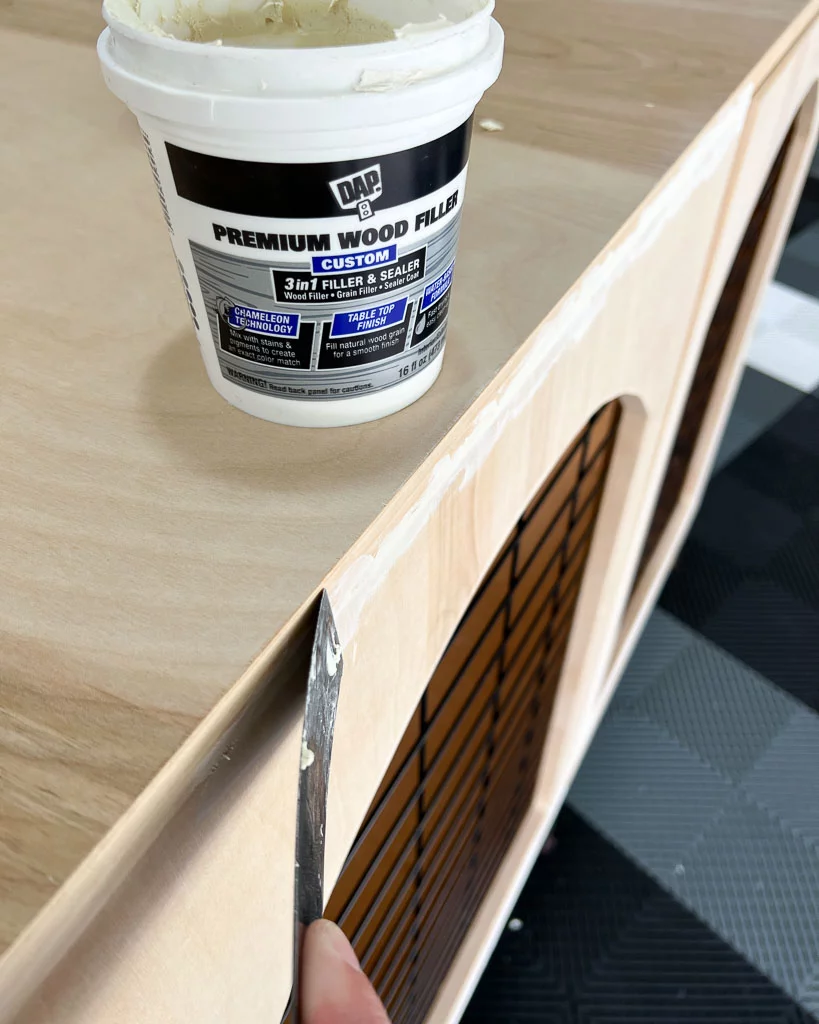
- Fill any imperfections with wood filler and sand.
No matter how careful you are when you choose and/or cut your plywood, you are almost guaranteed to have some tear out and imperfections to fill. I used my favorite wood filler (DAP Premium Wood Filler) to fill all the imperfections on the outer pieces of the crate that we would be painting and sanded it once it was dry.
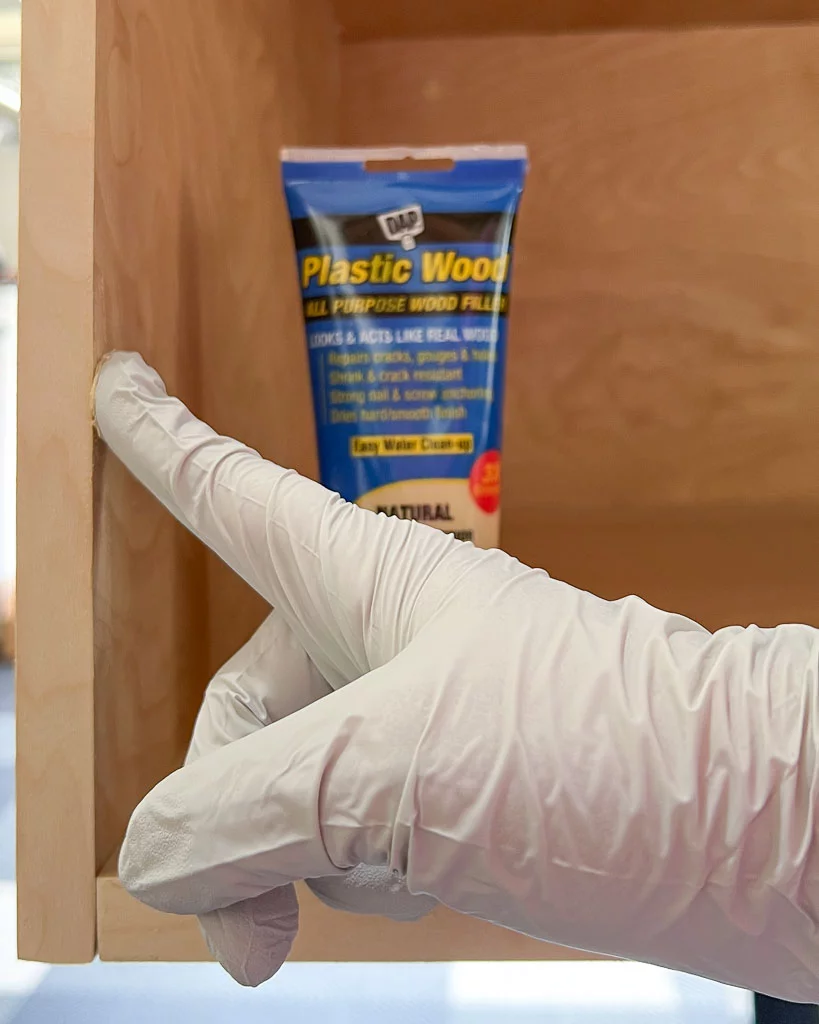
I prefer using DAP Premium Wood Filler whenever I can because it is sooooo smooth and easy to work with. BUT, it dries white unless you mix it with paint or stain (see the note below). Because we decided to clear coat the inside of our crates with Clear Polycrylic, I filled imperfections on the inside the crate with DAP Plastic Wood All Purpose Wood Filler since it is a natural color that blends in with the natural color of the plywood. Note that if you plan to stain any of your wood, you can mix it with stain before applying it to get an awesome color match! Since we were only applying a clear coat, this wasn't an option for us. - Assemble your crate and measure for the front panel and door.
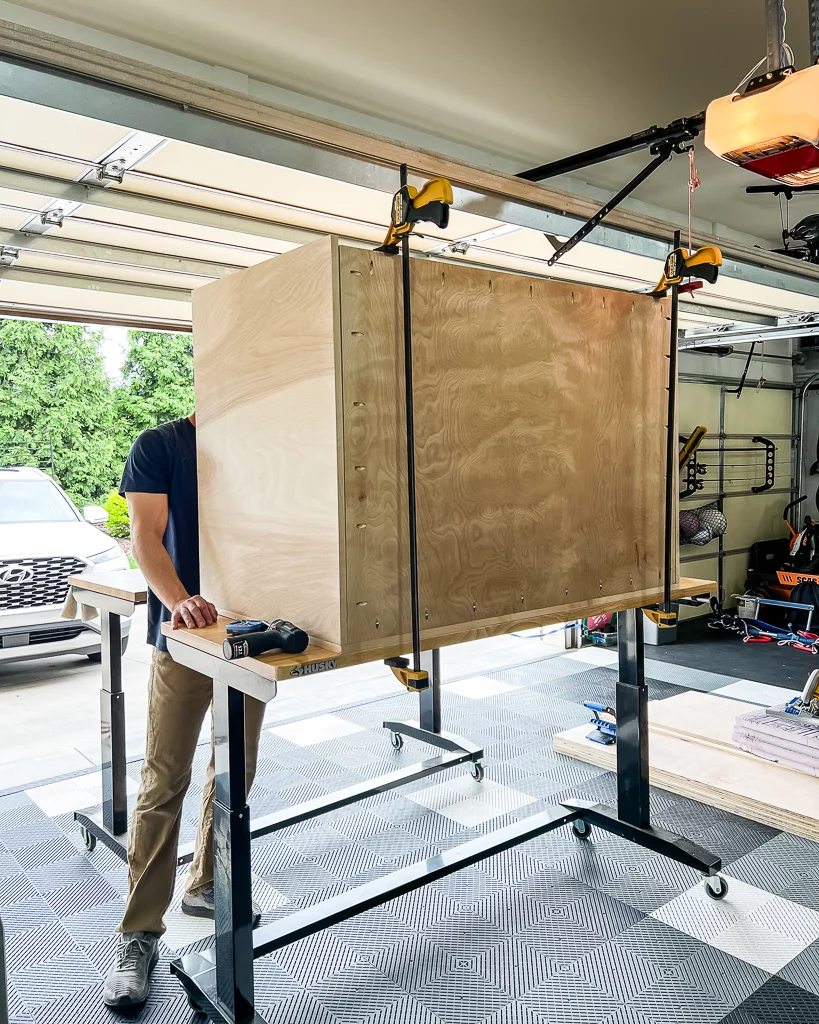
Now, you can permanently assemble your crate. We used clamps to help hold the back panel in place while we screwed it in. We made sure the pocket holes in the back panel faced outward since our dog crates will be pushed up against a wall and not visible/exposed.
- Cut a panel to the size of the opening of the crate.
Once the frame of your DIY dog crate is fully assembled, measure the opening of the crate. This piece will become the front stationary panel and door for your crate. It should fit into the crate opening (not overhang it). Cut a panel to fill the entire opening. Then cut it in half widthwise.
- Trim the door panel.
Next we trimmed 1/4″ off the height of the door and 1/4″ off the width of the door. This is so we could add edge banding to all 4 edges and still leave sufficient room so that the door could open and close smoothly.
- Add pocket holes to the stationary panel.
Add pocket holes to 3 sides of your stationary panel. The edge that meets up to the door at the center of the crate does not need pocket holes.
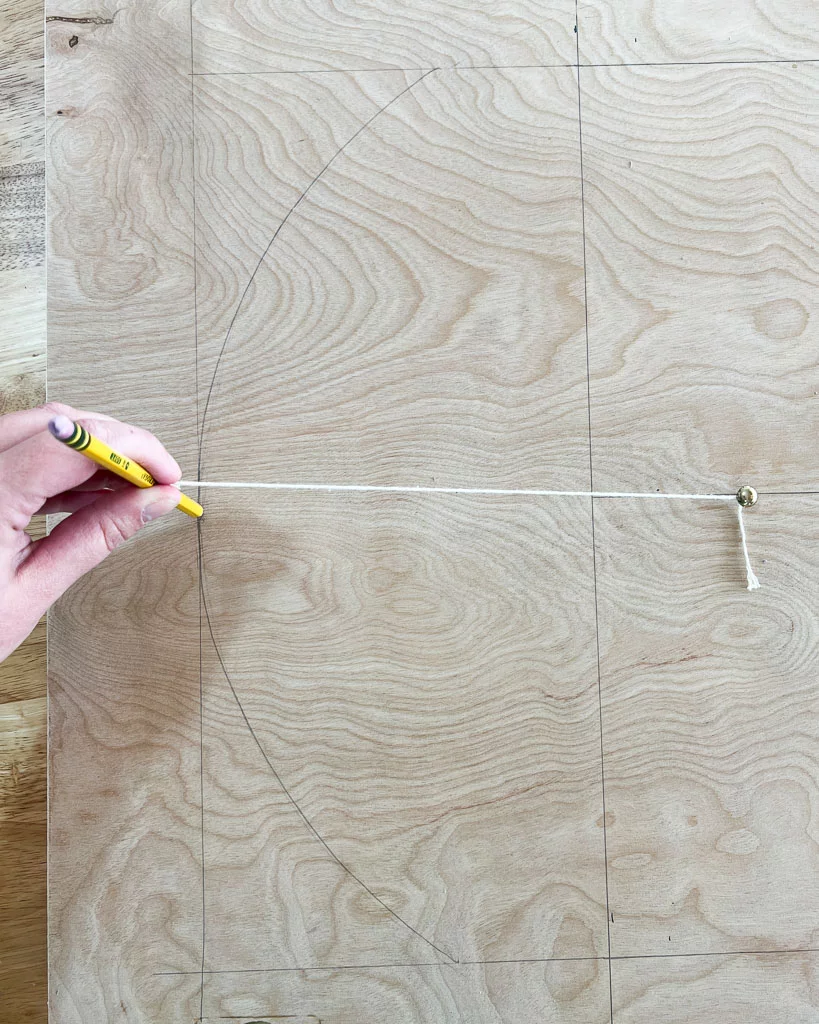
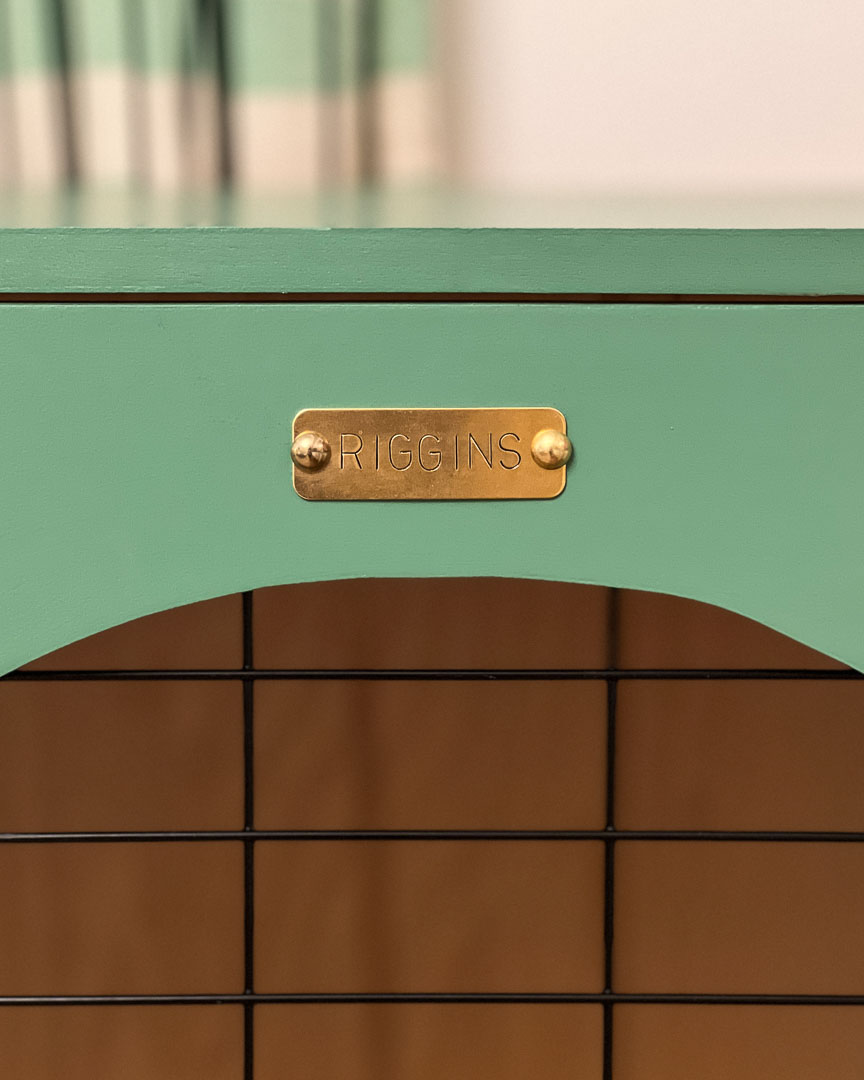
- Create the arches.
To draw the arches, follow these steps:
– Decide on the dimensions of your door frame. We decided on 2.5″ for the sides and bottom edges and 3″ for the top. You also need to decide the height at which you want your arch to begin. We chose 8″ from the top of the door.
– Use a level to mark your cut line along the bottom of your door.
– Use a level to draw two vertical lines along the 2.5″ marks you made on both sides of your door. Make sure to stop the vertical lines at the same point (the height at which you want your arch to begin). I started our arches 11″ from the top of the door. Then, measure and mark the center point between the vertical lines.
– Tack or nail a piece of string to to the center point and tie a pencil to the other end. The length of the string should be such that when you pull it taut the tip of your pencil touches the top of your vertical line(s).
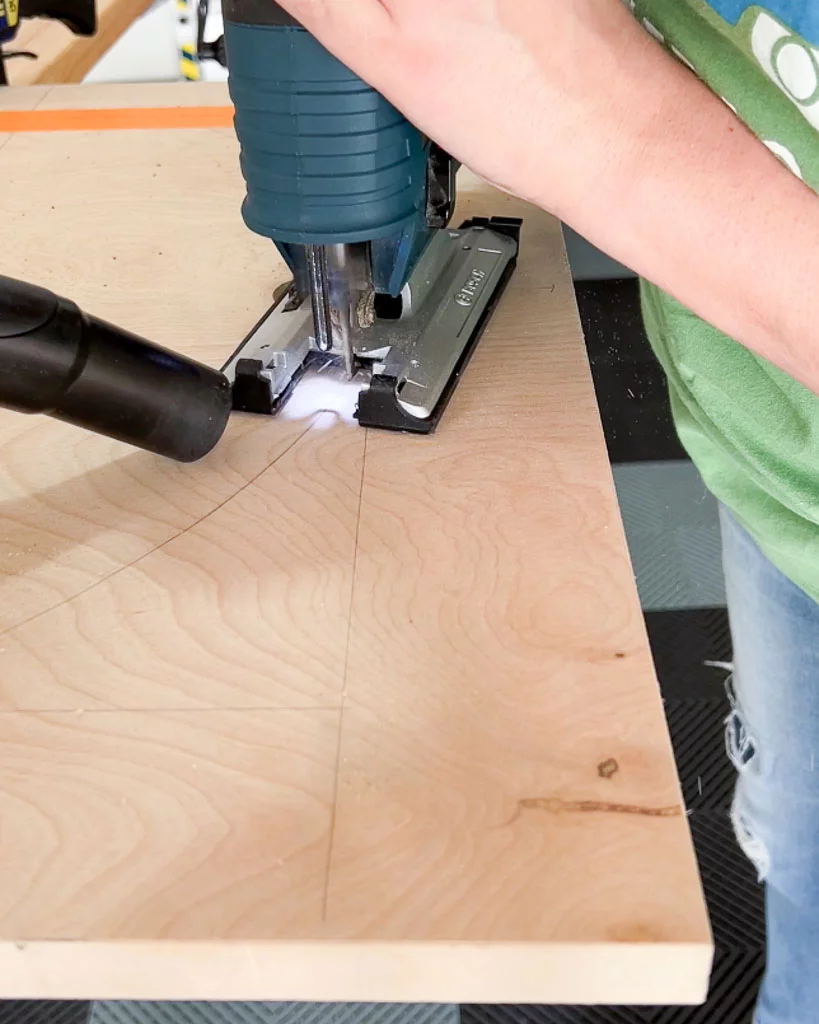
– Pull the string taut and place the tip of the pencil at the top of one of your vertical lines. Keep the string taut and your pencil perfectly upright as you draw an arch from each vertical line to meet in the center. - Use a jigsaw to cut out the arches.
Use a jigsaw to cut out the arch shape from your crate door. You can then use your door to trace the exact arch shape onto your stationary panel before also cutting it out with a jigsaw. Note that your stationary panel is 1/4″ taller and wider than the door, so be sure to center the door on the stationary panel before tracing the arch shape.
- Add edge banding to your door and stationary panel.
Add edge banding to all 4 edges of your door and the exposed edge of the stationary panel (the edge that does not have any pocket holes) and along the inside of each arch.
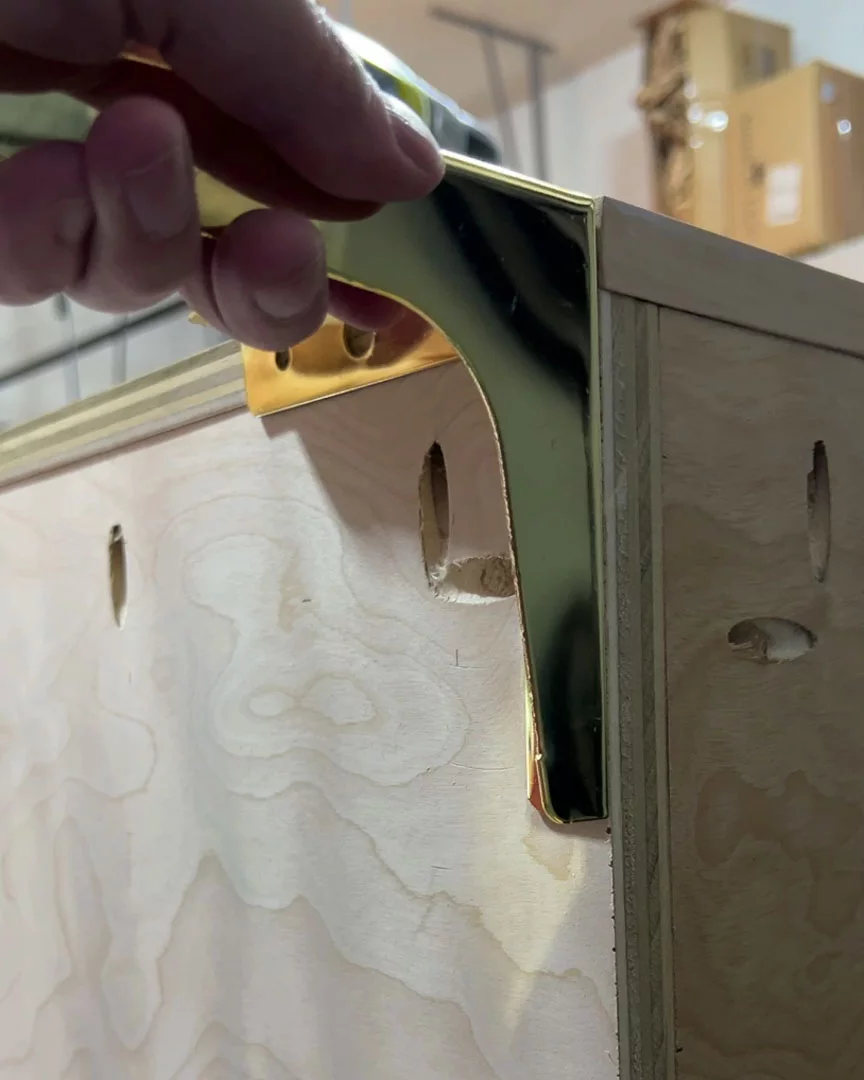
- Attach feet/legs.
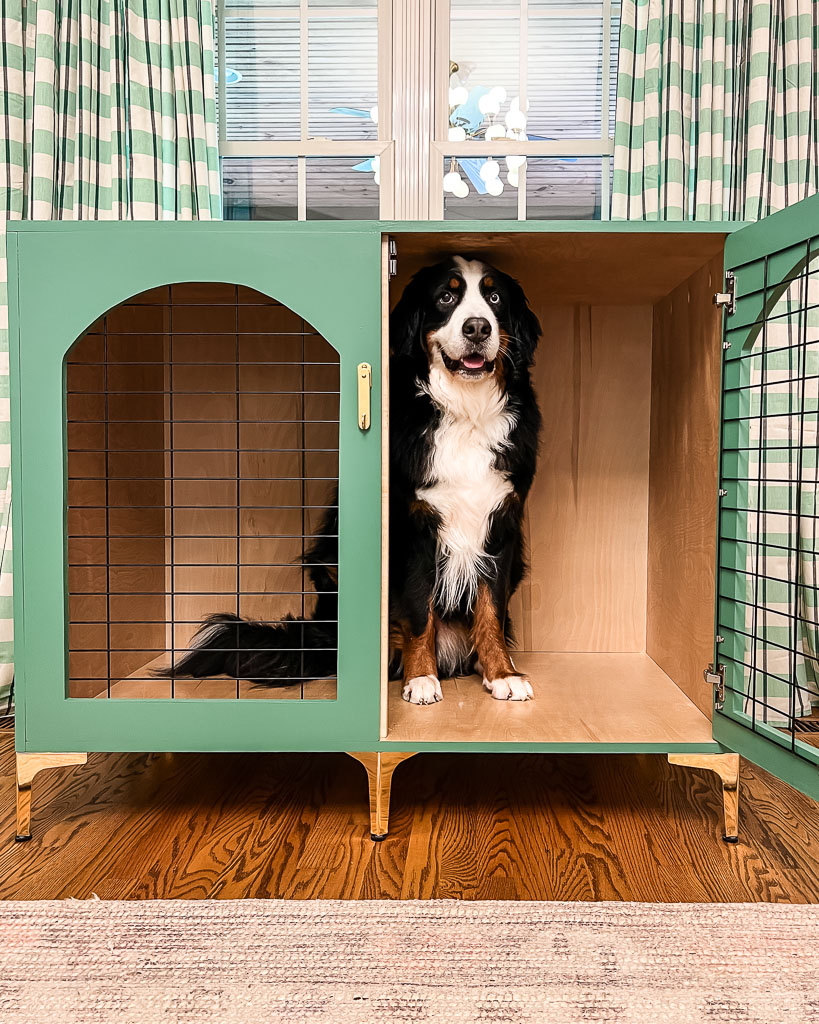
We installed these pre-made 6” furniture legs using the provided screws. We installed 4 legs in the corners of the crate. Because our crates are so wide and deep, we also added legs to the middle of the back and front–we used the same legs but turned them 90 degrees so that the arch detail on each side is not visible (you can see what I mean in the photos of the finished project at the end of this post).

- Finish the center of the doors.
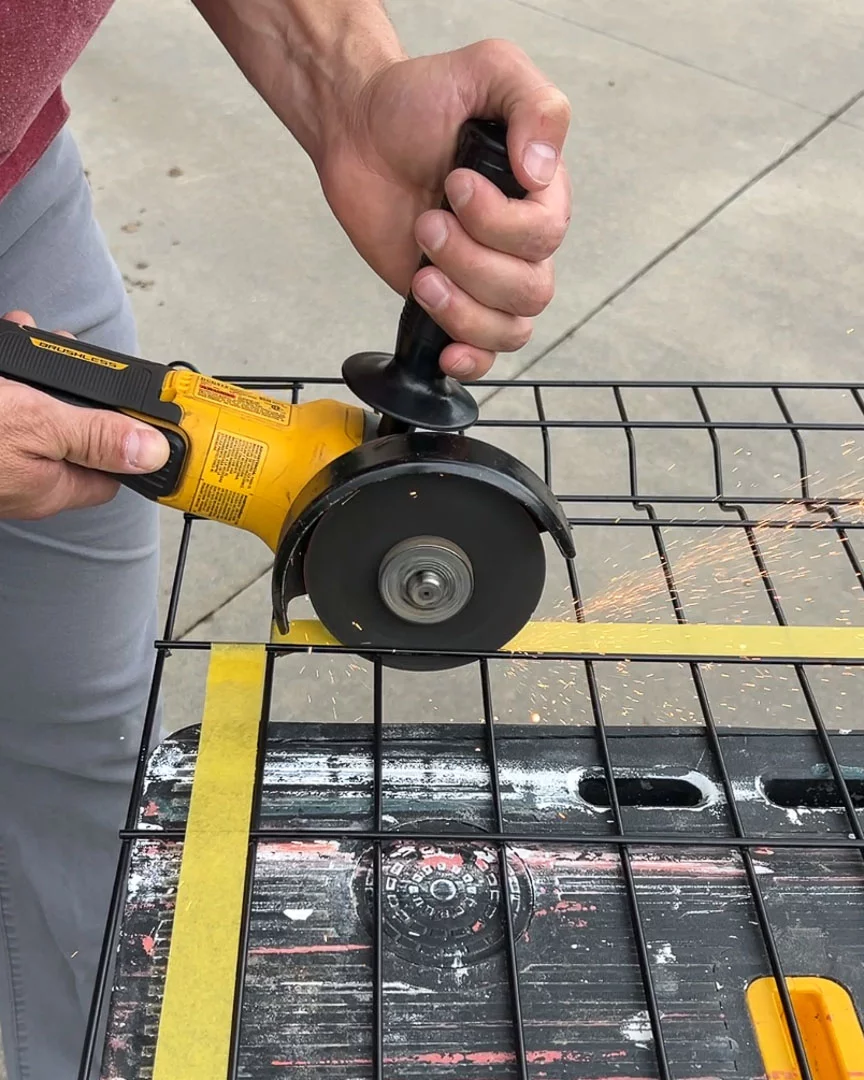
You need to decide on what material to use to fill in the center of your stationary panel and door. Just keep in mind that dog crates need plenty of ventilation but also need to be able to keep your dog safely inside. We decided to use these steel fence panels, but you could use wooden or even metal dowels.
We cut the steel fence panels down to size using our metal grinder, but you could use a hacksaw. After making your cuts, be sure to file down any sharp edges with a metal file.
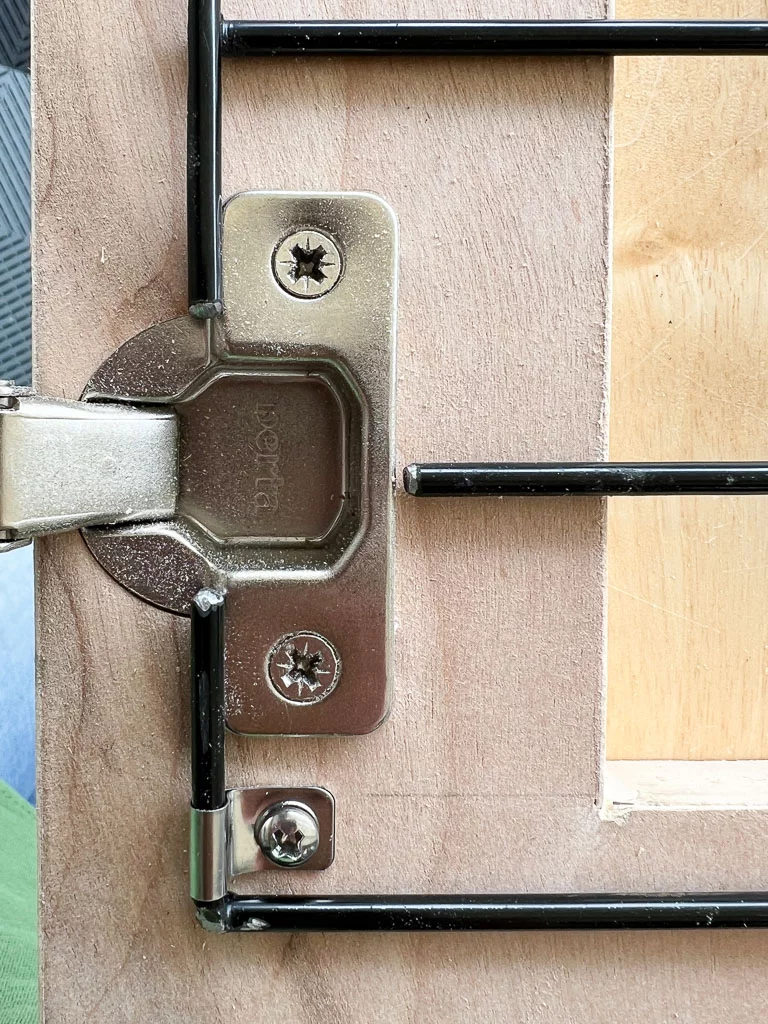
We attached them to the crate door frame using these wire clamps. You'll notice that we also had to make a few cuts to ensure they didn't interfere with the operation of the hinges.
- Install your stationary panel.
Attach the stationary panel to the frame of your dog crate with pocket screws. Once our stationary panel was installed, I used DAP Premium Wood Filler to fill the small gaps between the panel and the crate frame. This is optional, but I thought it looked odd to have a very small gap around the stationary panel since it wasn't identical to the gap around the door.
- Install the crate door.
Then install your door using concealed hinges. If you need instructions on how to do this, check out this very helpful post by my friend Zoe that walks you through how to install concealed cabinet hinges and hang cabinet doors.
- Paint or stain.
Now is the time to paint or stain your DIY dog crate. I removed the door to make painting it a bit easier. We used Clear Polycrylic on the inside and paint on the outside. You could paint or stain the inside and outside of your crate, but we felt like paint might not hold up that well against the toenails of a big, heavy dog, lol.
- Install door stop(s) and cabinet latch.
Once the door is installed, you need to install a door stop to prevent the door from swinging into your dog crate. You could glue a small piece of scrap wood to the top of the crate frame, set back ¾” to account for the thickness of the doors. We chose to install magnetic door catches to the top of our crate frame. They serve as door stops and help keep the door closed. Last but not least, install your cabinet latch.
- Add any finishing details.
This is totally optional, but for $8, it's my favorite part of these custom dog crates! We added a hand-punched brass nameplate to each crate we built. I could not possibly love them more. I didn't want to use basic screws to attach them. Instead, I managed to find pretty brass tacks that we randomly had in our screw organizer.


Here's a look at how our custom wooden dog crate turned out (plus a peek at the new curtains I hung). What do you think?!
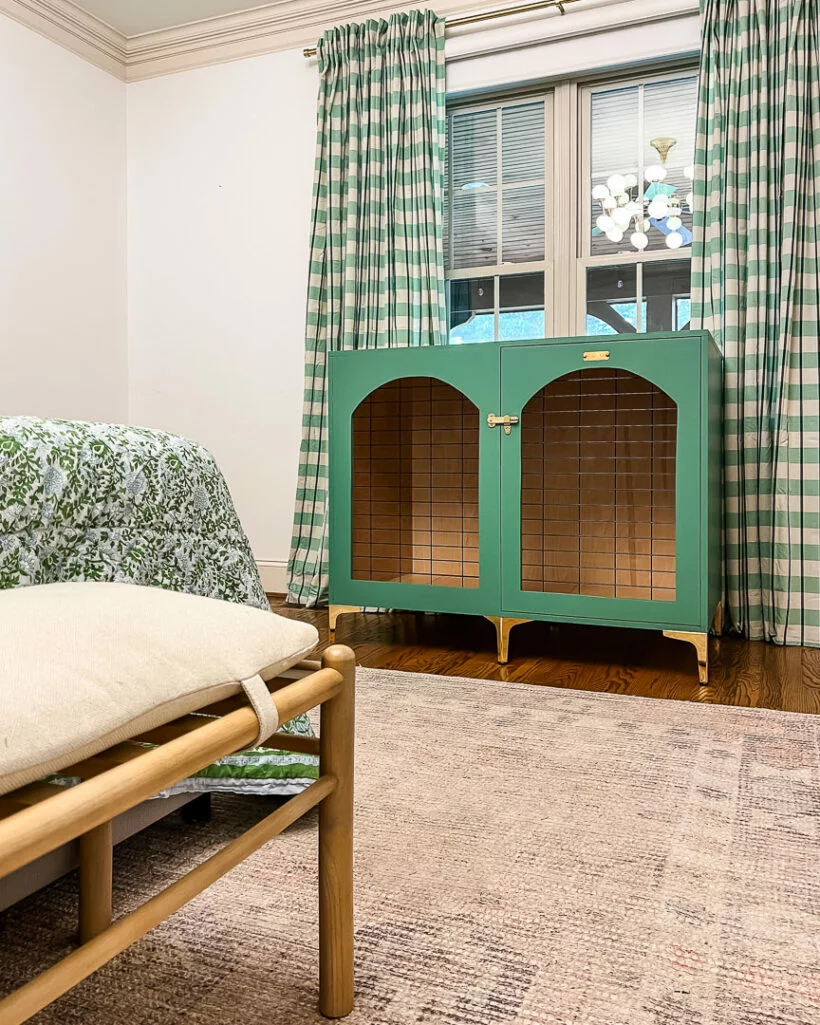
We still have to finish the second crate and the bench that will sit in between the two dog crates and add the finishing decor touches to this area. Check back soon to see how this view looks once everything is done!
More DIY Furniture Posts
Wondering how I approach transforming rooms and spaces in our home? Check out Designer in a Binder®.

And if you want exclusive content and behind-the-scenes sneak peeks, be sure to subscribe before you head out!

Awesome idea, thank you!
Furniture not only enhances the functionality and beauty of a space but also contributes to its ambiance and mood. The arrangement of furniture can create intimate conversation areas, open gathering spaces, or cozy reading nooks, shaping the way we interact with our environment.
May I ask why on earth would you even want a crate in your house? I have had dogs and cats and have never had any of them in CAGES when they were in their home with us. I understand the use of a crate when you are traveling or taking them to a vet but having your own animals in cages when at home seems unnecessarily cruel. Mine have nice comfy beds with blankets to lay on and be able to get up whenever they want.
Hi Esther. My post doesn’t in any way suggest that they our dogs are in their crates while we are home :) They are, however, in their crates when our entire family has to leave for several hours, which is rare. Otherwise, I work from home and they are in our home with us. Like your dogs they have plenty of comfy dog beds and also enjoying laying our our bed. Both of our dogs have been known to walk into their crates and lay in them even when the doors are wide open and we are home. It’s not surprising since dogs are den animals and crave the comfort and security of a den/cave. Our Bernese Mountain Dog, in particular, is anxious when we leave and strongly prefers to be in his safe, cozy crate when we are gone. We would happily leave him freely roam the house when we are gone since he is now 4 years old and well-trained, but he doesn’t enjoy that. Our puppy is only 3 1/2 months old and cannot safely be left out when we are gone. Now, may I ask you a question? Why on earth would you make harsh, judgmental assumptions about people you have never met and tell them they are “cruel” to their beloved pets? We don’t cage our dogs to take them to the vet, but I don’t think it’s “unnecessarily cruel” that you do so for your animals.
I love the aesthetics, but my furry lab/cocker mix would overheat with no cross-ventilation. I will add the wire panels on each end and on the upper part of the back wall.
Thanks for the steps, though. Very pretty.
With the position of the fans and A/C vents in our bedroom, that isn’t anything we needed to worry about. But if you don’t have much air movement in your room, that sounds like a great plan :)
Do you have a recommendation for a dog bed to put in the crate?
Hi Susan. This is the bed we are using in our DIY dog crates: https://rstyle.me/+1VwMILz9teR_bk5SXgT5uQ. It’s not a perfect fit, but it is a reasonable price for such a large bed and is durable with an easy-to-wash cover, so it was the best choice for us! I hope that helps :)
Hello Tasha,
Thanks for the idea for a “Dog Home within the Human Home.” We are building a “Dog Home within our RV.” I agree that the dog home works well with most dogs.
Our young pup is learning the ropes of our home and RV and we introduce him to his dog home on the first day with us. We will train him to be with us whenever we are home and on the road. He will have all the freedom to roam and explore. And when it’s time to kennel, at night and when we leave for extended periods, he will be safe, sound, and comfortable in his dog home.
I appreciate the way you responded to the previous commentor. You gave space for her opinion and then shared your position. We need to give more grace and space in our daily interactions.
Peace
Thank you, Matt. Enjoy traveling with your pup!