How to Paint IKEA Furniture and Mistakes to Avoid
I have been a DIYer since 2002, and over the past 22 years, I have painted nearly everything…floors, rugs, countertops, and lots of IKEA furniture. When I painted my first piece of IKEA laminate furniture years ago and I cringed as I watched the paint immediately bead up and separate. But I didn't give up and figured out how to make the paint adhere to everything from IKEA Billy bookcases to a Lack table. Best of all, the results actually last! Learn how to do it yourself with this step-by-step tutorial for painting IKEA furniture (or any laminate furniture).
Spoiler alert… There is a vital trick for successfully painting IKEA furniture and it doesn't involve sanding! It is the key to making it perfect, and you won't believe how easy it is.
There's so much to love about IKEA! The prices are awesome, especially when you are trying to furnish and decorate your home on a budget. I have lost count of how many pieces of IKEA furniture we have had over the years. We have found that a lot of IKEA pieces are stylish and durable. But there is one problem–there are times when you want furniture that isn't white…or black-brown…or “walnut.” There are tons of incredible IKEA hacks and IKEA bookcase hacks out there, but sometimes you just want a color change, not a full-blown project that requires power tools. Am I right?! So what's an IKEA lover to do? PAINT IT!
Why is painting IKEA furniture different?
Most IKEA furniture is not solid wood but is laminate-covered particle board. IKEA does have a line of solid wood pieces, but IKEA's most popular lines, like Billy, Lack, Kallax, and Malm, are laminate. And laminate is a slippery, non-porous surface that does not accept paint like wood does. Without prepping a laminate surface before painting, your paint will likely bead up and separate (see below). In the unlikely event you get your paint to stick and it dries, the adhesion will be poor and it will wind up chipping off eventually, which is not awesome.
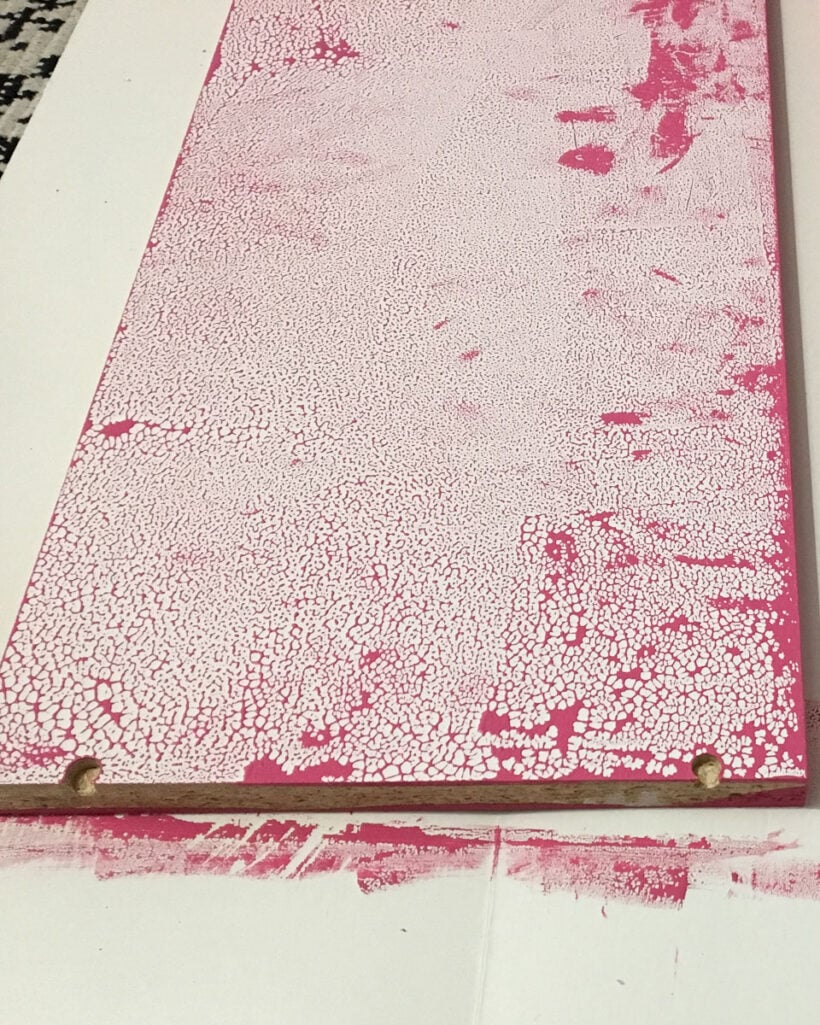
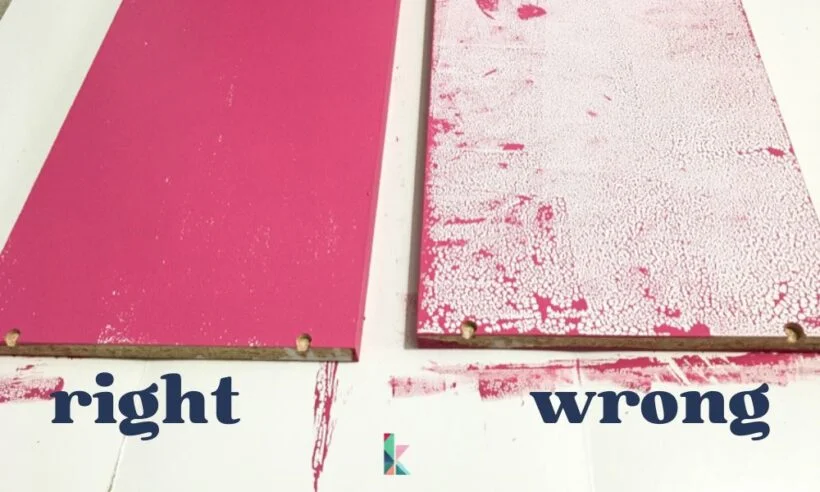
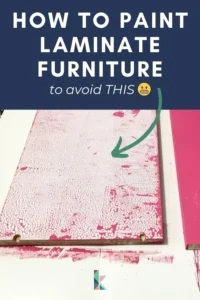
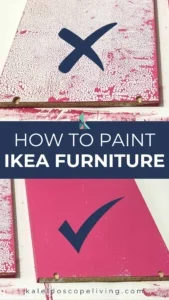
To demonstrate, I painted an IKEA Billy bookcase shelf on the right without using BIN shellac-based primer. See how the paint beaded up and didn't stick to the surface? On the other hand, the shelf on the left has one coat of shellac-based primer + one coat of paint. The right primer is CRUCIAL.
It does take a bit of patience and prep work since you have to prime first, but it's well worth it to be able to paint IKEA laminate furniture any color you want! Now let's dive into the tutorial!
This post contains affiliate links for your convenience. Click here for my full disclosure policy.
How to Paint IKEA Furniture
Materials needed
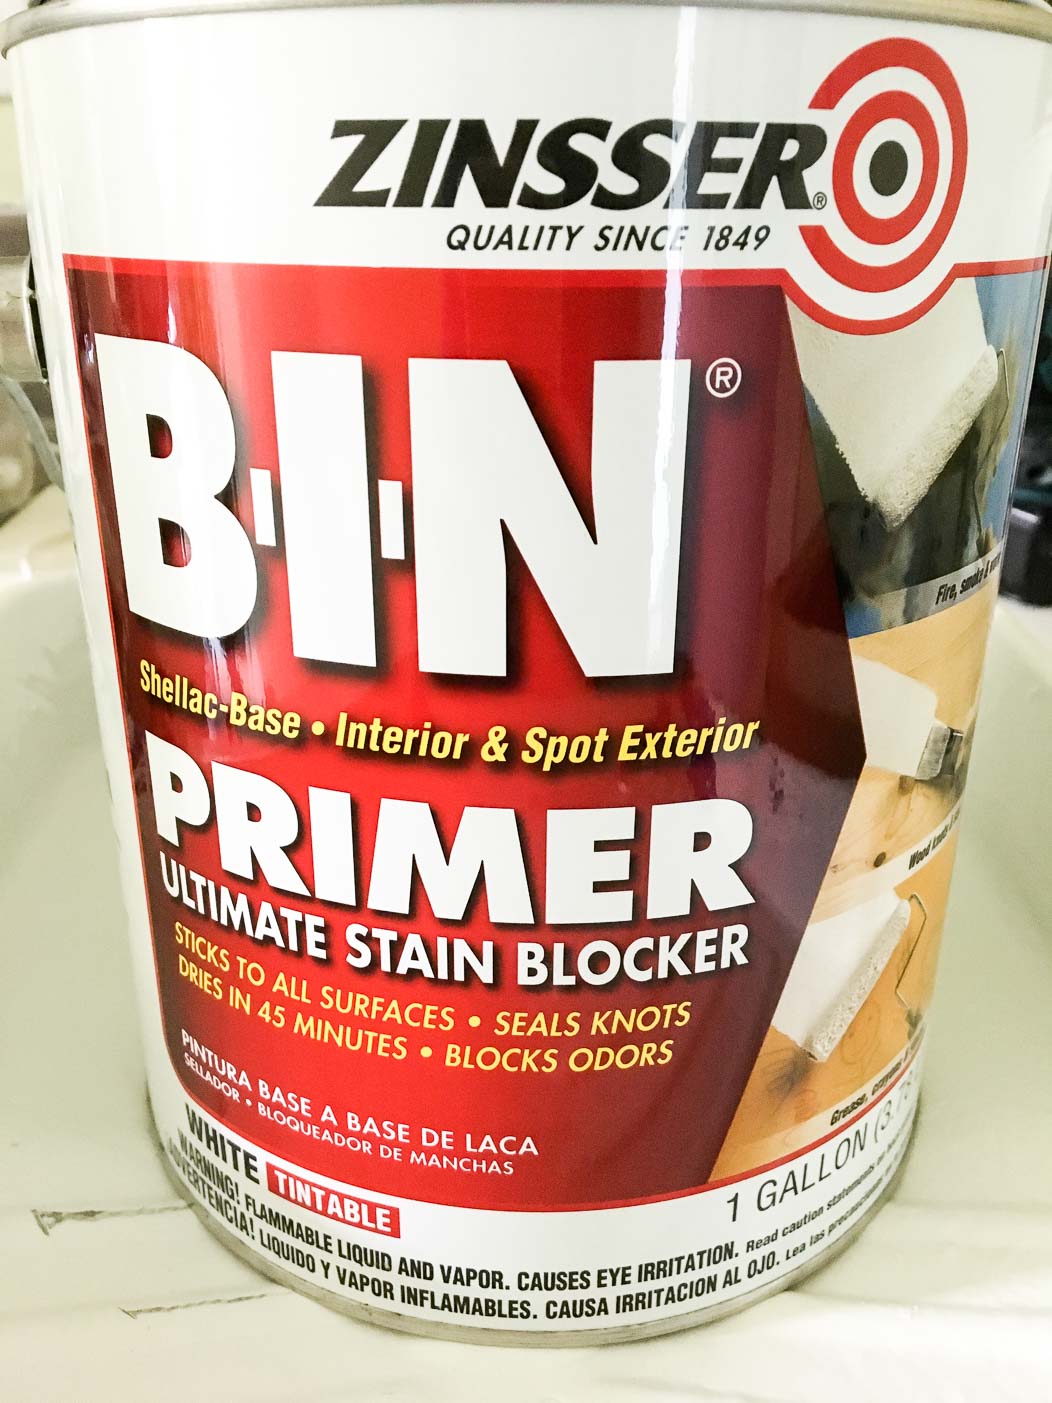
- Zinsser B.I.N. Primer or any shellac-based primer. This is CRUCIAL. You cannot use a water-based or oil-based primer that you may be used to.
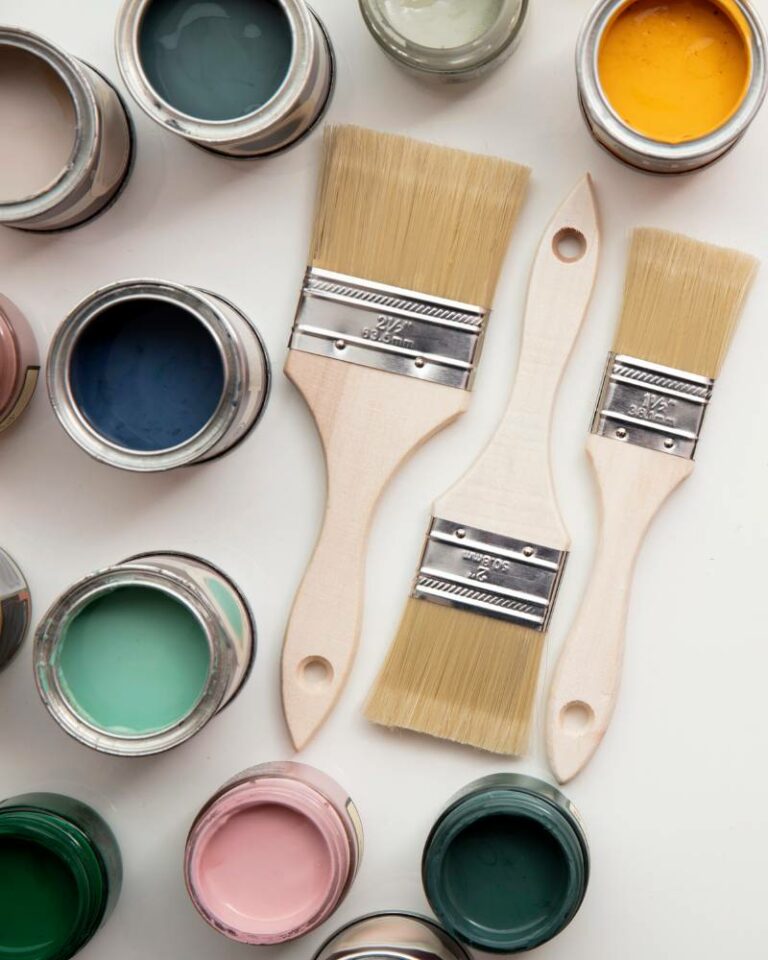
- A high-quality paint, such as chalk paint or mineral paint. I used Amy Howard At Home One-Step Paint in Drama Queen for this project, but you can see other paints I love for painting furniture here.
- Paintbrush
- Foam roller
- Drop cloths
Time needed: 6 hours
Here's everything you need to know about painting IKEA furniture that is laminate. The amount of time it take will depend on the size of your piece of furniture.
- Remove any hardware or knobs.
You want to get everything out of your way before you begin priming and painting!
- Clean your piece of furniture.
I like to clean my furniture pieces with Simple Green or Krud Cutter before painting them. After a good cleaning, wipe your piece down again with a damp cloth or sponge saturated with just water to remove any residual cleaning solution which can interfere with paint adhesion.
- Prime your piece with a shellac-based primer.
Lots of people recommend a light scuff sanding at this point. I do not sand and do not feel it's necessary so long as you are using the correct primer. But you absolutely must use a shellac-based primer for your paint to adhere properly. Again, I used Zinsser B.I.N. Primer but any shellac-based primer should work! Allow it to dry completely. It dries pretty quickly.

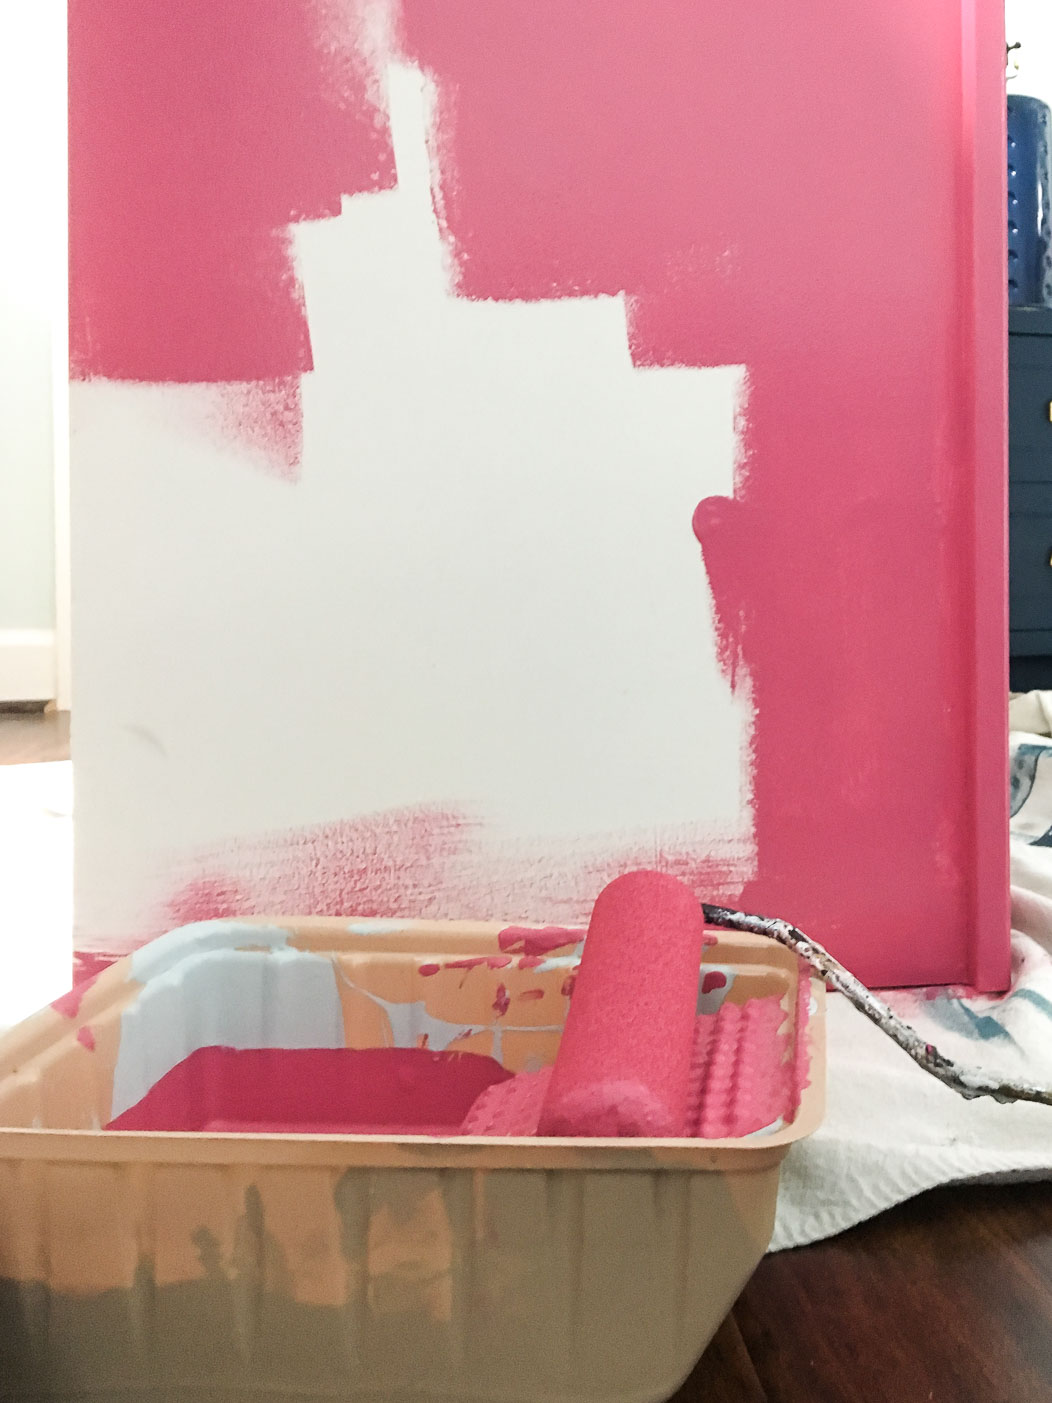
- Apply two coats of high-quality paint.
I HIGHLY recommend using one of the paints I recommend for painting furniture. Quality paint matters! Latex paint is not meant for painting furniture and using it is the other big mistake you should avoid when painting furniture. One of the paints I love and use often is Amy Howard At Home One-Step Paint.
To get a smooth finish, I like to use a dense foam roller for the large, flat surfaces. I only use a brush for any details that I can't reach with the foam roller.
Apply your first coat of paint and let it dry for a few hours (or however long the manufacturer of the paint you use recommends). Then apply a second coat. If you need additional coverage, you can apply additional coats as needed, but with a high-quality paint, two coats should be good! After your final coat, let your paint dry fully for at least 24 hours before using it or stacking pieces on top of each other like we did. - Seal your piece (optional).
If you use high-quality paint, you don't have to seal your piece. But if you want the additional protection or to add a bit of sheen, you can apply wax or a polycrylic topcoat after your paint cures. I used Amy Howard At Home Light Antique Wax over my entire piece. If you prefer to use a topcoat, I would recommend something like Minwax Polycrylic. Just be sure that your topcoat is compatible with whatever paint you choose to use!
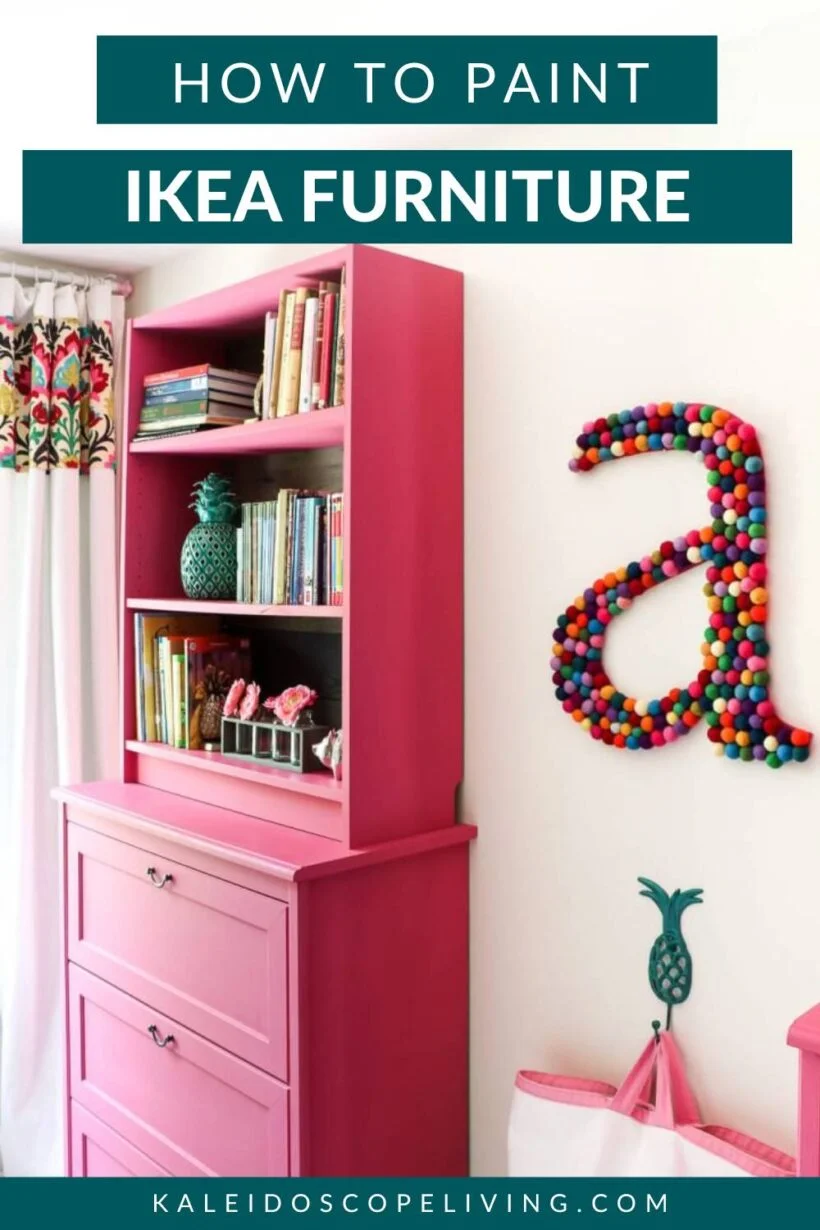
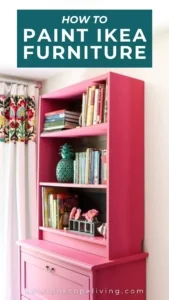
That's all there is to painting IKEA furniture and getting results that will look great and last for years! After our paint dried for 24+ hours, we stacked two 41″ IKEA Billy bookcases on top of IKEA Aspelund chests of drawers. It kind of gave us the look of built-ins with far less work and effort! And it resulted in tons of storage in our daughters' shared bedroom. They held up fabulously and were this pink color for a couple of years.

Then I painted them a deep purple color when our girls moved into separate bedrooms. I did not have to prime them again–I just used high-quality paint to change the color. And they continued to hold up beautifully for another 18 months or so when we moved and sold them on Facebook Marketplace :)
I've used this method to paint countless pieces other pieces of IKEA laminate furniture, including this IKEA Lack Hack. I promise it works well and I do hope you will give it a try yourself!
Frequently Asked Questions about Painting IKEA Furniture
If you aren't sure whether your IKEA furniture is laminate or not, head to the IKEA website and look up your product name. Then click on “Product Details” and then on “Materials.” If you see “particle board” + “acrylic paint” or “acrylic lacquer”, it means your furniture is laminate. If your piece is solid wood, you would see something like “solid pine” or “solid birch.”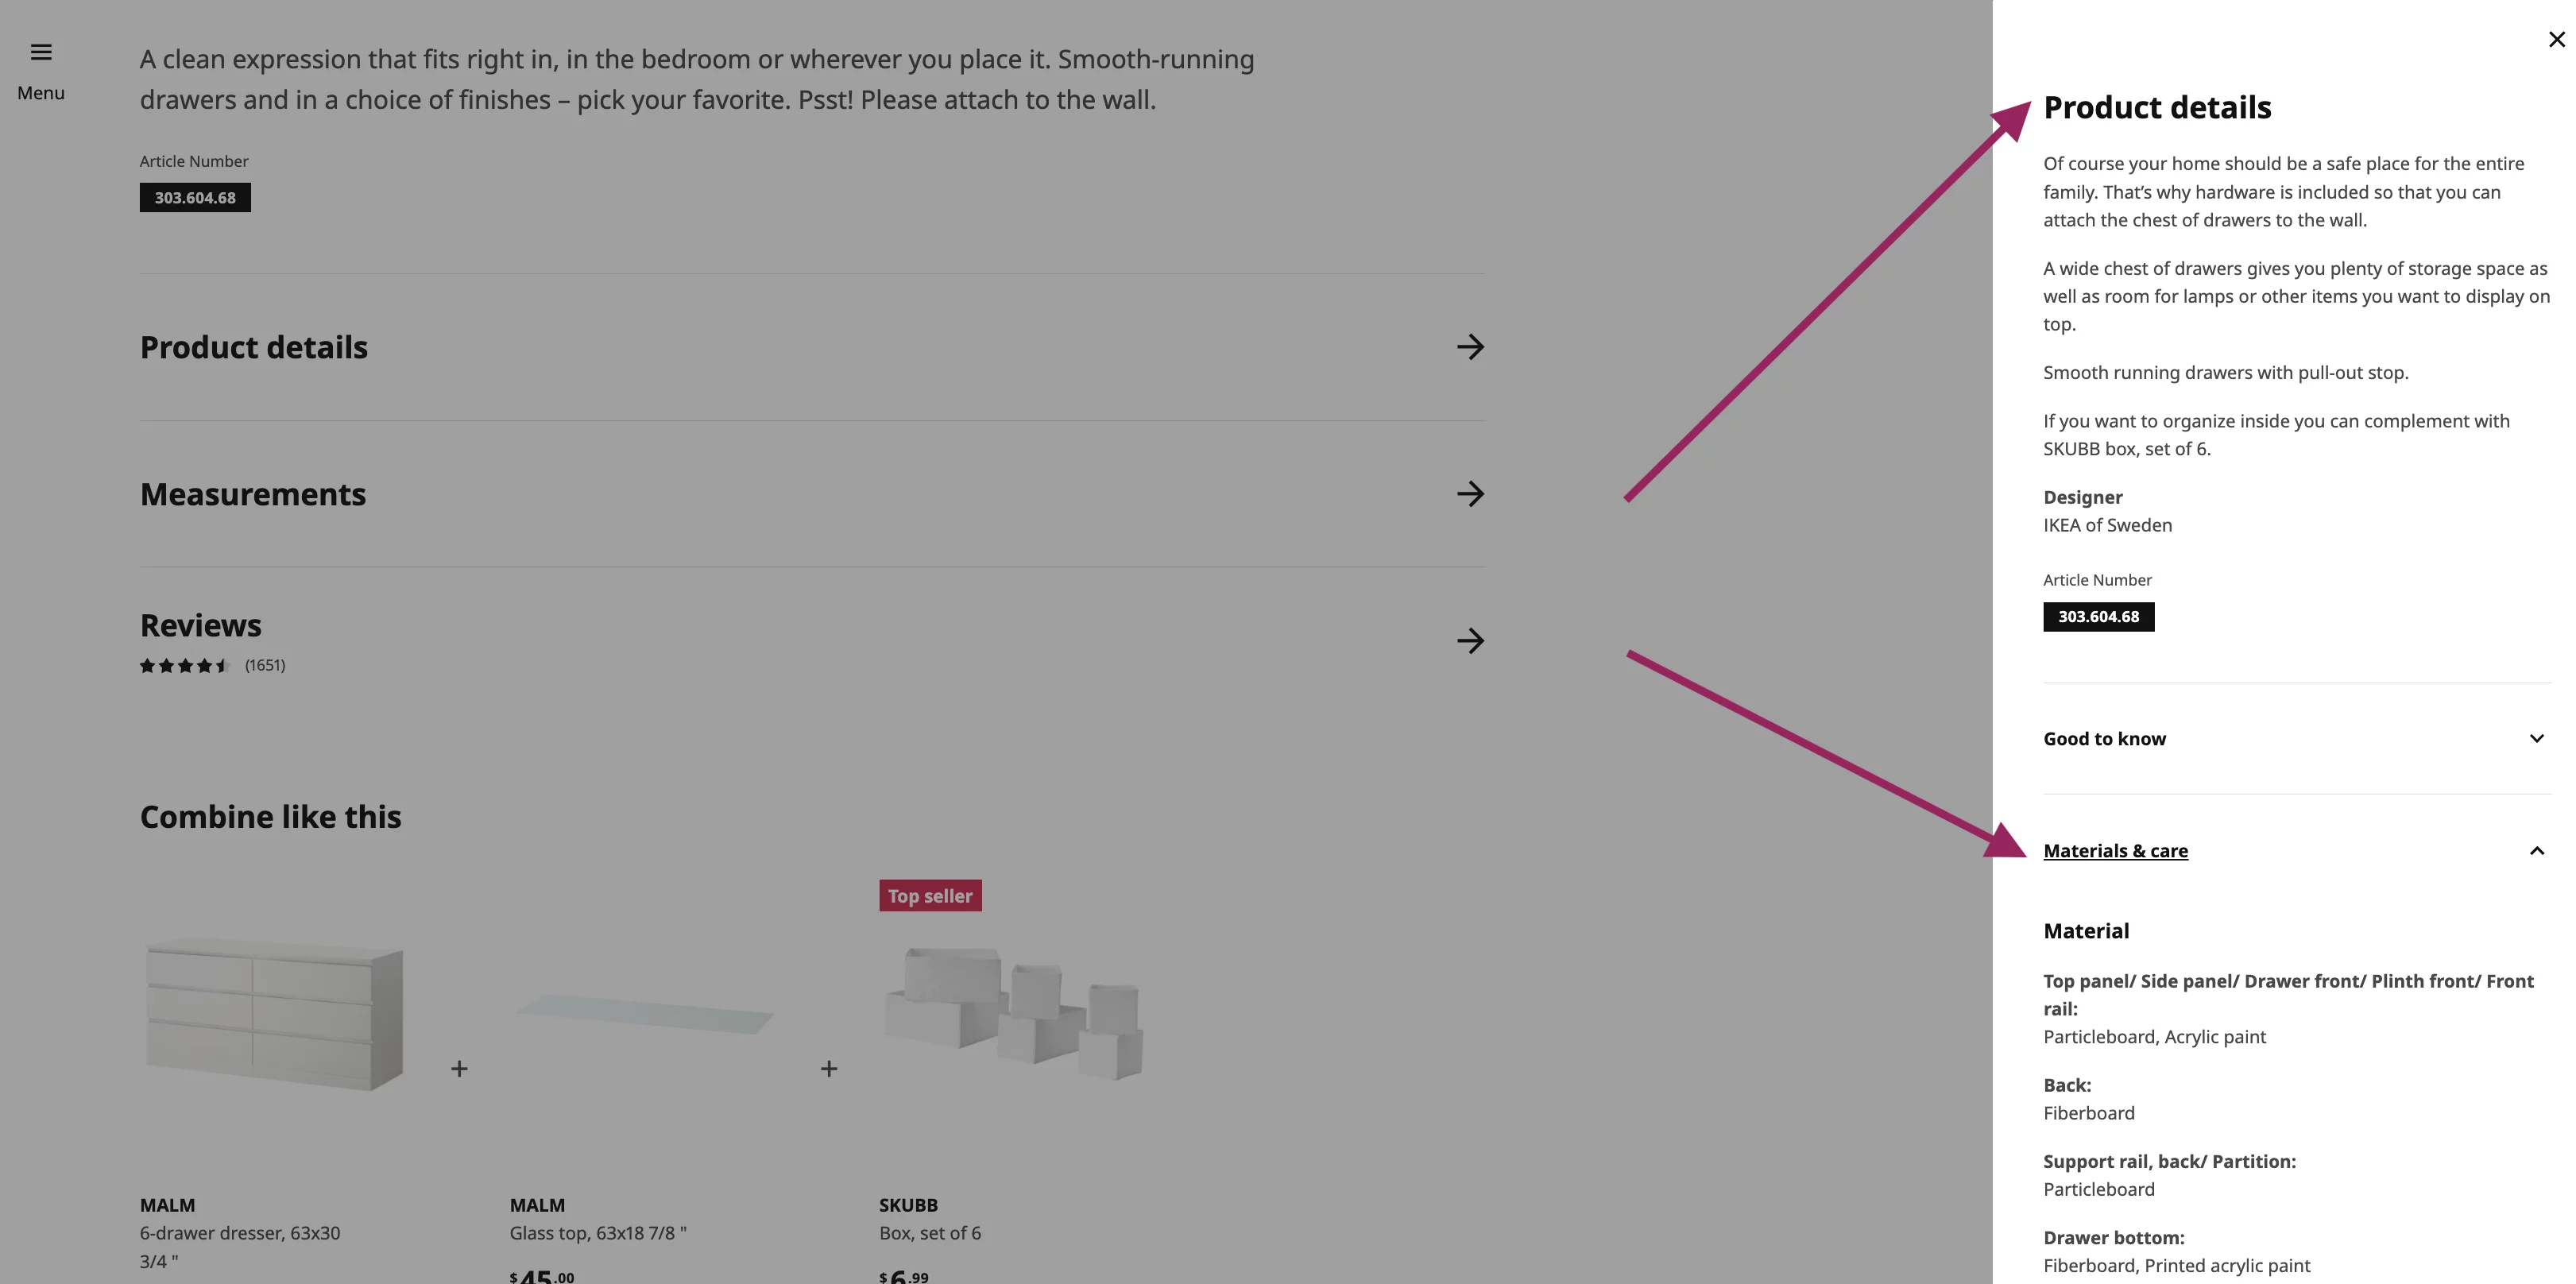
As long as you use a shellac-based primer, you do not need to sand your laminate furniture before painting it. I have never sanded before using the primer. That said, sanding your piece before applying the primer would only help your paint adhere even better, so if you are willing to do a bit more work, you certainly can sand first.
You can also lightly sand in between coats of paint to get the smoothest finish possible. Recently, I have become a fan of quickly sanding with a fine grit sandpaper in between coats of paint–it's quick, easy and really does help you acheive a smooth finish. That said, I can't think of a time I have sanded at any point in the process of painting the many pieces of IKEA furniture I've painted over the years.
There are pros and cons to each. In some ways it is probably easier to paint the pieces before you assemble the piece because it's easier to make sure every nook and cranny is covered. But if you paint before assembly, you will probably need to do some touch-up painting after the fact. We had used our pieces for a few years before painting them, so ours were fully assembled (though we were able to take the bookcase shelves out to paint them). I would say this really boils down to personal preference.
If you plan on painting IKEA furniture for yourself, be sure to save this post to Pinterest so you can refer back to it later!
More Paint Posts

Wondering how I approach transforming rooms and spaces in our home? Check out Designer in a Binder®.

And if you want exclusive content and behind-the-scenes sneak peeks, be sure to subscribe before you head out!

Have you ever tried using a paint sprayer or airbrush? I have two dressers that I have painted in the past and just enough OCD that I drove myself bonkers trying to get the brush strokes out. I tried a matte paint as well as one with sheen and sanded like crazy between coats to try to smooth it out. I didn’t one at the time that polyurethane ends up yellowing so I’ve been considering redoing them.
Hi Rochelle. We have used a paint sprayer to paint furniture. I find it’s ultimately more time-consuming. And if you buy a good quality paint, it should self-level well enough that you don’t notice brush strokes. Or you could try adding a paint extender to help avoid brush strokes also.
I have a deep scratch on top of my malm small dresser. If i use a filler does that change the instructions you’ve provided?
I hate how the chalk paint looks. Can I put another type of paint like acrylic on top of it?
I’m not aware of any reason that you can’t paint over chalk paint. But you might want to test a spot.
The shellac based primer was a solid move. Your chalk paint suggestion was a horrible recommendation. Covering chalk paint with a clear poly was a huge mistake. This has cost me a lot of time and money. Complete failure. Poly over chalk paint looks awful and chalk cannot hold up to even the most gentle touch. I used Behr and that’s supposed to be the most durable.
I now need to sand everything and repaint. $300 in paint wasted due to this advice.
I’m going to sand and repaint everything using a Behr Scuff Defense paint and primer.
I regret following the advice posted here.
Hi Patrick. You may have noticed that my post says “If you use high-quality paint, you don’t have to seal your piece. But if you want the additional protection or to add a bit of sheen, you can apply wax or a polycrylic topcoat after your paint cures. I used Amy Howard At Home Light Antique Wax over my entire piece. If you prefer to use a topcoat, I would recommend something like Minwax Polycrylic. Just be sure that your topcoat is compatible with whatever paint you choose to use!”
I used high quality chalk paint, but it is brittle and shows any touch. It is not a durable material.
I also used the acrylic you recommended.
All materials are now in the trash bin, unfortunately. This was a 100% fail.
Update. Sanding did not work. This was a complete loss. Unfortunately, we have to toss everything and start over. Out about $1500 with advice given here.
You need to stop with the nastiness. She shared what she used and how she used it. It worked for her. It didn’t for you. The audacity of you blaming her for you being out $1500 is ludicrous.
Who’s ‘we’? I feel sorry for the poor soul in your company
Hi there!
Have you ever experienced paint flaking on the inside corners of a Billy bookcase?
We sanded everything with 120 grit sandpaper, used a tac cloth, followed by BIN Shellac primer then cabinet paint. Everything adhered great except for the inside corners. At first I thought maybe the primer didn’t coat the corners properly, but the cabinet paint that’s flaking off (which is dark blue) is white on the underside which I’m assuming is the layer of BIN primer. I’m hoping I can resand, prime, and paint just the inside corners without it looking terrible.
I haven’t experienced that–sorry!
Yes. BIN works fairly well, but definitely flakes off of the IKEA material. I regret attempting to paint.
I did your method. I used shellac primer and acrylic enamel paint. And these shelves fleck and chip so bad i have to touch them up every time something touches them. I’m wondering if they have done the same for you or something went wrong?
Hi Christine. No, we did not have any problems. We used them for years before moving to a new home and selling them. Sorry to hear you had problems!
Same issue.
Hi! Was there a reason you didnt paint the backboard of the shelf pink as well? Thanks in advance! And very cool DIY. <3
Hi Selly. Just personal preference :) We chose to not use the IKEA backer board and instead added reclaimed wood planks to the back.
Hello, can I use shellac on wood furniture that has heavy stain on it?
Or a wood veneer over the regular wood?
Or do I have to strip or sand it to paint it?
Thank you!
I’m not sure, sorry.
Hello Tasha. I recently bought 5 Ikea Billy white bookcases, wondered how to paint them and stumbled into your guide.
Questions:
I found this product, is this the primer you are talking about?
Shellac Primer; [link blocked]
One Step paint:[link blocked]
Questions:
1.- So the primer is white? How will I know I applied completely if the billy is white too?
2.- How many of the 1 quart primers do you think I would need to coat my 5 billy bookcases?
3.- How many of the one step paint do you think I would need to paint my 5 billy bookcases?
4.- Just to be clear, the process would be, before assemblying painting with the primer once (or was it twice?) letting it dry 48 hours (Or less is fine?) and then giving it two coats of paint with the one step paint?
Sorry if I am not clear since english is not my first language and thanks. Also I ask because I live overseas and if I had any extra paint it would be a paint to return it.
Hi Ricardo. I cannot see the products you linked to, so I can’t answer those questions. The shellac based primer I used is not the exact same color as the billy bookcases so I was able to easily see where I had applied the primer. In terms of coverage, I really don’t know but you should be able to look at the manufacturer’s coverage guidelines to calculate it for the size and number of your bookcases. I believe I only used one coat of primer and applied 2 coats of the paint after the primer dried. The number of coats of paint required will depend on the color–some have better coverage than others. Good luck with your project!
I’ve heard you should wait 48 hours between coats of the shellac primer before you paint. How long did you wait between coats?
It’s been so long since we originally completed this project that I don’t remember. If I had to guess, I would say we let it dry overnight. But I don’t think we waited a full 48 hours. The exact product instructions may depend on the brand of the shellac-based primer you use since formulas can vary from brand to brand :) They can also change over time as formulas are updated.
Can you put stain over the primer?
I’m not sure.
Question- did the paint scrape off when you slid the shelves back in? I’ve seen some people paint with the shelves in to avoid this. What was your experience?
We didn’t have that issue. But if you did, touch-up should be easy! I feel like if you paint everything with the shelves in place you wouldn’t be able to adjust them in the future.
Would these same directions apply to kitchen cabinets that are laminate?
Hi Natalie! Generally speaking, yes but it would depend somewhat on the paint you plan to use. If the paint you want to use on your cabinets beads up on the laminate, you definitely would want to use a shellac-based primer first :)
is there a vegan alternatve to shellac primer that will work for laminate?
Hello,
Thanks for the post! It’s very helpful. The thing is I painted billy bookcase without a primer and it looks terrible right now. I am going to apply a primer but I have a question? Can I apply it on the painted parts too?
I would apply it over the entire piece (including the painted parts), but only after you sand any areas where the paint has peeled or scraped off so that you don’t see that texture once you paint it again :)
Which ikea pieces are these? I absolutely love the pink you chose. Thanks for some great diy info.
Hi Dina! The details of the IKEA pieces I used can be found here: https://designertrapped.com/ikea-billy-bookcase-hack/
Hi Tasha,
I live in germany (I’m from Toronto) and I used to be an avid furniture restorer but finding the products here that I need is near to impossible. Primer with shellac not likely but shellac yes so Im wondering if the laminated furniture could be primed with pure shellac then either primed with something else or just directly painted?
Hi Gabriele! Unfortunately, I don’t know the answer to that since I have not tried it. Sorry!
Hi, thank you so much for this article. I would like to paint two white Hemnes nightstands. I would like to paint it brown to much another furniture we already have. What paint can you recommend me to use that is not chalk paint finish. Thank you so much
Hi Emily. You can find more of my furniture paint recommendations in this post: https://designertrapped.com/best-paint-for-furniture/
Thanks for this. I read another article about painting the white Billy bookcase, where the paint would scratch with everyday use. Is this a problem you have experience? Would the ‘birch’ finish work better than the white?
Hi Amanda! If you correctly prepare the piece and use the shellac-based primer before painting your IKEA laminate furniture, your paint should not scratch off with everyday use :) The color of the underlying laminate shouldn’t make any difference. I hope that helps!
Hi. Love the article, thank you for posting. Extremely helpful for someone like me. I do have dumb question. If I want to paint my new IKEA furniture- Do I paint pieces before assembling ? Or after? What’s the best practice in your opinion?
Hi Lillian! Not a dumb question at all. I would always paint as much as you can before assembling because it makes it SO much easier! You may have a little bit of touch up after you finish assembling, but I still think it’s the best way to go :) I hope that helps!
I really don’t want to wax (rewax) furniture. What paint besides chalk paint can be used?
Hi Mary! Waxing a chalk paint is totally optional. But if you want to check out other furniture paint options, check out this post: https://designertrapped.com/best-paint-for-furniture/ I hope that helps!
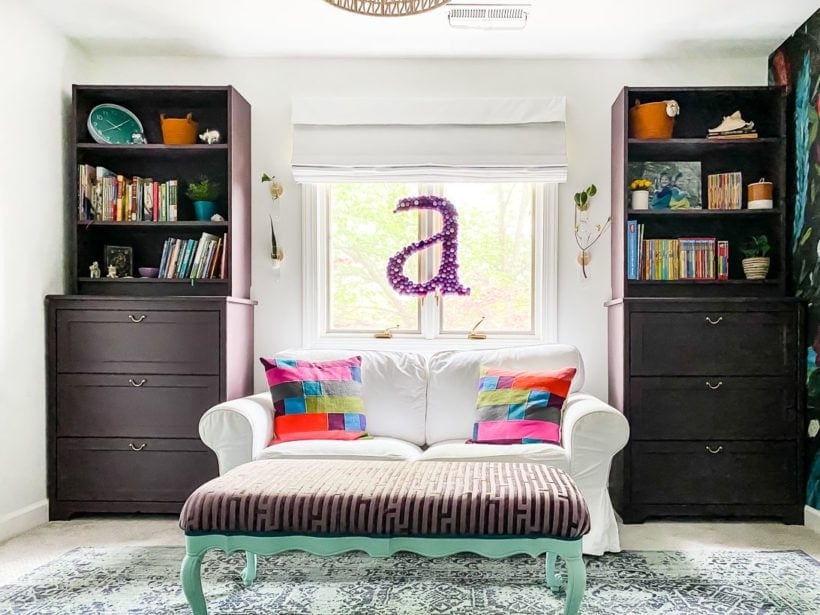
Love this room, Tasha! The A is so cute! I gotta try that one day. Enjoy!
Thanks so much Julie! My daughter loves it. I’m almost entirely done with it, so stay tuned for the full room reveal soon!