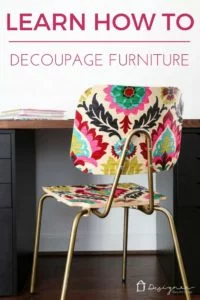
How to Decoupage Furniture With Fabric
Have you ever wondered how you can add interest to a furniture piece without painting it? You can decoupage furniture for an incredibly budget-friendly makeover! Using Mod Podge and fabric, it is simple to give your wood pieces a beautiful and affordable DIY makeover.
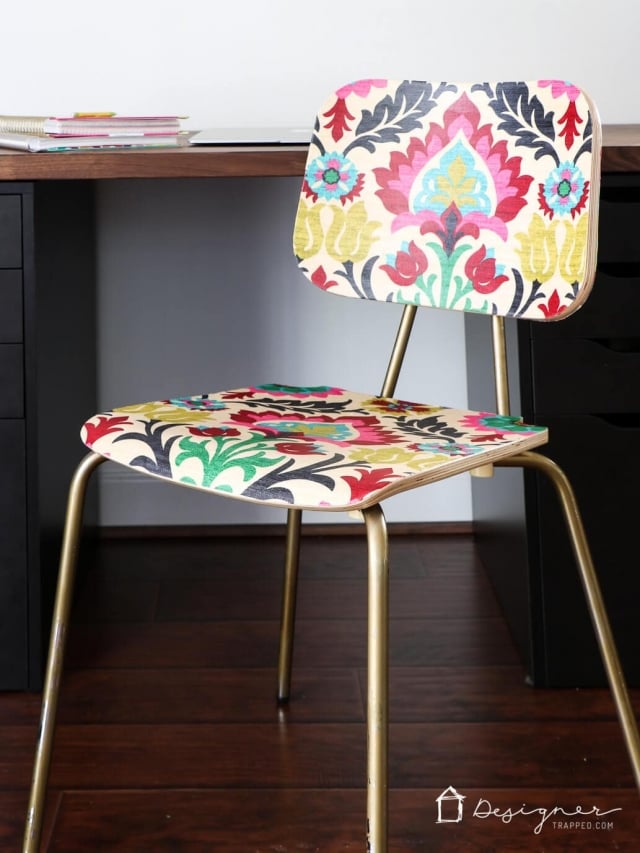
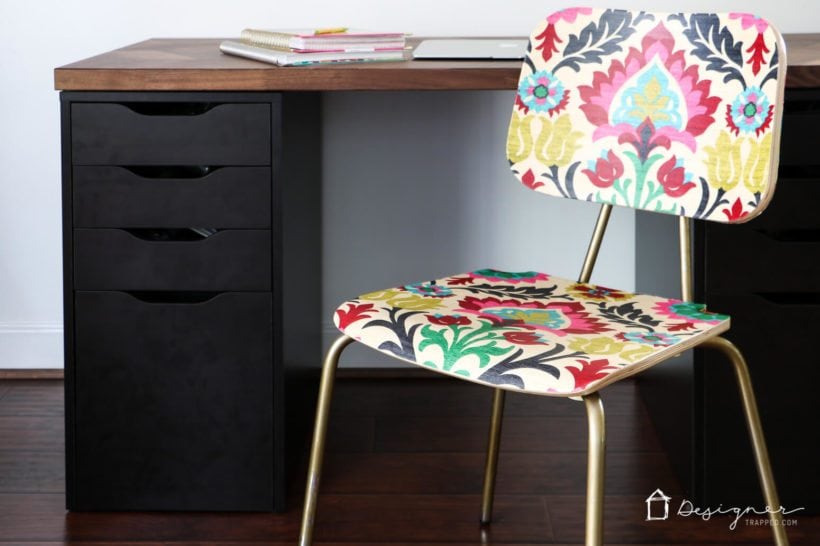
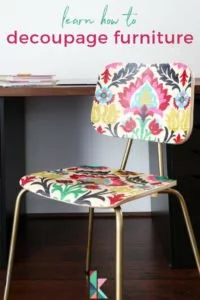
When I transformed an unused room in our house into my home office and craft room I spent a lot of time searching for a desk chair. Unfortunately, I wound up falling in love with a very expensive upholstered chair with stunning fabric that was WAY out of my budget at $445 (which was closer to my budget for my entire room).
I so so wanted it for my desk chair. Unfortunately, at $445 it just wasn't an option. So, I had to get creative to achieve the look I wanted with a much smaller price tag. I found the fabric and a chair and created my own version! I am in love with the final result (and how it easy it was) and I am sharing the full tutorial with you!
This post contains some affiliate links for your convenience. Click here to read my full disclosure policy.
How to Decoupage Furniture Tutorial
Materials Needed to Decoupage Furniture
- Fabric. (The amount you need depends on the size of your chair and how you want to position the pattern. I used around 1 yard.)
- Chair. (I used a basic $45 wood chair I found on Amazon that is no longer available, but If I had more time, I would have shopped consignment stores to look for one for even less!)
- Matte Mod Podge (or another decoupage glue)
- Gold Spray paint. (Optional! I spray painted the silver metal legs with gold spray paint.)
- Exacto knife
- Foam paint brush
You can also watch the video below (it will play after a short ad) for a really good overview of the project and then read below for the full instructions!
Time needed: 3 hours
Learn how to decoupage wood furniture by following the steps below. The time to complete excludes drying time.
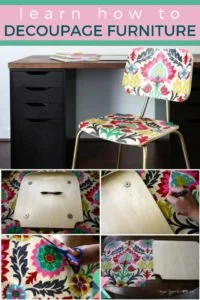
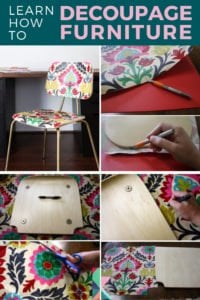
- Disassemble your furniture.
If you are working with a piece of furniture you already have, it will be much easier if you disassemble your piece first. Since I started with a new wood chair, I was able to skip this step. But I did spray paint the legs of the chair since I wanted them to be gold.
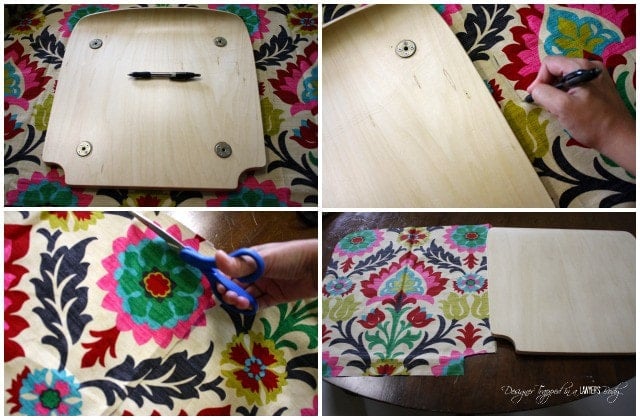
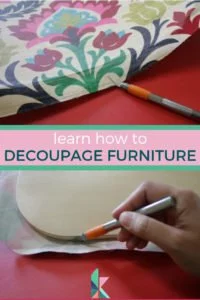
- Trace the shape of your furniture pieces onto your fabric.
Lay your fabric on a flat surface. Place the seat of your chair on top of the fabric and trace the perimeter of the wood. Be sure to trace about 1 inch beyond the wood surface, so that your fabric piece winds up being a bit larger than the seat itself. Using the lines you have traced as your guide, cut your fabric out.

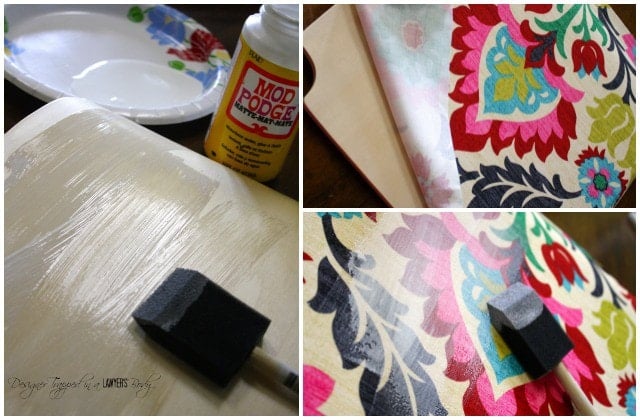
- Coat the wood with Mod Podge / decoupage.
Coat the seat of your piece of furniture with Mod Podge (or the decoupage medium of your choice). Lay your fabric on top and smooth out any wrinkles and bubbles. (I put my fabric directly over the hardware holes for the chair back and once it was all screwed together it was not an issue.) Once your fabric is in place, coat the top of the fabric with Mod Podge as well. Allow it to dry overnight.
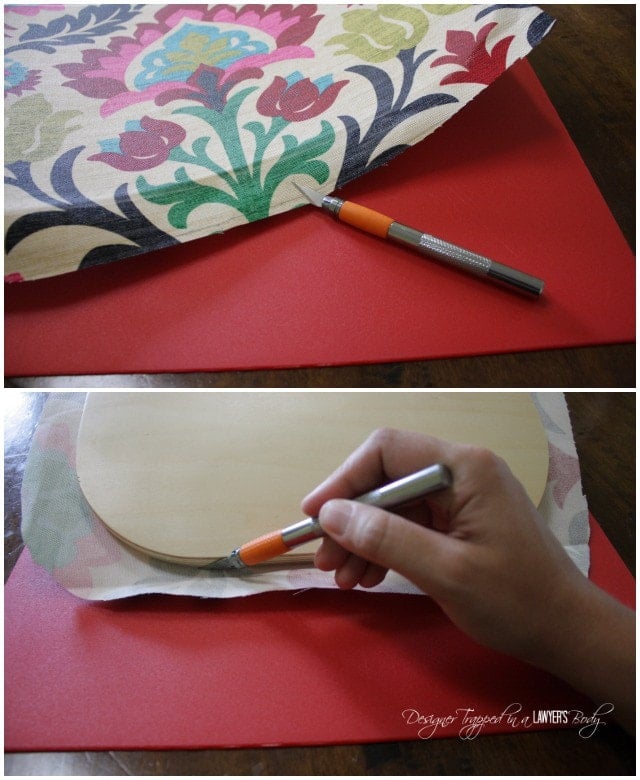
- Trim away excess fabric.
By the next morning, your fabric should feel nice and stiff, particularly around the edges of the wood. If it does, you are ready to trim off your excess fabric with a sharp craft or utility knife. Use the edge of your chair as the guide and cut off your fabric as close to the edge of the wood as possible.

You may wind up with some stray threads of fabric. Trim them off as necessary and then coat the entire perimeter of your seat with your decoupage glue. This should flatten any stray threads that cannot be trimmed AND prevent further fraying. - Repeat steps 2 through 5 for the remaining pieces.
Follow the exact same steps for any other wood pieces of your furniture that you want to decoupage with fabric.
- Reassemble/assemble your furniture piece and enjoy!
The last step is to put your piece of furniture together and admire your work!
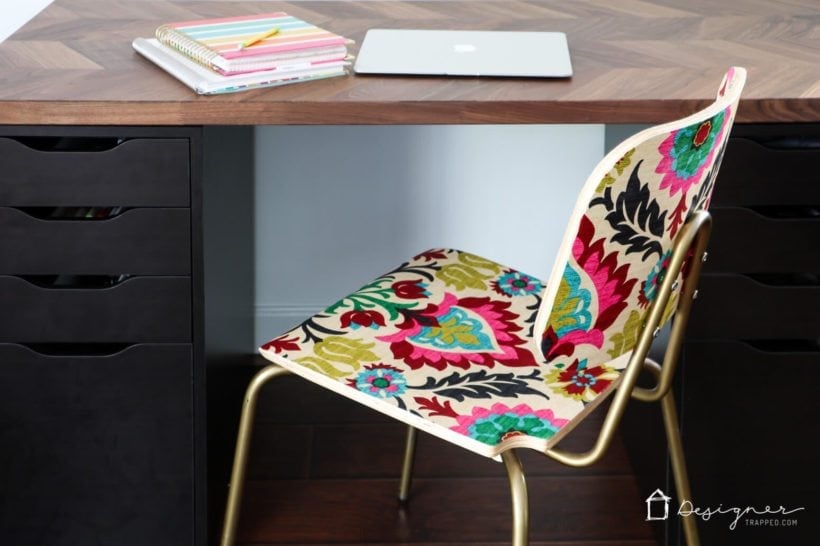
That's it! For around $60, I have a totally custom chair at a FRACTION of the cost of my inspiration chair. I love, love, love it. It could not be more simple and you don't have to prime or sand to do this decoupage furniture project.
Now that I have used the chair for a good, long while, I occasionally have to trim stray threads and have applied additional Mod Podge on one of the corners where the fabric started to loosen a bit. As I mentioned, the spray-painted legs have been touched up, but that's my fault for rushing the spray painting and only applying one coat. The bottom line is that with that little bit of maintenance, my decoupage chair is holding up wonderfully and we sit in it a lot!
This is one of my favorite makeovers. This beautiful chair may be the simplest of my furniture projects and it certainly is one of my most budget-friendly, but it still is high impact!
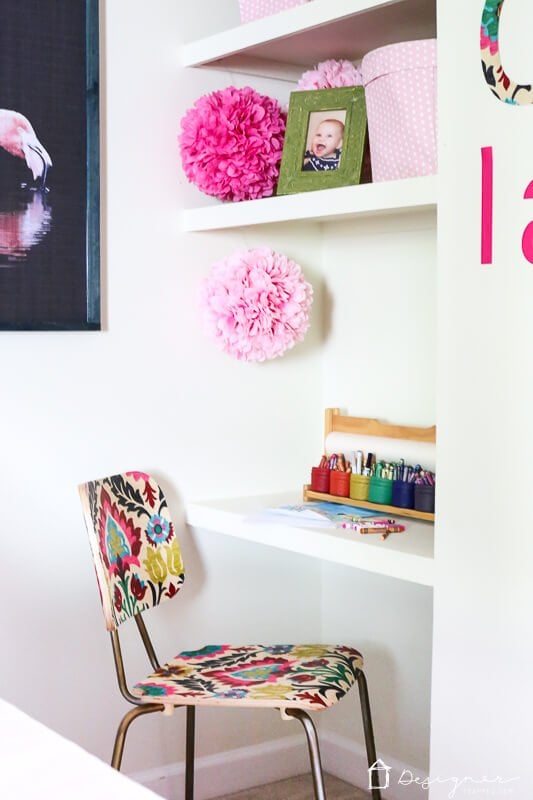
After a few years, I replaced my desk chair and moved this chair into Attley's big girl room. I coordinated the chair with her custom decoupaged wall quote and it was perfect!

Decoupage really is an unsung hero in the world of DIY projects. You can use it on so many different surfaces and the brilliant decoupage ideas out there are limitless! So grab your furniture and your decoupage paper or fabric or wallpaper and your Mod Podge and get to work!
Other posts you may enjoy:
- How to Decoupage Napkins to Customize Anything!
- 50 of the Best IKEA Hacks I've Ever Seen
- 17 Easy DIY Projects to Do While You’re Stuck At Home
- DIY Photo Canvas Prints With Authentic Texture
- 14 Inspiring IKEA Desk Hacks
- Sherwin-Williams Pure White Color Review with Pictures
Wondering how I approach transforming rooms and spaces in our home? Check out Designer in a Binder®.

And if you want exclusive content and behind-the-scenes sneak peeks, be sure to subscribe before you head out!

Hi could i do this with a cushioned leather seat? As in use modge podge the same way you did with the fabric but with a leather seat?
Hi Annie! I wouldn’t recommend this on leather. Because a leather seat is flexible, I’m afraid the Mod Podge “seal” would break as soon as someone sits on it. It can really only be used on a stable surface that doesn’t bend/flex when sat on. I hope that helps!
I’m updating you on a project I emailed you about last year – the painted kitchen backsplash! I loved it, and also did concrete skimmed countertops. And it sold my house for me! Which was the whole purpose in doing it after all!
And now this is my next project. I found an IKEA chair on the curb that some poor person had spray painted a hideous combination of yellow and blue geometric lines. I rescued it and have been trying to figure out how to help it and now I know! Thanks for the great idea! And I’m obsessed with your fabric choice too!
Thanks Christine! I LOVE that you tried the backsplash and countertops. Well done! Good luck on your chair. Sounds like you are a natural DIY’er!
I have a coffee table that I wanted to refinish do you think I could do this what would you use as a top coat . This would look great! I just love your chair!
I didn’t use any top coat besides the the mod podge. Good luck!
Tasha I have 8 adult school chairs like the one you did but they have rivet buttons on the seat and backs holing them to the frames. Any suggestions about working around them?
You would have to either go over it, use a craft knife to cut out the rivets and expose them, or take the chair apart. Good luck!
Thanks, cant take the chair apart factory rivets. Hopefully the fabric won’t wrinke when I get to the rivets. May need two people to handle this project. Thank you. May just make pads and back covers to change out seasonally.
That may be a better option in the long run. Good luck with it, Ruth!
Hi Tasha, did you cover the back and the bottom of the chair? I love your office, well done.
Nope, just the front. But I think it will look great!
Did you use a sealer on top of modge podge? ♡
The mod podge is the sealer! Nothing else needed. Thanks for reading!
Love this! You did an amazing job centering the design too. A girl after my own heart. Thanks for sharing!
Thanks Latricia! I do love this fabric!
I am so excited right now you have no idea. The fabric you used is my dream fabric. I saw it at Hobby Lobby months ago and for 32 dollars a yard. College student budget does not work well with crazy expensive fabric. The site you linked it to is for a fraction. So in love with this chair. Thanks so much!
I am so glad you found it! Thanks for reading :)
Every other week, Hobby Lobby has fabric 30-40% off. It’s the only time I buy fabric there. Check your local add. If it’s not on sale this week, it’ll be next week.
Great tip!
I love it! You are an inspiration.
Thank you Vicki!
Omg! I covered my dining chairs in the same fabric (same design, different colors). I wish I could upload a pic here. I bought mine st JoAnn’s.
Wow! that’s great Gunjan. I think we have the same taste. It would be great if you could upload the picture of your chair.
Love the project! What type of fabric would you recommend using…… thick, thin, double sided, upholstery?
Thanks!
Hi Christy! I would recommend a drapery or upholstery weight cotton fabric. I hope that helps!
I love this idea! The fabric is so bright and cheerful!
And, (I know its a typo but please don’t fix it, it’s too cute!) I love that you found a “mental” chair! LOL
How is the chair still holding up? Also, can they be wiped down? I’m considering this for dining chairs.
It’s holding up great, Rachael! I have had to add some Mod Podge to the edges a couple of times, but I think that’s because I used regular Mod Podge. If I had it to do over again, I would use the Mod Podge specifically for fabric–I bet that is a bit stronger and holds the edges down even better!
Absolutely gorgeous! Love the fabric print!
Hi! Thanks so much for your brilliant idea! I have 4 metal folding chairs that I’ve been wanting to spray paint a pretty color for a while. Adding fabric would make them so much prettier. Do you think this would work on a metal chair? What about if I added a THICK layer of batting too?
Thank you!!
Danielle
Hi Danielle! I do think it would work directly on metal, but probably not with an added layer of batting. The mod podge needs to adhere the fabric directly to a hard, stable surface. Good luck!
love this idea. Just picked up 10 of these chairs for $20! My new dining chairs for the cottage. Going fabric shopping right now! Next step: how to make Modpodge at home.
What a fabulous deal, Terri! Would love to see how yours turn out!
I do a lot of fabric decoupage on stools, furniture, and trays. Also bird houses. I almost always get bubbles that are very difficult to smooth out. Did you have a problem with that? Also, I found that, after two coats of mod Podge, I can sand the surface smooth and then I can put polyurethane over it, sand again, and have a very smooth finish!
Interesting, Marilyn! I have never had any problems with bubbles. Good idea about putting poly on top–thanks for the tip!
Does this process also work on office chairs ( leather type)? It would be nice if it can!
Unfortunately, I think it will only work on a solid surface chair :( Thanks for reading my blog, Regina!
If you want that beautiful fabric to pop you need to coat your chair with some sort of lacquer…you can use a spray lacquer which i do for smaller projects….put about four coats on and lightly sand between the first two or three coats as the lacquer brings up the nap….ive done lots of deco furniture!
That’s a great idea, Tina! Thanks!
I absolutely love this and what a great idea to mod podge the fabric onto the chair. I am also obsessed with this fabric as well. I purchased a couple yards of it and I plan to recover 2 chairs in my dining room. Love what you’ve done!
This is cool :) I’d like to know how it holds up with use because Mod Podge is a low quality adhesive. Maybe try matte medium or another poly instead?
Also, I’m sorry to say this, but your website is commercialized to the point of being so obnoxious. Any image I try to look at has a pop up that covers the bottom half pretty much the whole time. I get that you want to make some money, but geeeez! I think I’ll avoid in the future. It really detracts from the content and the DIY experience.
Sorry to see you go, Ali, but thanks for the compliment on my chair. I have been using the chair for almost a year and it is still in great shape!
Hi Tasha!
Love the chair, but WHERE did you get that rug??
–Fellow designer trapped in a lawyer’s body
Hi Clare! It’s always nice to meet another designer/lawyer! Isn’t that rug fabulous? I got it at Rugs USA!
Cuuuuuuuutttttttteeeeeee!!!!!
Thank you, Mandie!
Hi there! Love what you’ve done to repurpose this chair, such a great idea. I was just wondering if you think I could do the same sort of thing with a chair like this: http://discountfoldingchairsandtables.com/media/catalog/product/cache/1/image/9df78eab33525d08d6e5fb8d27136e95/v/i/vinyl-folding-chair-black_1_1.jpg
I have a couple and the design that is on them clashes with my decor but I would like to use them so this would be a quick fix if you think it will adhere to the vinyl.
Thank you!
Hmmm, Lynzee. I don’t think it would work on these chairs since there is some flexibility in the surface of them. But, I bet you could easily re-upholster them. Just google it and I get a ton of good tutorials will pop up. Good luck!
Won’t the chair get sticky?
Nope, it’s not at all sticky, Linda!
This is such a fabulous idea, and you used the perfect fabric and the perfect chair. Love it!
Thanks so much, Bethany! Love the name of your blog! Happy new year.
Could you then coat it with a coat of poly spray? So cute! Love it!
Get out! Again you have outdone your crafty self with another awesome project. Love the fabric!
I’d love for you to share this project at my Show Me Saturday linky party this weekend. My readers would love this!
Happy New Year!
~ Ashley