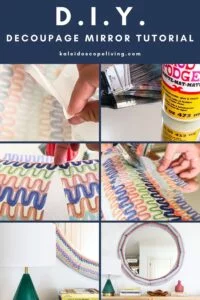
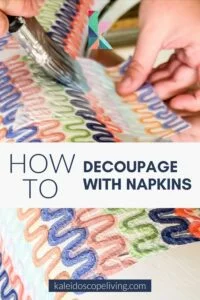
How to Decoupage Napkins to Customize Anything!
Decoupage is a great way to add color and pattern to pretty much any surface. Learn how to decoupage napkins onto pretty much anything with these tips and tricks!
If you've been around a while, you know that decoupage is one of the ways that I have added color and pattern to things like furniture and even wall hangings in the past. You may have even discovered me because of my popular post on how to decoupage furniture with fabric for an “upholstered” look! I've also decoupaged fabric onto chipboard and then cut out letters to create this one-of-a-kind wall quote. And I also used decoupage and fabric for this easy but dramatic Ikea kids’ table and chairs makeover. So yeah, I'm a fan of decoupaging with fabric!
But fabric isn't always inexpensive! If you are like me, you may wonder “can you decoupage napkins?” The answer is YES!
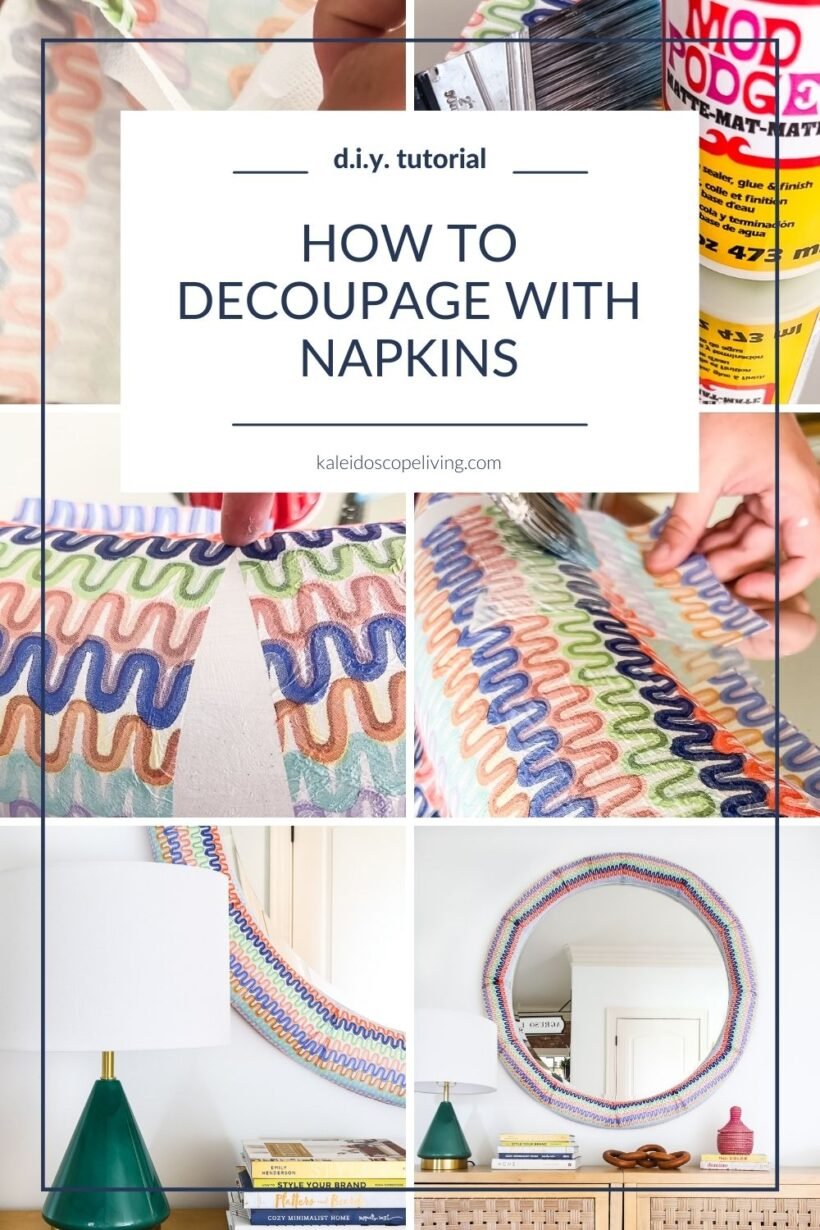
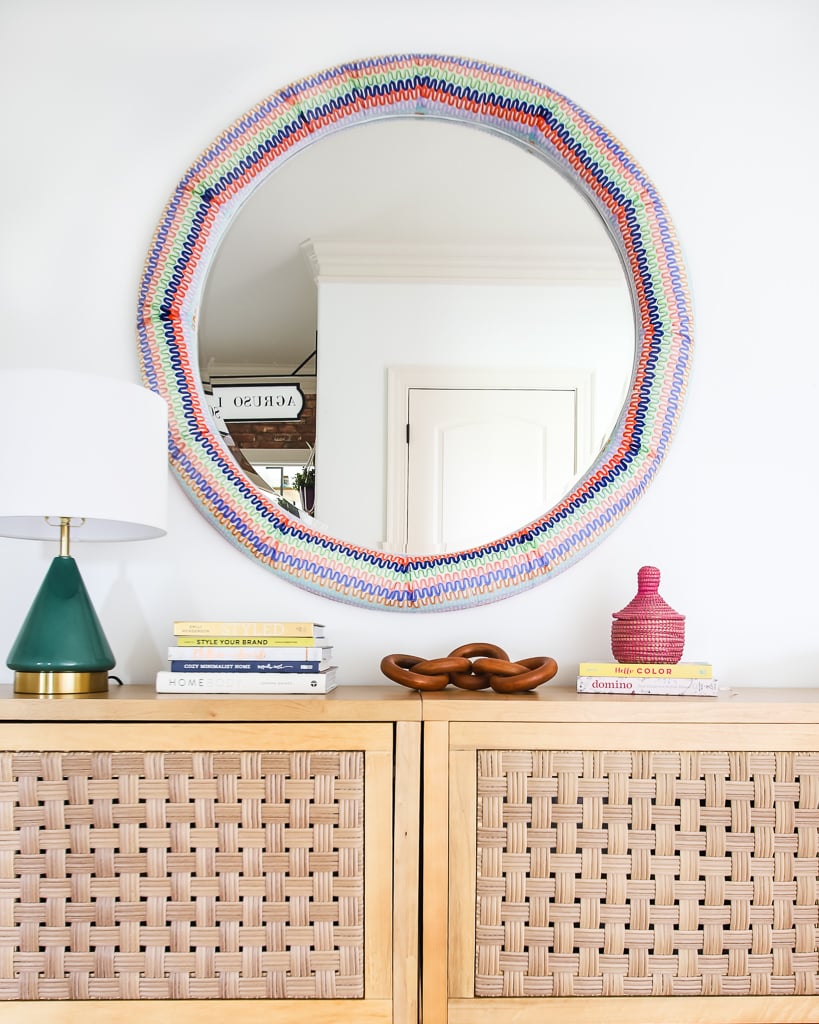
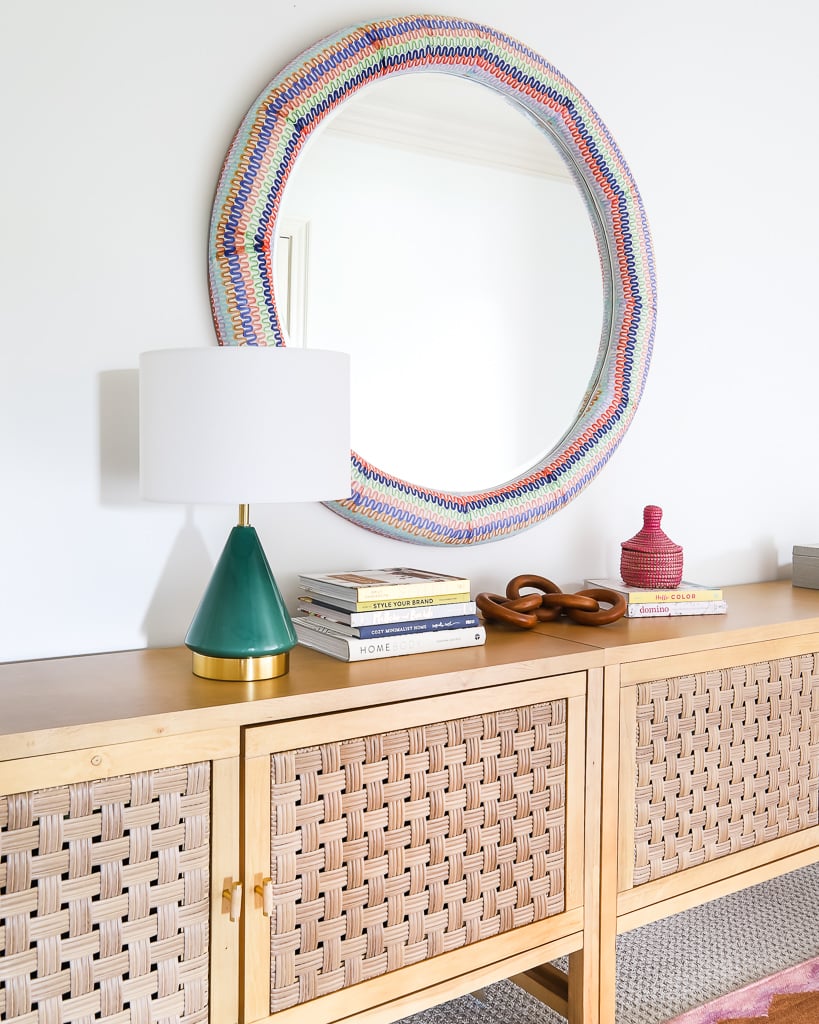
After doing some research, I decided to decoupage napkins onto an old mirror to give it a new look and it turned out beautifully! Best of all, the 2 packs of napkins for this project only cost me $16.00 and I didn't even use all of them.
Now, I will admit that decoupaging with napkins is a bit tricky and there is a learning curve. But with these tips and tricks that I learned along the way, you can absolutely do it. So let's get into the details!
What You Need to Know About Decoupaging with Napkins
You can really decoupage napkins onto pretty much any smooth surface including wood, paper, fabric, glass, metal, tin, terra cotta, MDF, and more. I personally recommend finding a relatively SMOOTH surface to decoupage with napkins because they are so delicate and a textured surface would make it even trickier to apply without tearing, in my opinion.
- Pros
- They are inexpensive!
- It's easy to find fun, colorful patterns.
- They provide a more delicate/subtle look than something like fabric can provide.
- Cons
- Napkins are delicate and very thin once you remove the non-printed layers, so they can tear very easily, especially once wet from whatever decoupage medium you use (I always use Mod Podge).
- Because they are thin and tear easily, there's really no way to avoid wrinkling (especially if you are working on a curved surface like my mirror). Embrace the wrinkles!
- Random Tips
- Many people will suggest using a piece of plastic wrap on top of the napkin to smooth out any wrinkled without tearing the napkin while the Mod Podge is still wet. I tried this and it didn't work well for me, but it might work for you!
- Other people use hair spray on their napkins before applying them. I didn't try this but I might next time.
- For some projects, you may want to sand and seal your project at the end. But since my mirror hangs on the wall and won't really be touched or come into contact with water, I didn't do either.
This post contains affiliate links for your convenience. Click here for my full disclosure policy.
How to Decoupage Napkins Onto a Smooth Surface
Materials Needed
- Paper napkins (I found the best selection at Paper Source)
- Mod Podge
- Paint brush (a multi-purpose bristle brush or foam brush is fine)
- A disposable cup
- A plastic ziploc bag
- A wet rag (in case of mistakes)
I highly recommend you watch the short video below for an overview of this project! The detailed written tutorial follows :)
Step 1: Choose your surface
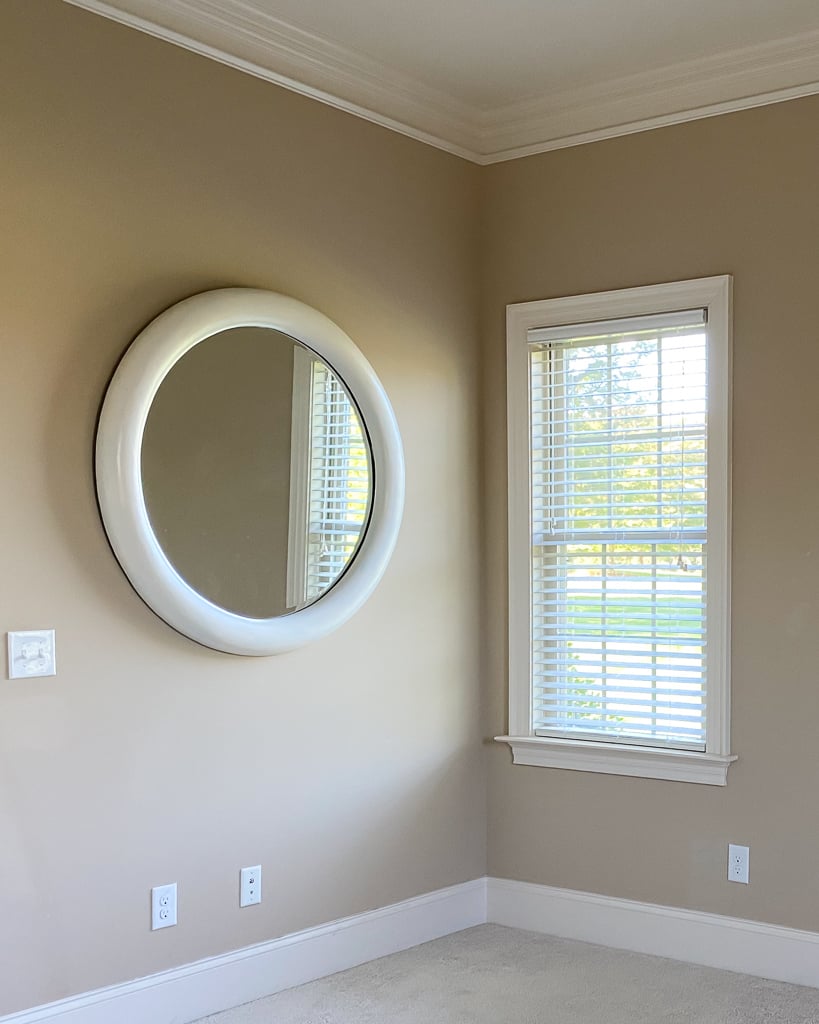
I chose this large wood mirror that was left behind by the former owners of our current home. It was in the guest room and because it was such a nice size (it's 44 inches in diameter) and scale, I decided to hang onto it. I only recently decided that I wanted to add some color and pattern to the thick, rounded frame and napkins seemed to be a good choice! This is what it looked like at the time we closed on our house–pretty, but a bit boring.
Step 2: Choose your napkins & decoupage medium
I fell in love with these napkins at Paper Source and HIGHLY recommend that you check there first when looking for beautiful napkins. When I first started hunting for pretty napkins, I realized pretty quickly that a lot of napkins are a bit too traditional/old-fashioned for my style. Fortunately, Paper Source had plenty of colorful and modern options.
As I mentioned above, I always use Mod Podge for my decoupage projects. I used Mod Podge Matte for this project.
Step 3: Clean your surface well
I gave my mirror a good cleaning before getting started. It had been in our attic, so it was pretty filthy. I also primed it with a multi-purpose primer to brighten up the white of the frame so that the colors of the napkins would show up as well as possible, but this step is completely optional and probably unnecessary for MOST surfaces.
Step 4: Decide on a layout (if necessary)
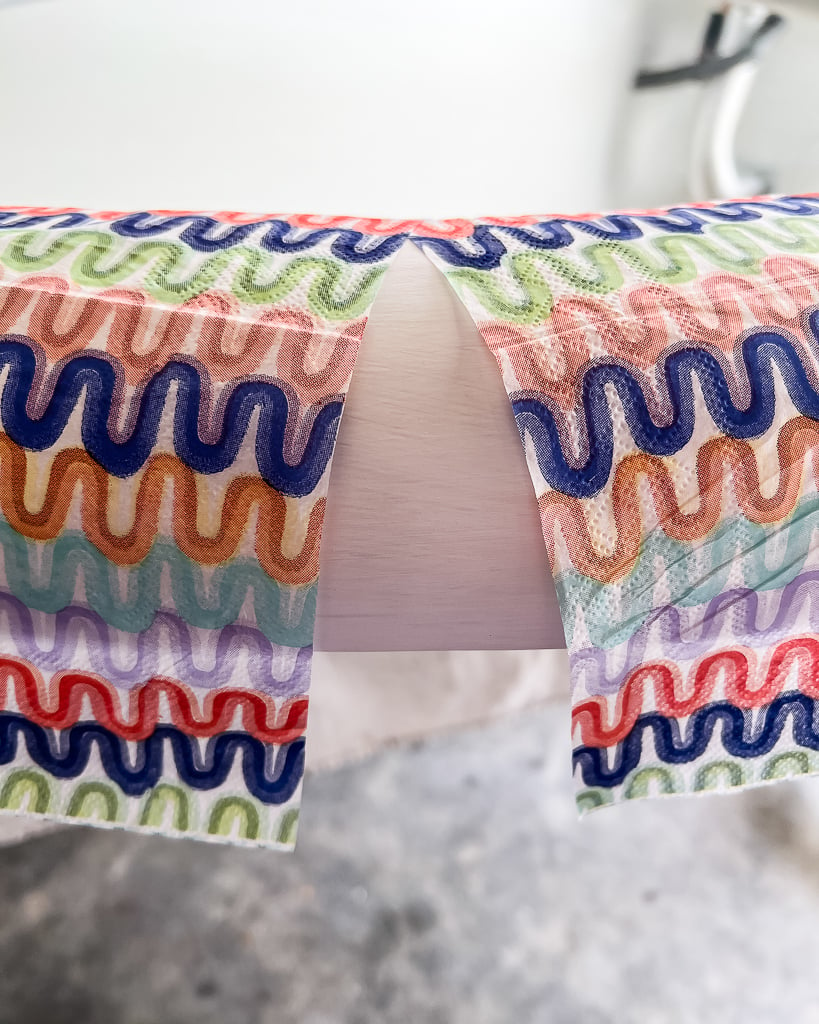
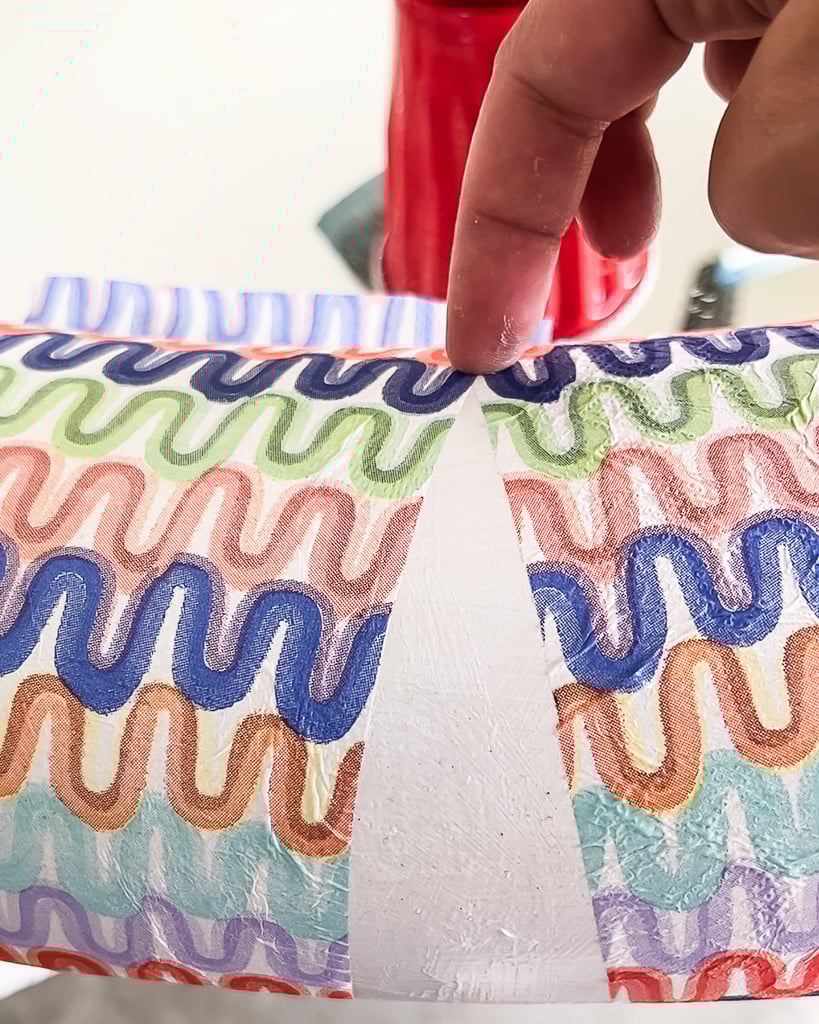
I have to admit that choosing a linear pattern to go on a round AND curved surface made this project more complicated and tricky than it should have been, lol. But I fell in love with the napkins so I was willing to put in the extra work. I figured out that if it would be best to match up the pattern on an angle. That way I would be able to fill in the blank triangles caused by using a square napkin on a curved surface by cutting out triangles to fit the blank spots (more on that later).
Bottom line…if you are working on any large surface (especially if it's curved or anything other than straight and flat), decide on your layout BEFORE you start decoupaging your napkins on.
Step 5: Separate your napkins
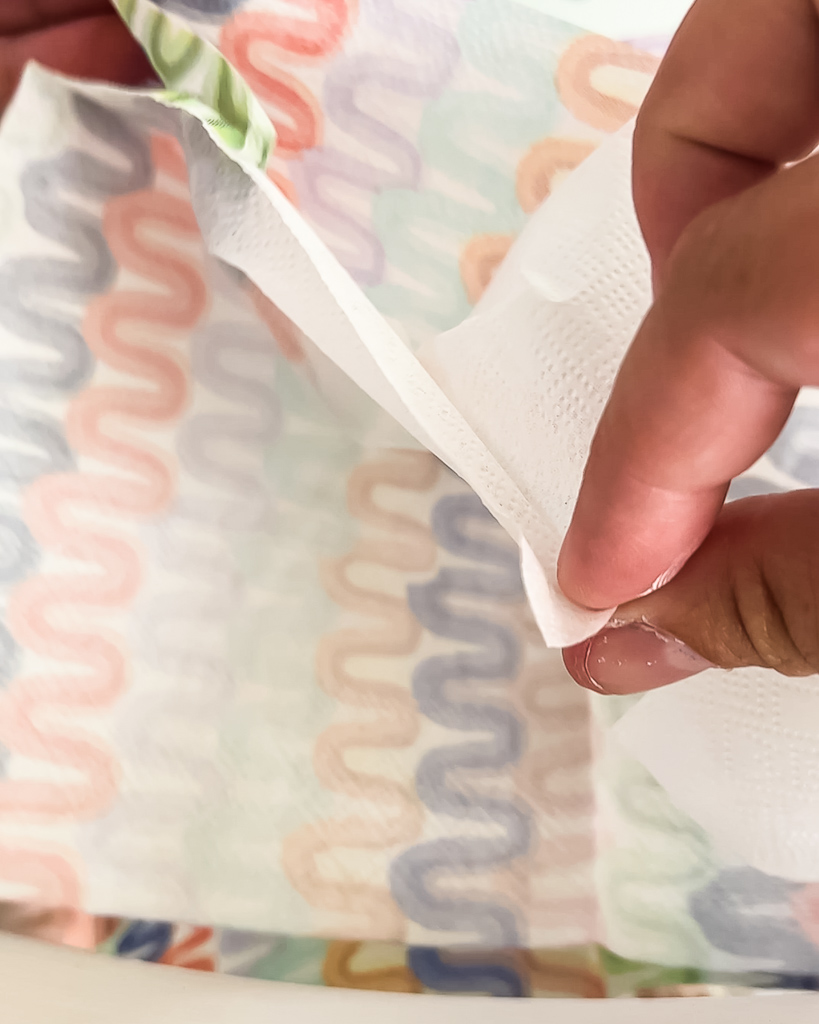
Separate your napkin layers before beginning. My napkins had 3 layers. Two plain white layers and 1 patterned layer. I peeled off each of the white layers until I was left with only the single-ply patterned layer. You can gently rub the layers together to separate them or use a piece of Scotch tape in one corner and pull if yours are being really stubborn.
Step 6: Time to decoupage!
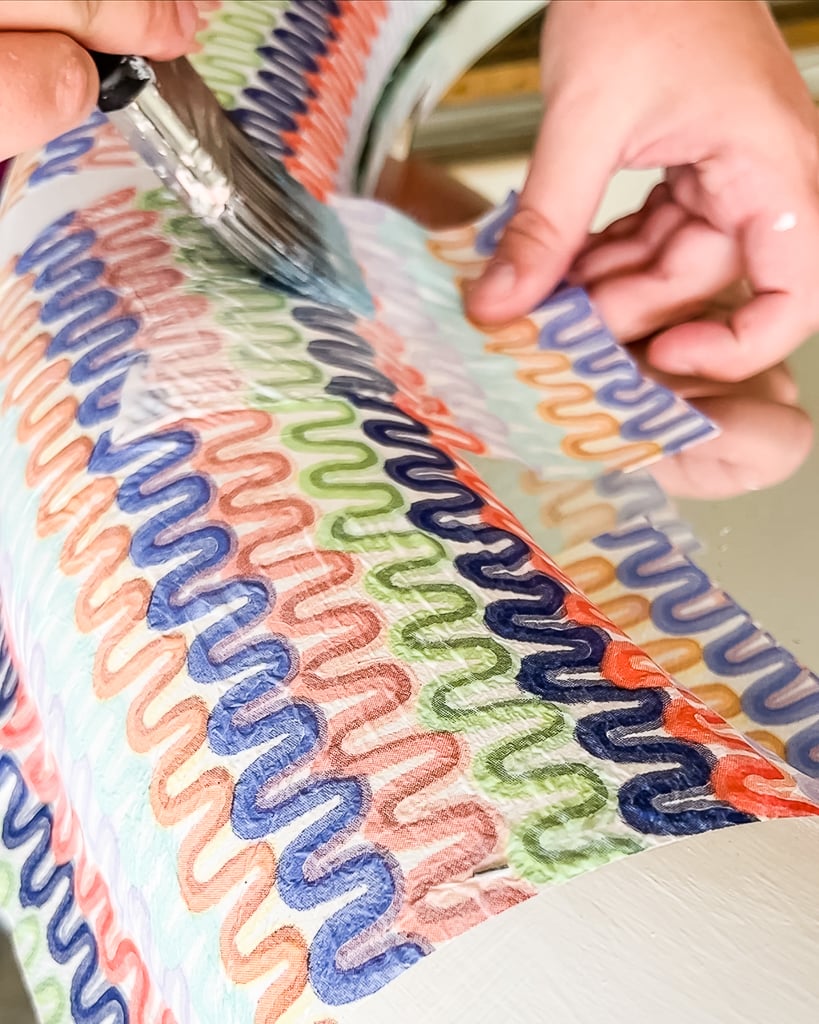
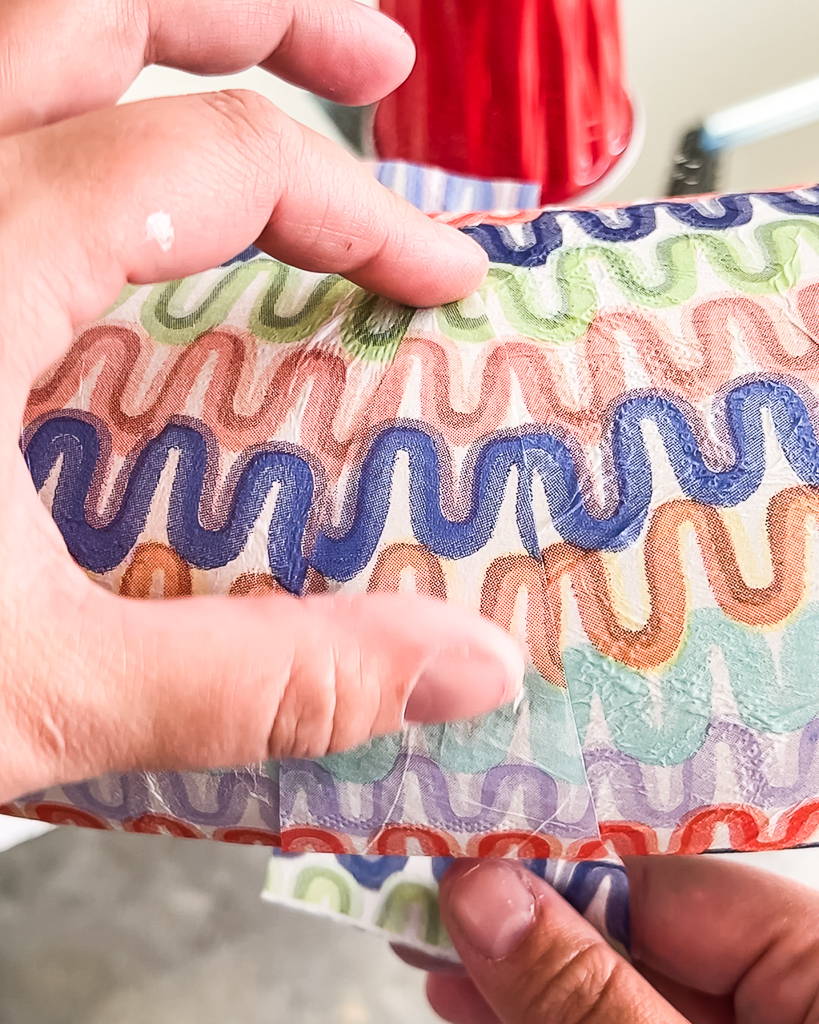
I personally found it much easier to place my napkin on the wood mirror frame and ONLY apply Mod Podge on top of the napkin. The alternative is to coat your surface with Mod Podge, then lay the napkin on it as smoothly as possible and then coat the top with Mod Podge. I tried it both ways. The reason I prefer only applying Mod Podge to the top is because it's much easier to place your napkin where you want it on a smooth, dry surface. If you place it on top of wet Mod Podge, it's VERY hard to reposition even slightly without ripping it. And because a napkin is soooooo thin, just applying Mod Podge to the top still allowed for plenty of adhesion.
The pressure of your brush as you apply the Mod Podge is important. Don’t make the pressure too light so that you have to go over the same spot multiple times–that will weaken and possibly tear your napkin. But don't be too rough because that may also tear the napkin. If you mess up, do NOT panic. While the Mod Podge is still wet, just use a damp cloth to scrub the ruined napkin off. It comes right off! I had to do this a few times and I STILL didn't use two full packs of napkins.
If you are working on a curved/rounded surface like me, you may want to make some relief cuts in your napkin to help accommodate the curve of your surface.
As I mentioned earlier, I was left with some blank spots created by placing a square napkin on a curved surface. No problem! I just cut out pieces of napkin in the same shape & size as those blank spots and filled them in.
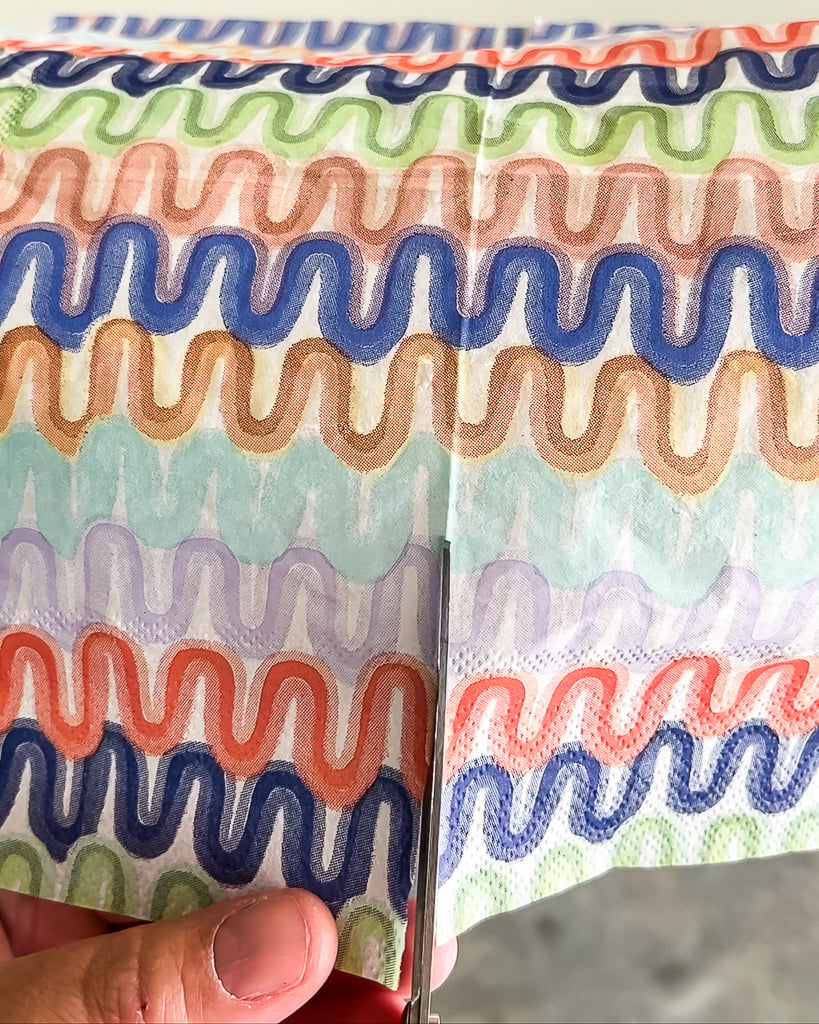
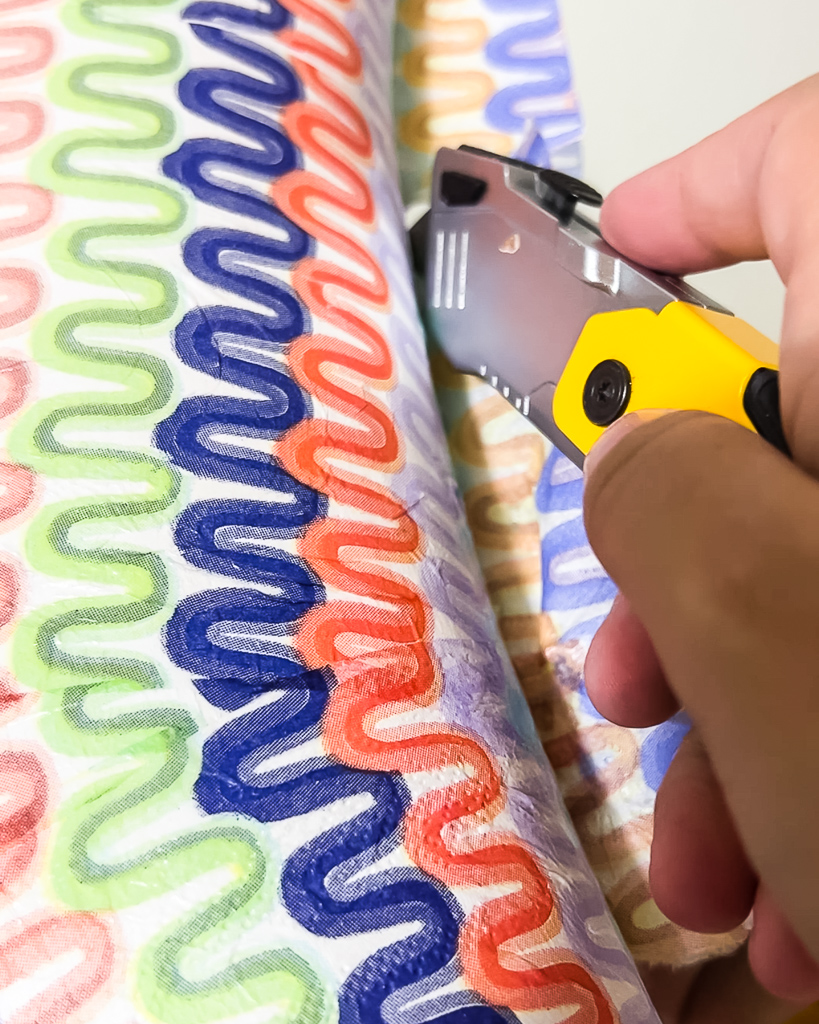
Step 7: Allow to fully dry/harden and then trim as needed
I wrapped the outer edges of my mirror with the decoupage napkins, which game me a nice finished edge. But the inner edges were another story. I had a lot of excess napkin material to trim off. If you have excess material to trim, be sure to let your Mod Podge fully dry and harden before trimming it off. Otherwise, you will just rip the still damp napkins (ask me how I know). I let mine dry overnight and then used a utility knife to trim the inner edges. Then to give it an even cleaner finish, I caulked the gap between the frame and mirror.

Step 8: Sand/seal if needed
For some projects, you may want to sand and seal your project at the end. But since my mirror hangs on the wall and won't really be touched or come into contact with water, I didn't do either. Just keep in mind that Mod Podge is not waterproof (it is water-resistant). It’s also not highly heat resistant. So if you need a sealer to combat either of those issues depending on how you will use your project, do it :)
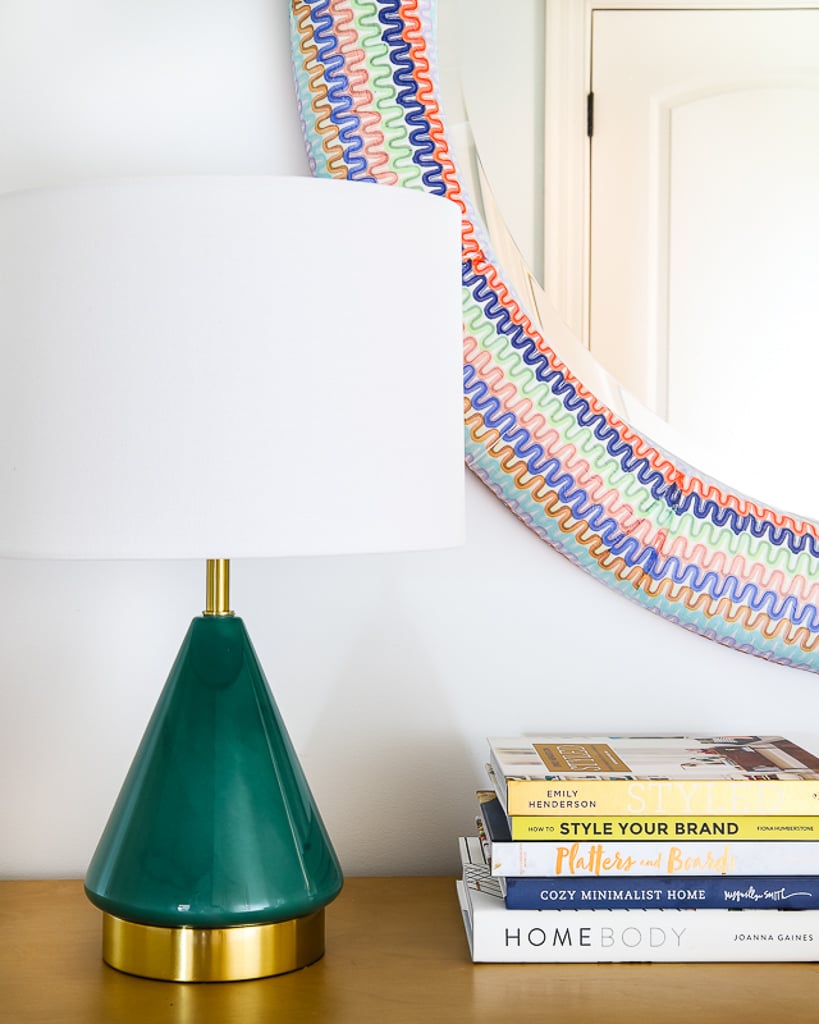
And that's it! Check out how my mirror turned out. It's so unique and colorful–I love it!!!!
What do you think?! Are you going to decoupage napkins sometime soon?! If you love this idea and want to save the tutorial, be sure to save it to Pinterest :)
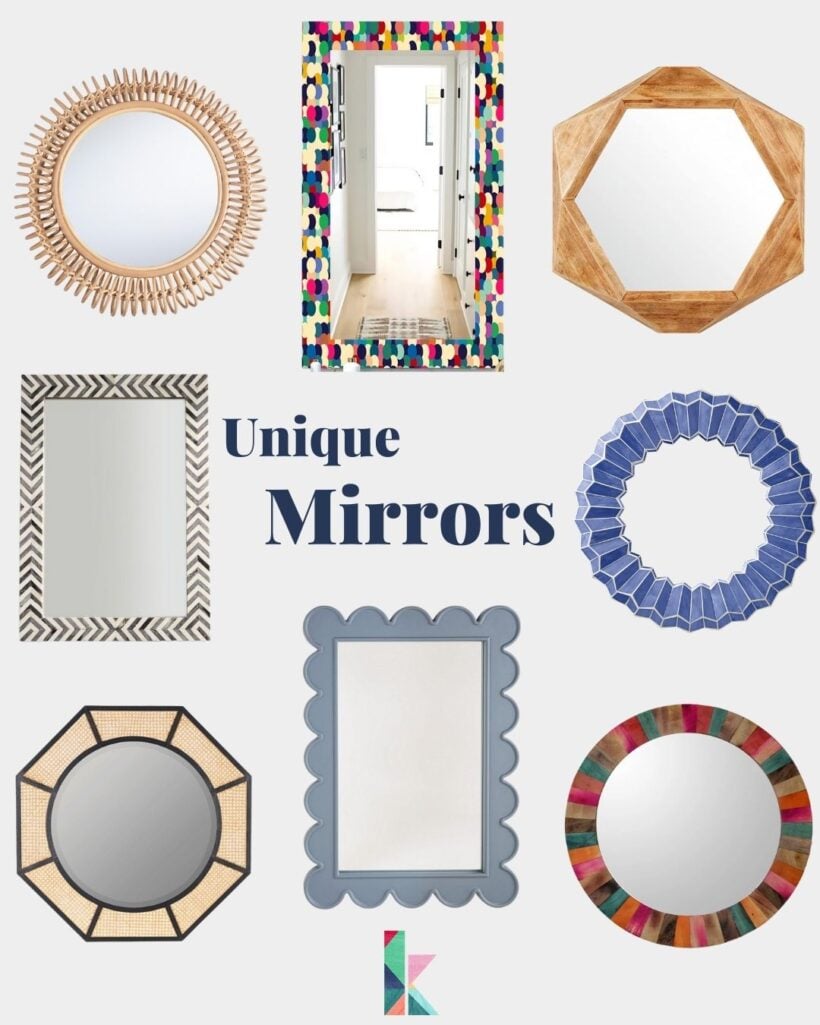
And if you love the idea of a statement mirror but don't want to make one yourself, check out my favorite unique mirror options. Scroll and click on any product image for full details.
Scroll and click on any product image for full product details

Click on the image for links to everything
Other posts you may enjoy:
- 16 Gallery Wall Ideas (and Tips) To Inspire You
- How to Decorate With Color Even When It Scares You
- Unique Family Photo Gallery Wall
- 20+ Creative Decoupage Ideas Anyone Can Do
- 5 Room Updates for Under $100 (Some are FREE!)
- DIY Photo Canvas Prints With Authentic Texture
- How to Make Any Wallpaper Removable & Renter-Friendly
Wondering how I approach transforming rooms and spaces in our home? Check out Designer in a Binder®.

And if you want exclusive content and behind-the-scenes sneak peeks, be sure to subscribe before you head out!

Last Updated on October 12, 2022