The Easiest DIY Concrete Vanity & Sink (No Forms or Heavy Lifting)
Love the look of concrete bathroom vanities but don't want to have to build custom forms and lift all that weight? This is the easiest DIY concrete vanity top and it costs less than $50. Plus, no forms or heavy-lifting are required!
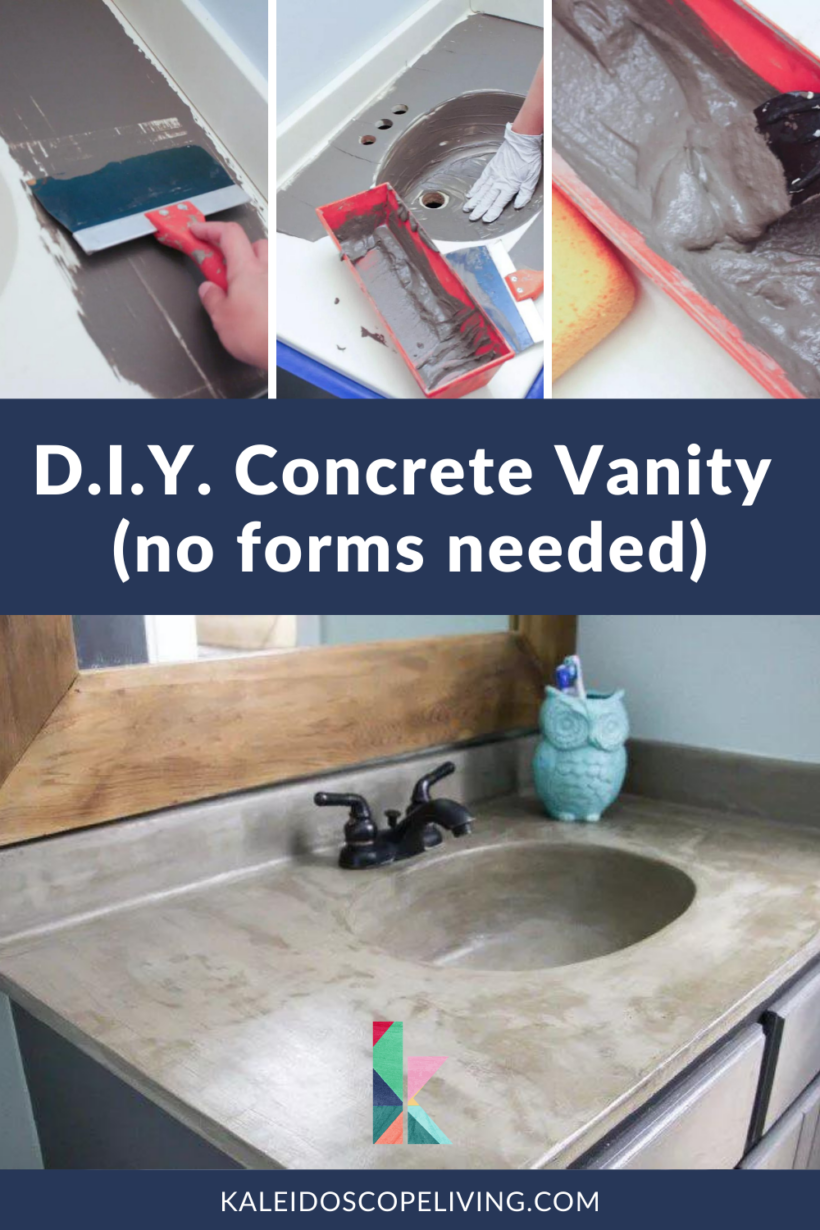
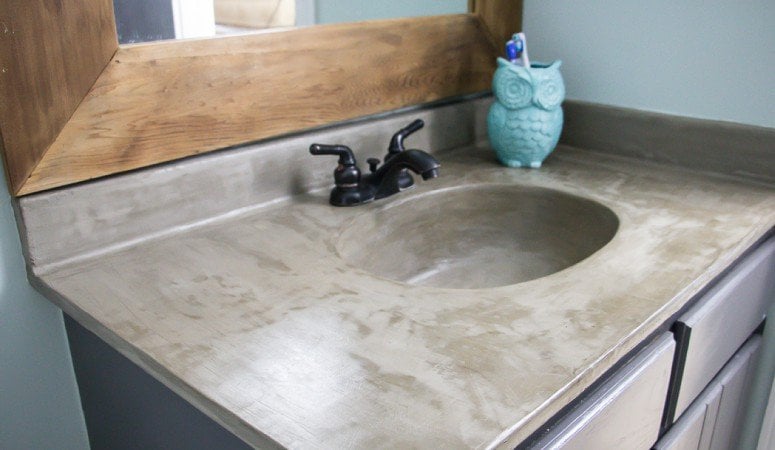
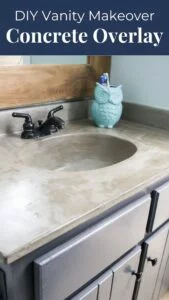
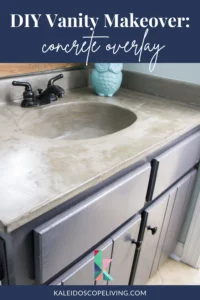
Do you have outdated bathroom vanities that need an update on a budget? And do you love the look of concrete vanity tops but are nervous about building custom forms to pour a concrete vanity AND then having to lift it?! I mean, let's face it, even a small concrete vanity top is HEAVY! Well, you are in luck because I am here to show you all the details of my DIY vanity makeover using an inexpensive concrete overlay to create a gorgeous “faux” concrete vanity top.
I originally completed this post in 2014 but updated it in 2019 shortly after we completed a full renovation of this powder room. It held up BEAUTIFULLY for 5+ years y'all!
The bathrooms in our old house were full of cultured marble countertops with integral sinks that were quite popular in the early 80’s. Not my favorite look. It was not in our budget to replace the vanity top the powder room so I had to get creative. We had successfully created our own DIY concrete fireplace and loved the results. So we took a risk and decided to attempt to use the same DIY concrete overlay method to create a “faux” concrete sink and vanity top for our powder room vanity. IT WORKED! Now, read on to learn how you can do it, too!
You can even watch the short video below to see an update on how it's holding up!
This post contains some affiliate links for your convenience. Click here to read my full disclosure policy.
DIY “Faux” Concrete Vanity Top & Sink Tutorial
Materials Needed
- Ardex Feather Finish or Henry's Feather Finish
- 14 inch drywall tray
- 6 inch metal Drywall knife
- 2 inch putty knife
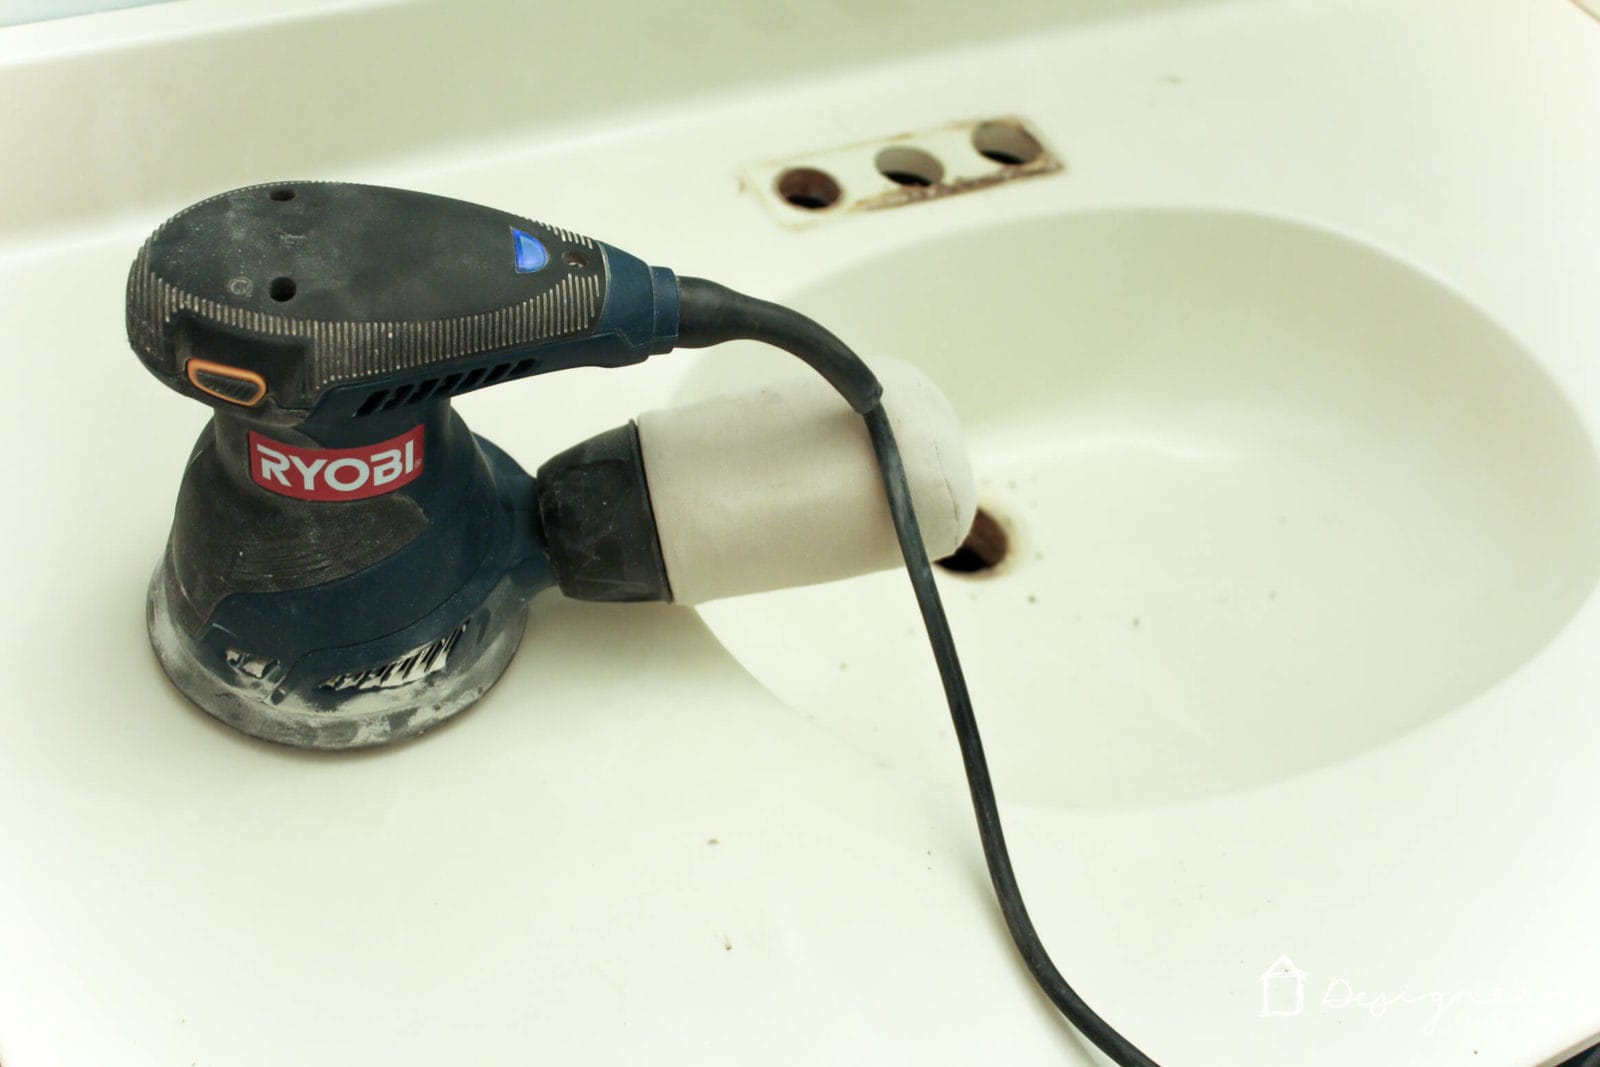
- An electric sander (makes some of the sanding work easier, but you CAN sand by hand if you don’t have an electric sander. This is the sander we have: Ryobi Random Orbit Sander)
- Latex gloves
- Acrylic concrete sealer (this is the exact sealer we used: Quikrete 873002 Concrete Cure And Seal Satin Finish)
- 150 and 220 grit sandpaper
- A large sponge
NOTE: We also painted the vanity cabinet for a quick update. We used the same process and paint as we did when we painted our kitchen cabinets, which you can read all about here. This is another method I have used to paint cabinets, which also works brilliantly!
Step-by-Step Tutorial
Time needed: 2 hours and 30 minutes
This entire project only took me about 2 1/2 hours (excluding drying time). It's quick and easy!
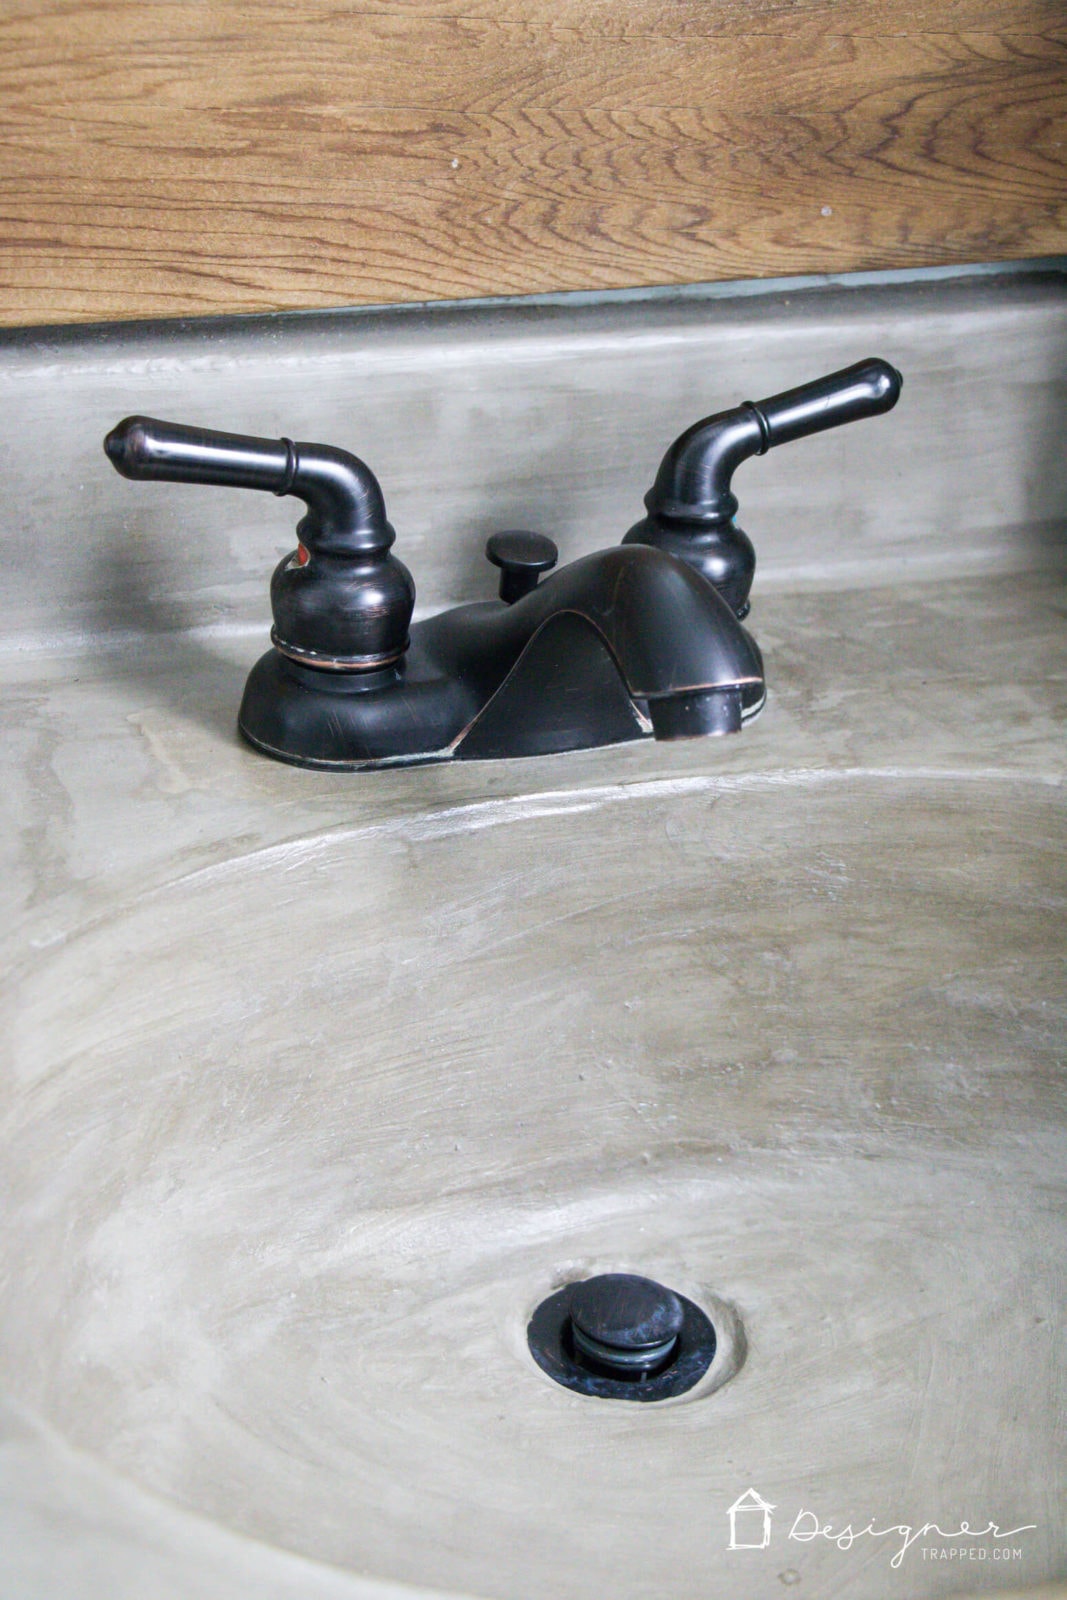
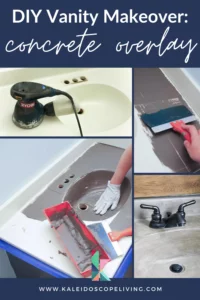
- Remove your old faucet.
Start by removing your old faucet. And if you plan to replace your drain stopper, remove your drain stopper as well. If you plan to use the same drain stopper, leave it in place.
- Scuff sand your countertop and sink.
Sand your countertop and sink. This will dull the finish of the cultured marble and make it easier for the concrete to adhere. This step shouldn't take long. You aren't trying to sand all the shine off of the surface–you just need to make scuff marks all over the surface.

- Install your drain stopper.
If you plan to replace your faucet and drain stopper, now is the time to install the drain stopper (don't put the new faucet on yet).
Note that we originally completed this project without the drain stopper in place, but about a year later we wound up with some discoloration around the drain, presumably from water seeping in under it and darkening the concrete. We were able to fix it by removing the drain and a bit of concrete, placing the drain and then putting new concrete over the edge of the drain (you can see exactly how we fixed it here). Our fix worked like a charm, but the short version for you is that you need your drain stopper in place first. - Mix your concrete.
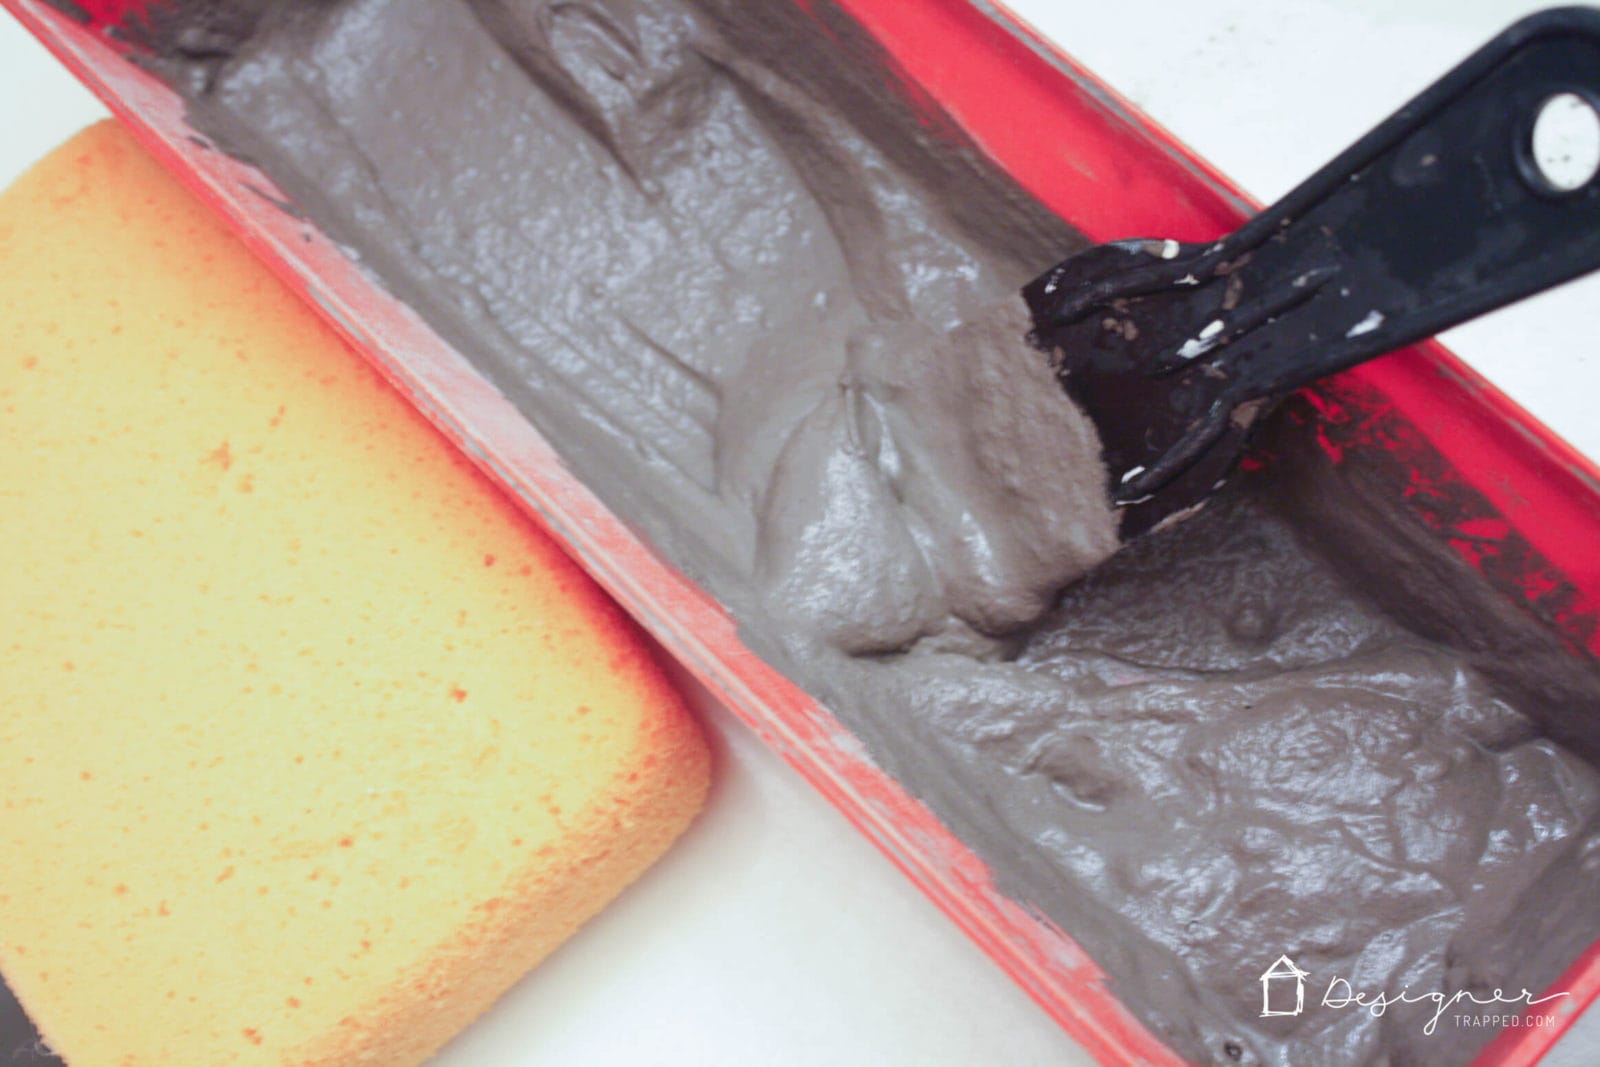
Now it's time to mix up your Feather Finish / concrete. Pour some of the dry mix into your drywall tray, add water and mix it with a small putty knife. You want to mix it to the consistency of thick pancake batter. After mixing it, let it sit for a few minutes and then mix it again. Now it is ready to work with.
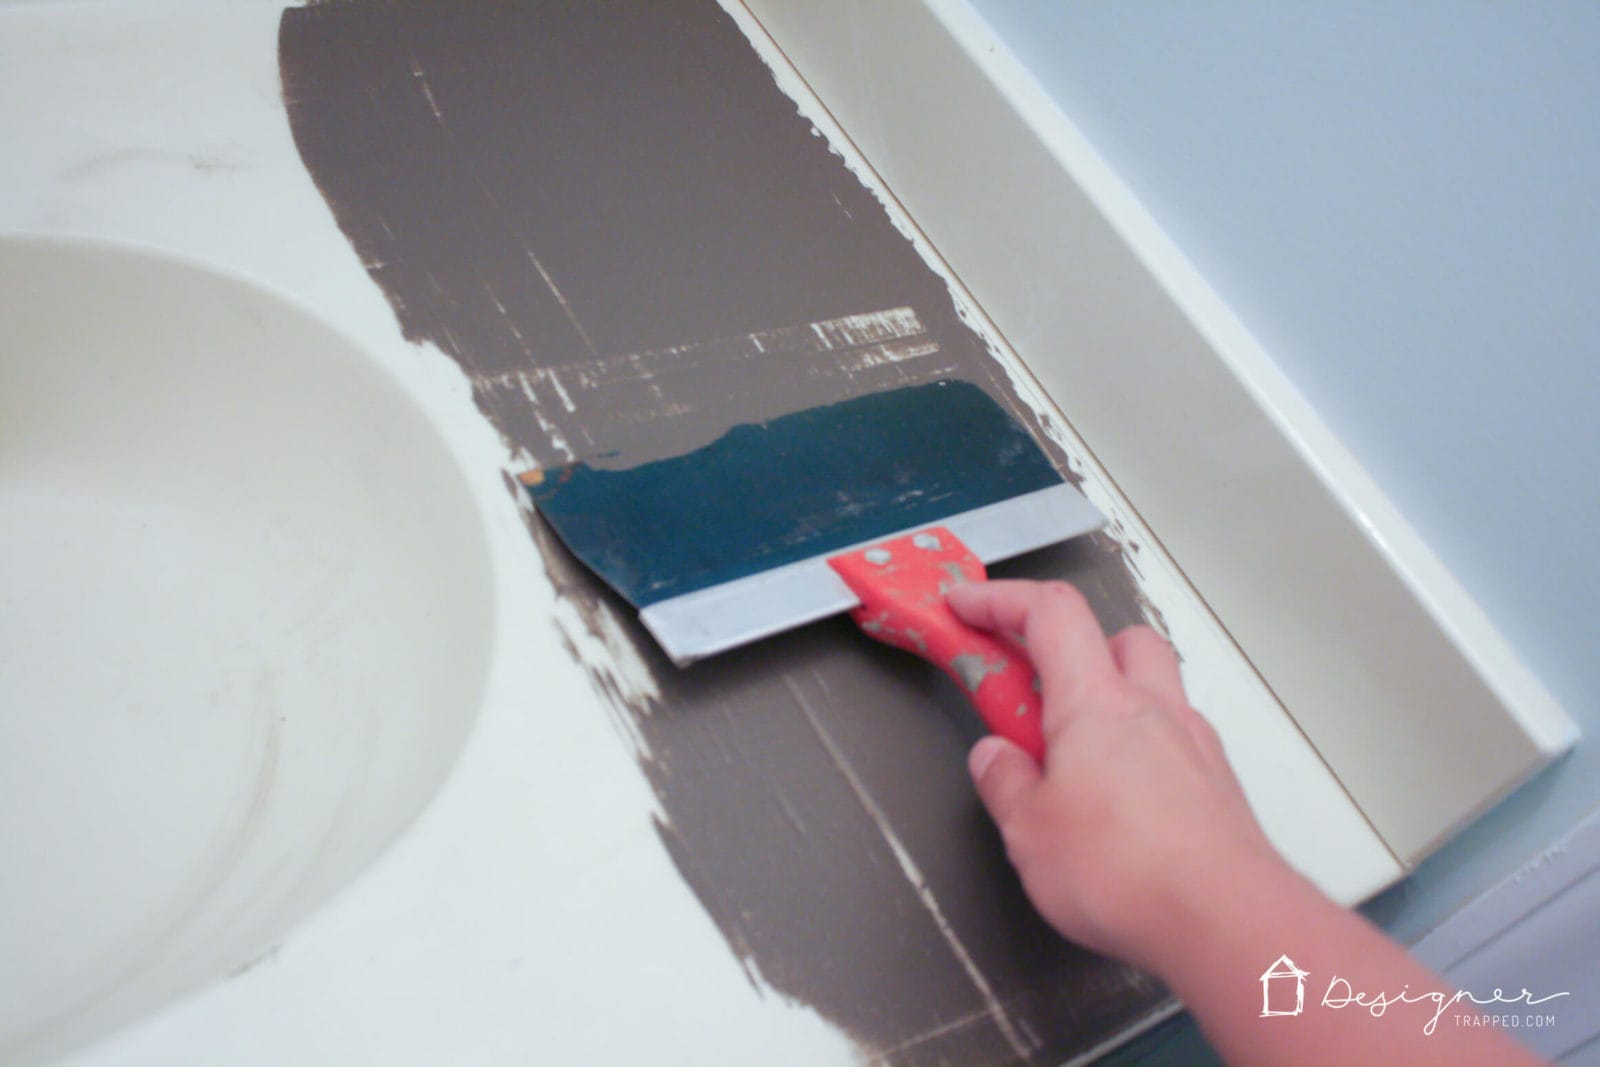
- Apply your first coat of concrete.
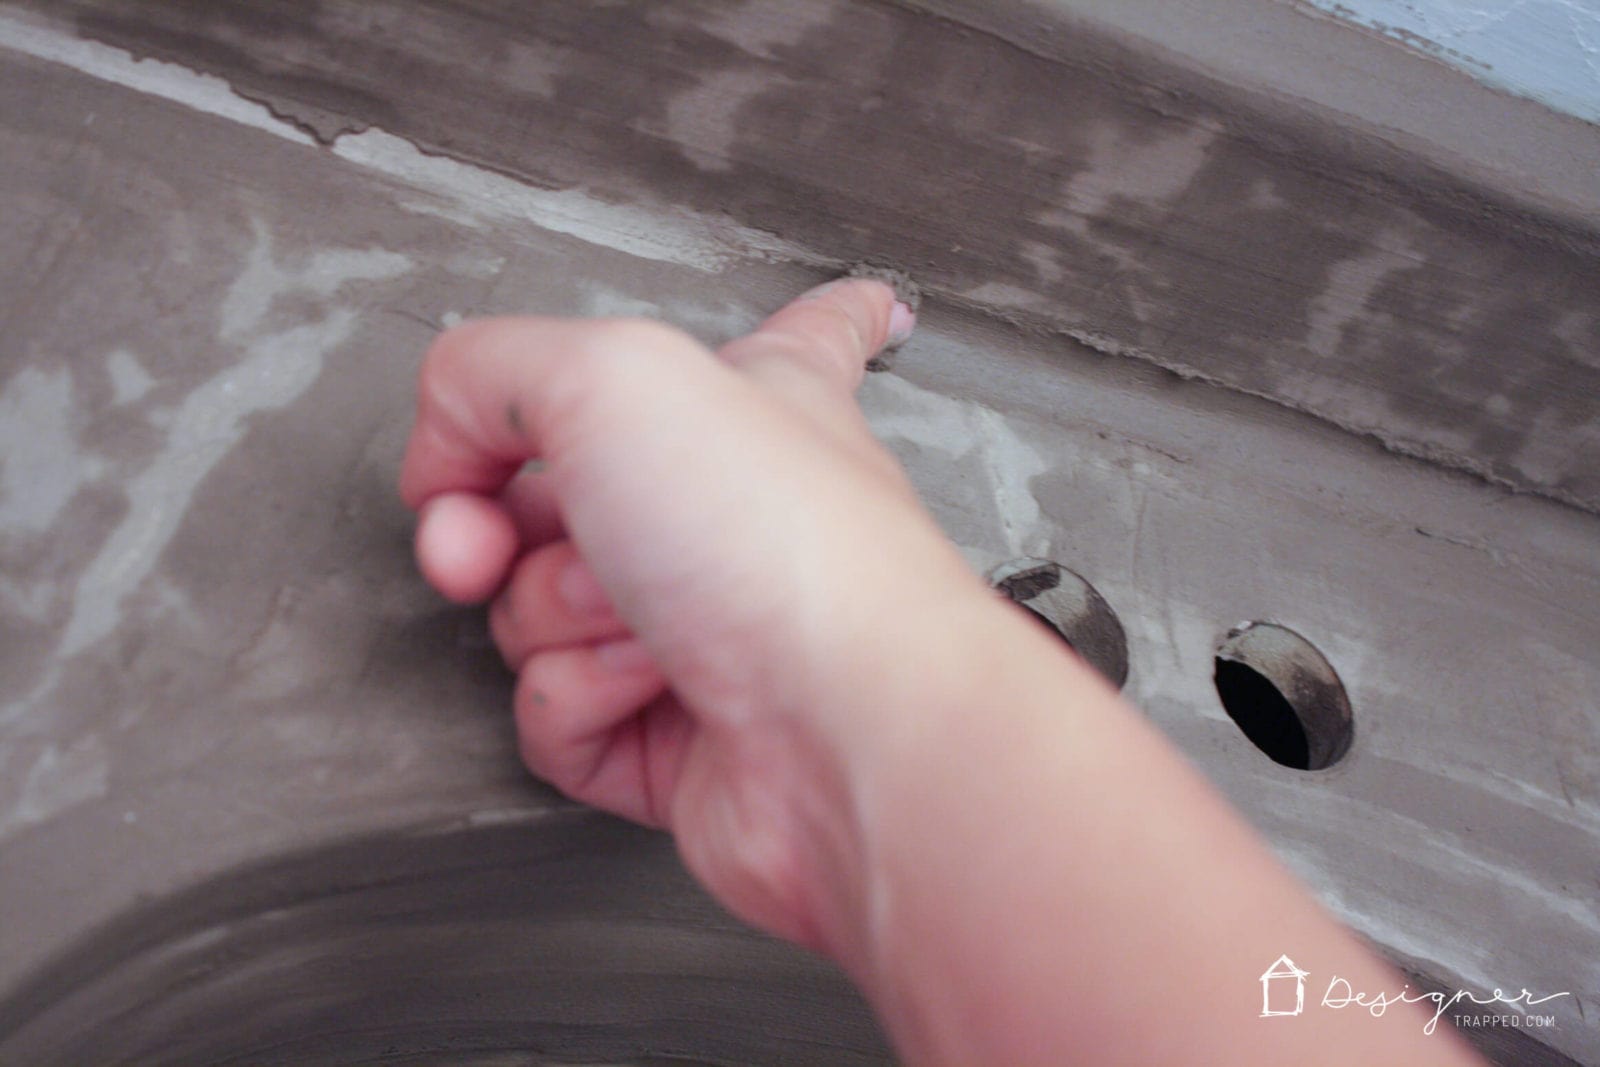
Apply your first coat of concrete to the entire cultured marble countertop and any backsplash. You want to apply a THIN coat–do not strive for full coverage on the first coat. It will look like a hot mess, but don't get nervous. I use my large drywall knife to apply it to most of the countertop surface and I use the smaller putty knife to apply it to the small backsplash piece. Use your fingers to apply it to the corners and top of the edges. You may get some on your walls in the process. Don't worry, it wipes off fairly easily even after it dries.
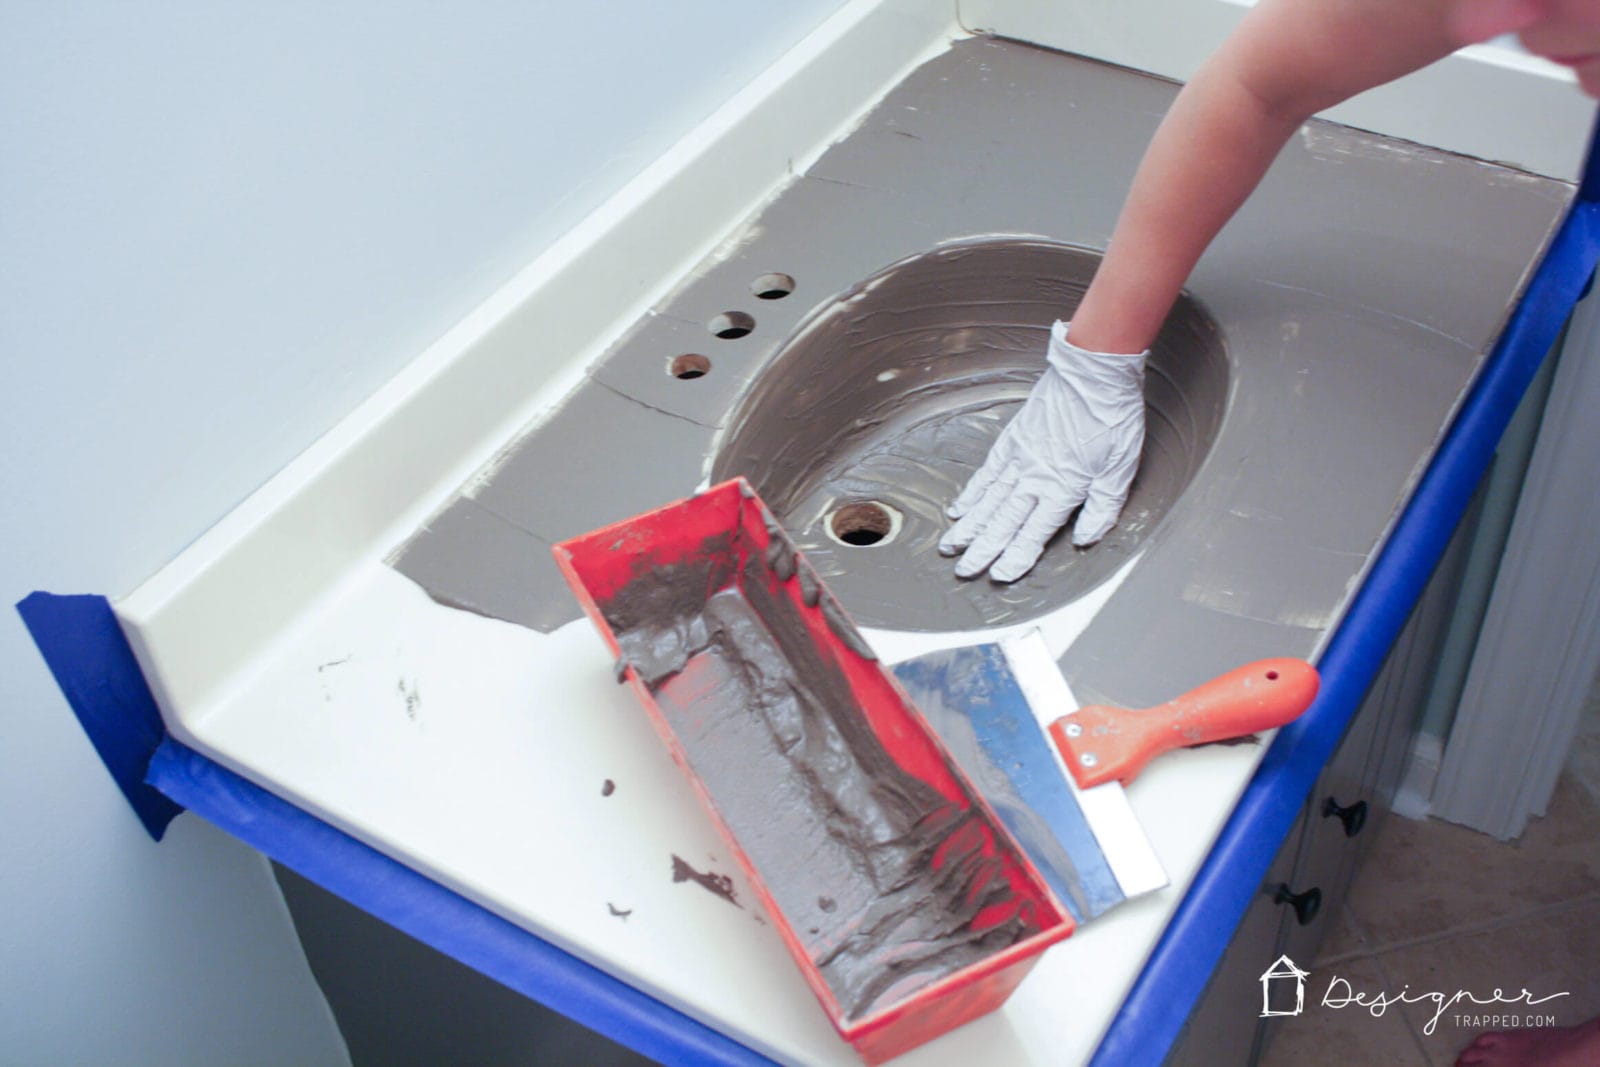
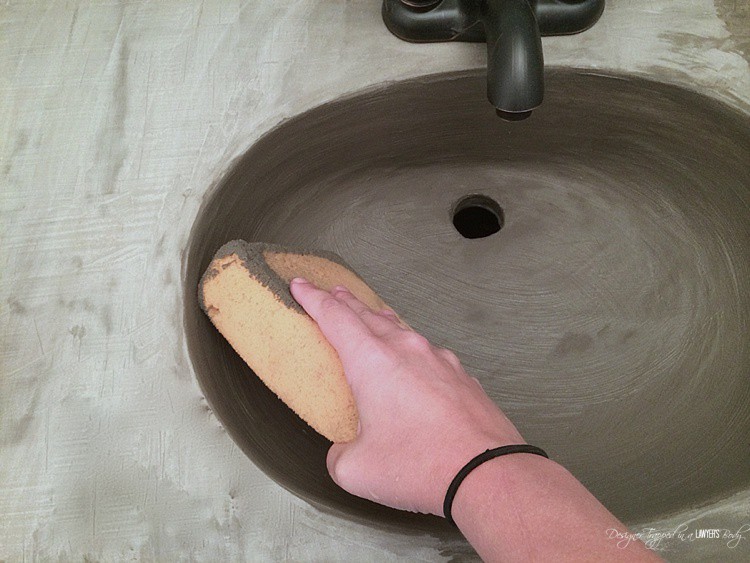
- Apply concrete to the sink basin.
Next, apply it to the sink basin. You have to do this with your fingers. You should protect your skin with gloves. Spread it around as best you can. Again, it will be messy and you will see finger marks. That's okay!
- Allow the first coat to dry.
Allow it to dry. It dries fairly quickly, but I allowed each coat to dry overnight because I was working on it at night anyway.
- Lightly sand.
Once it is dry, give it a light hand sanding. NOTE: If you applied your first coat too thickly and there are significant imperfections, you may be better off using an electric sander.
- Layer additional coats of concrete on until you are happy with the coverage.
Repeat steps 5 to 8 until you achieve the coverage you want. With these coats, you will really be able to get concrete in the corners and on any ledges, etc. because it will adhere to the first coat of concrete. I used my fingers to really get into the corners.
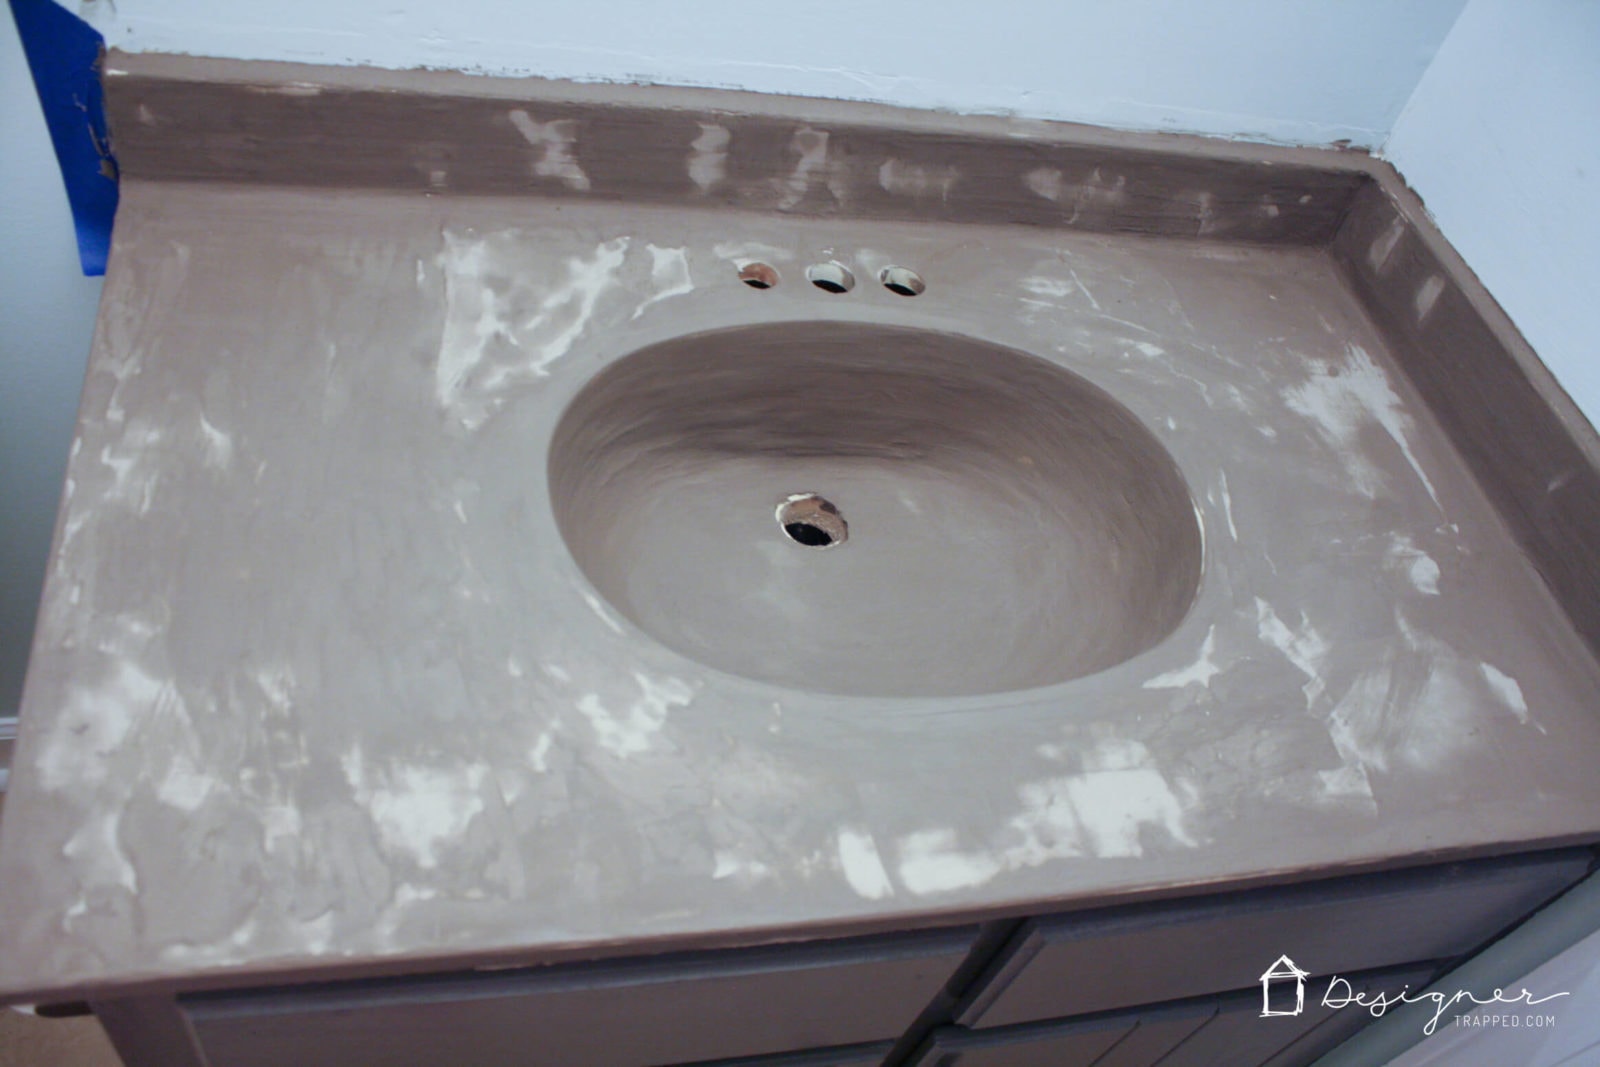
I was happy after 3 coats, but I am fairly experienced using this product since we used it on our DIY concrete fireplace and am able to apply it fairly smoothly. If you have more imperfections, you will probably require more coats to get it nice and smooth. The photo below shows you what the second coat looks like drying–a splotchy mess! DON'T PANIC! - Smooth out the concrete in the sink basin.
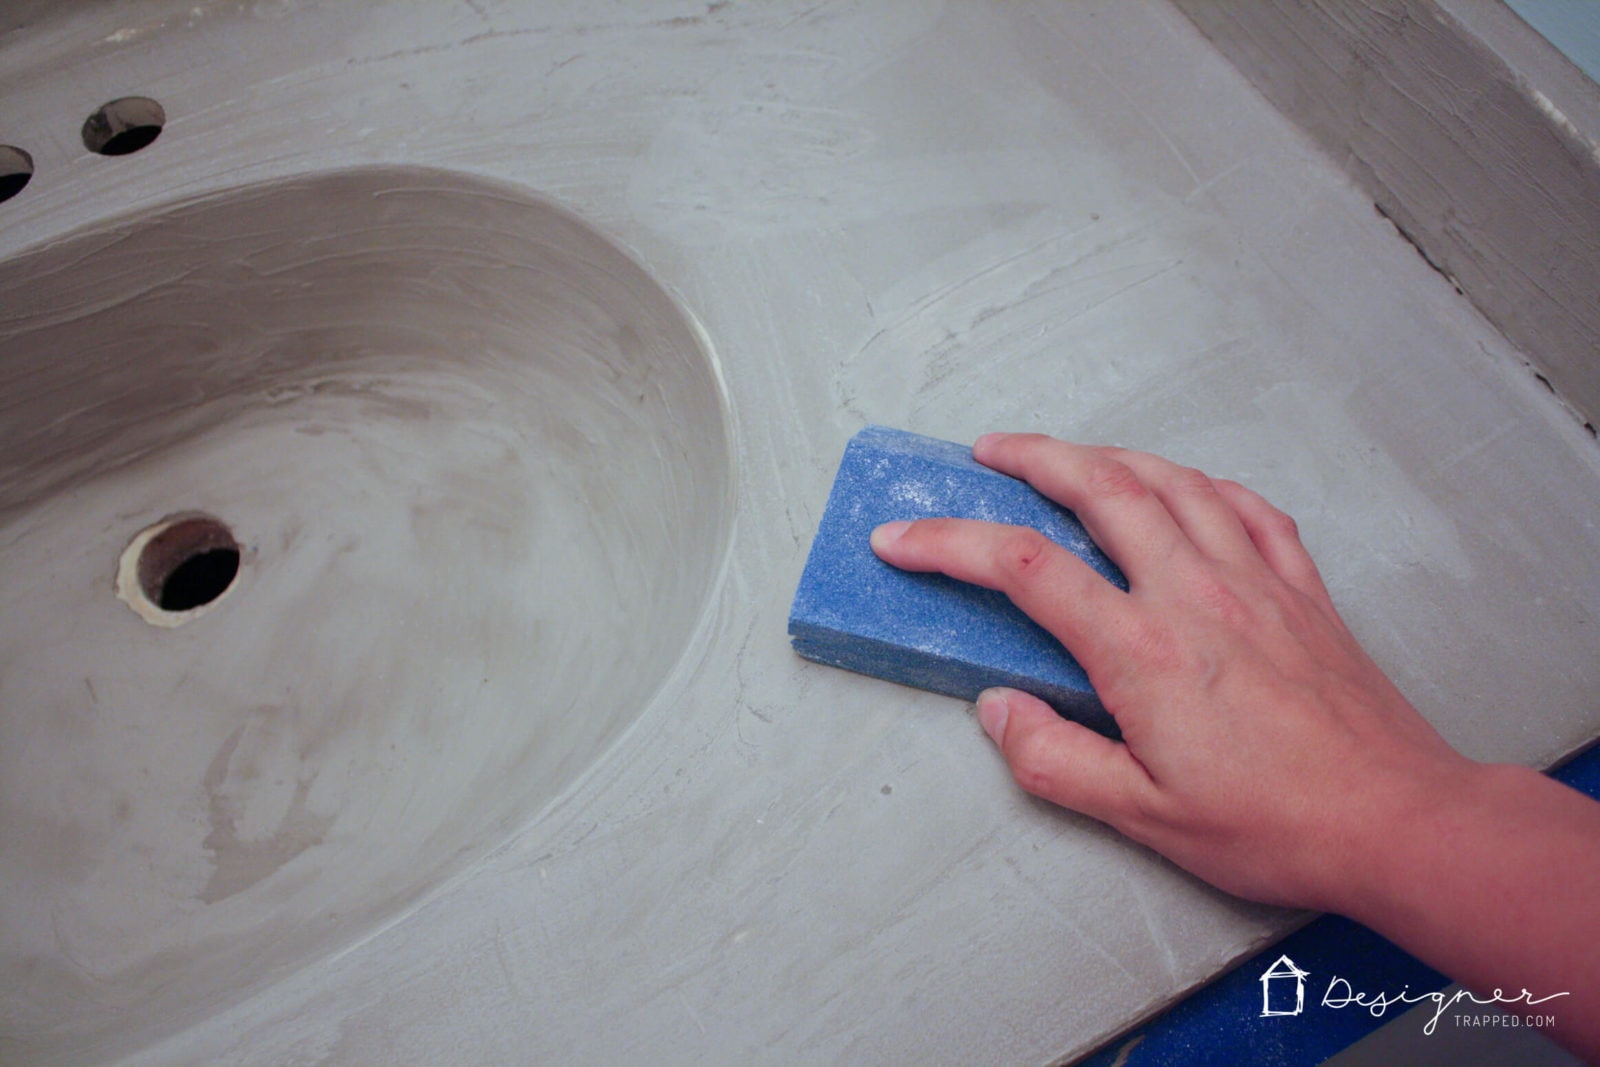
When you put your second and third coats in the sink basin, it helps to smooth the ridges left by your fingers out with a sponge AFTER the concrete has dried a little bit. You want it to be just firm enough to smooth out the ridges–if it is too wet, you will wind up wiping off the concrete, which you do not want. This requires a little bit of trial and error, but I would say as a rule of thumb, you can smooth it out with a sponge about 10 to 20 minutes after you have applied it. Again, as I mentioned in step 6, do not try to smooth out the first coat in the sink–it will wipe right off. Only do this with your second and third coats!

- Do a final sanding.
Once you are happy with the coverage, you will want to do a final sanding of the entire concrete vanity top. I do it by hand to ensure that I don't remove too much of the concrete, particularly on the edges and corners. But again, if you have significant imperfections, you may need to break out the electric sander.
- Apply a concrete sealer.
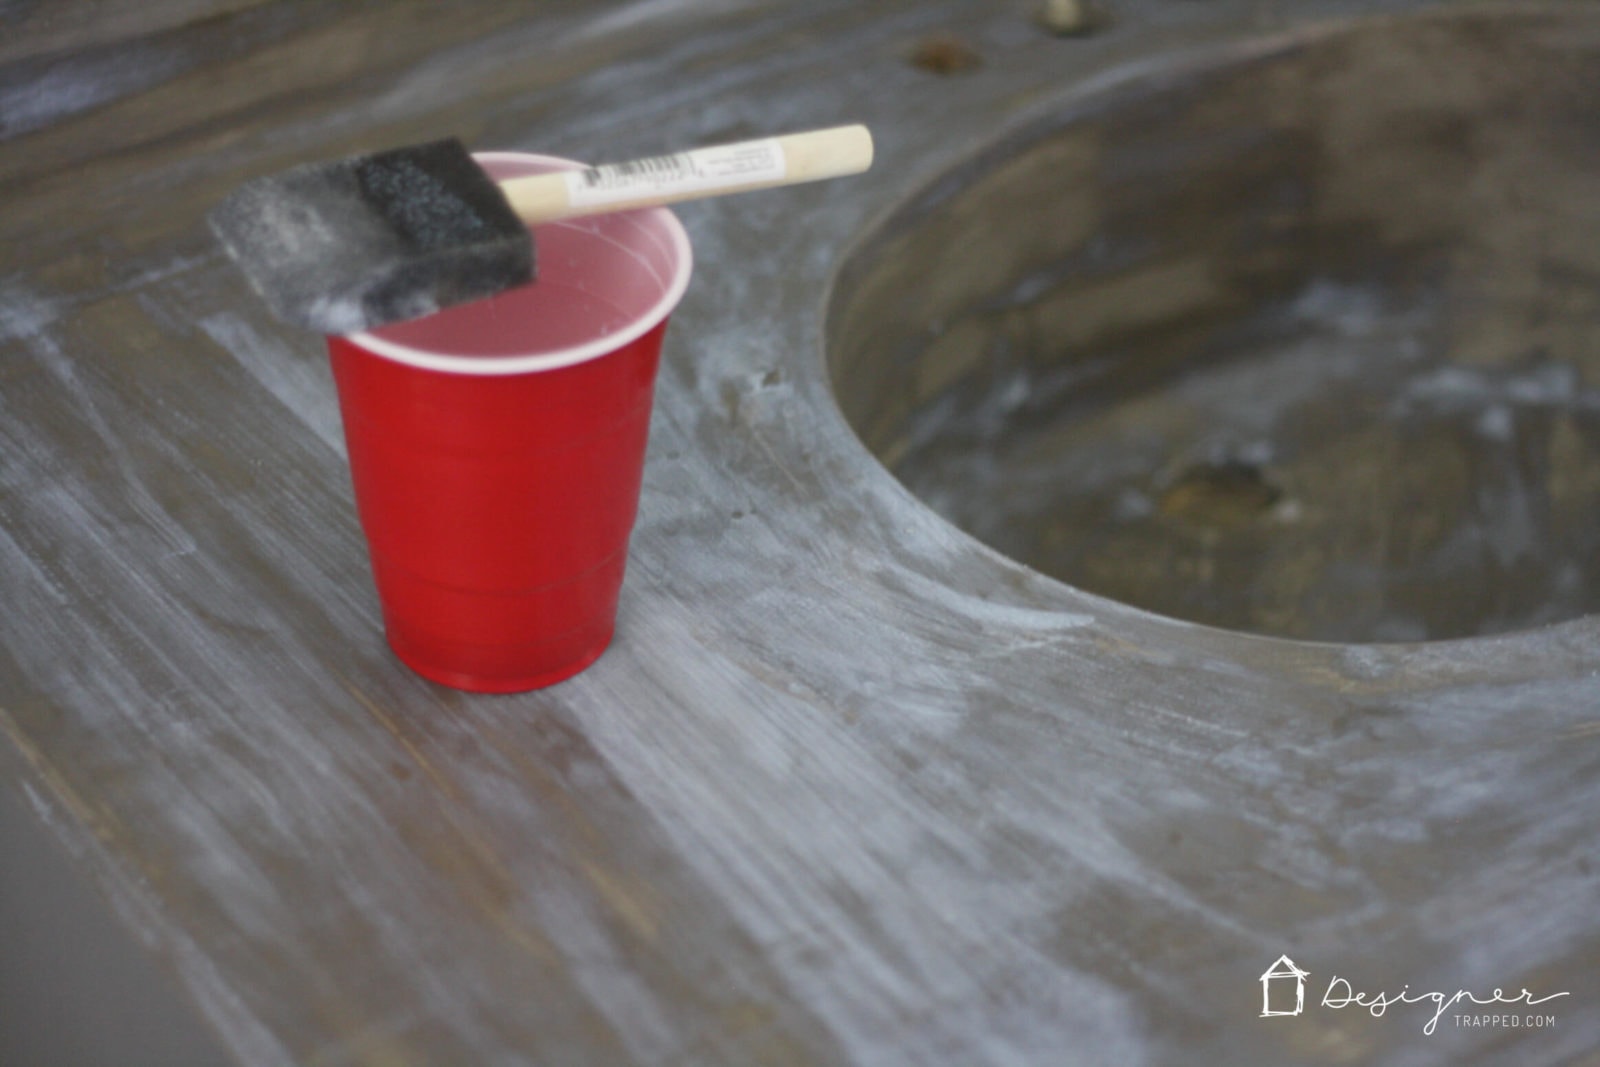
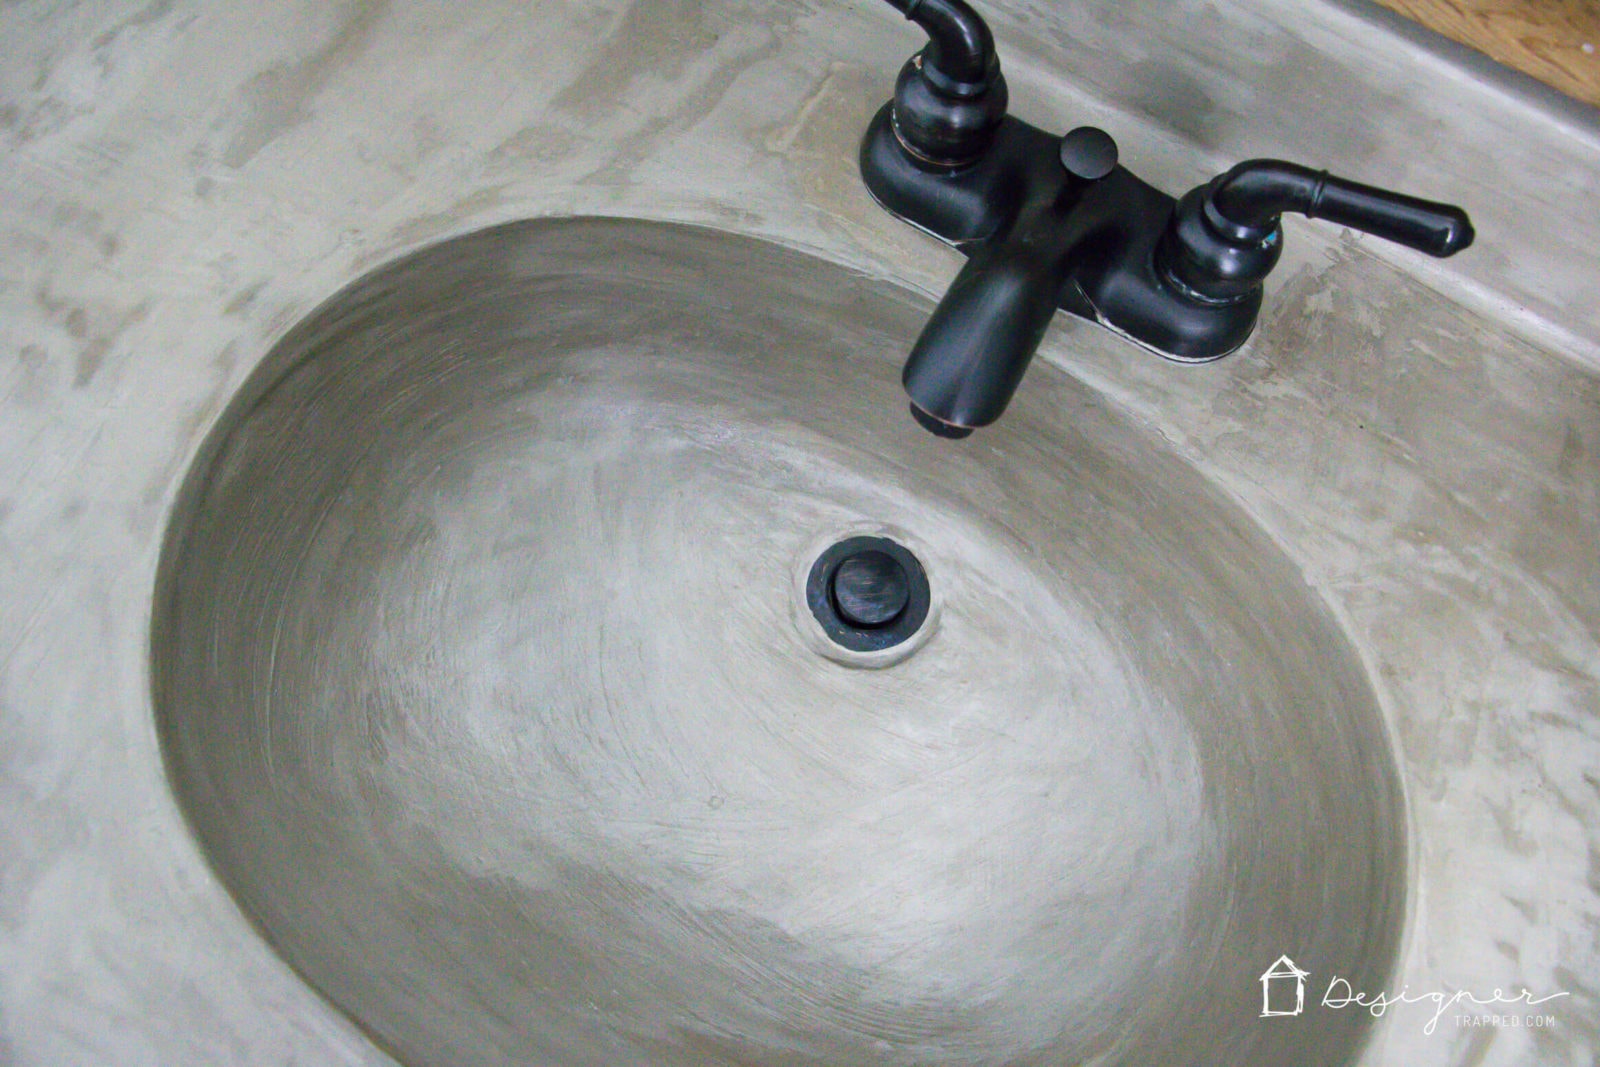
Your last step is to apply a sealer. I recommend using a water-based acrylic concrete sealer in satin finish {this is the exact sealer we used: Quikrete 873002 Concrete Cure And Seal Satin Finish). It gives your concrete a nice, smooth finish with a slight sheen. It also darkens the concrete up a bit, which I like. When you apply the sealer, it will have a milky appearance. Don't worry, it dries clear. Follow the directions carefully–do not apply the sealer too thick and/or leave puddles. Also be sure to smooth out any air bubbles. I applied two coats.
- Install your new faucet.
After the sealer dries, install your new faucet (or reinstall your old faucet). We found our awesome new faucet on Amazon for only $39, which is an amazing deal. You can find the exact faucet we purchased here.
Here's a look at how it turned out. We were THRILLED.
Time and Cost Involved
So, how long did it take me to complete this faux concrete sink and vanity top? Each coat/sanding cycle took me only about 30 minutes. Including the sealing step and removal and reinstallation of the faucet, this project took only about 2 1/2 hours (excluding drying time), spread out over several nights after work and getting my girls to bed.
The cost was very low, coming in well under $20.00. We purchased our Henry's Feather Finish at Home Depot for $16.00 for the box and used less than 1/4 of the contents. We already had the sealer leftover from when I used this same technique in our laundry room. And, since we are frequent DIYers, we had all of the other supplies on hand. Even if you had to purchase the sealer and some of the other supplies, you would still spend far less on this DIY vanity makeover than what you would spend on a completely new vanity or new countertop!
Frequently Asked Questions About This Project
This vanity held up beautifully the entire time we had it! We loved it from the time we completed it in 2014 right up until the day we demoed it in 2019 for our new powder room design. You can see the powder room renovation reveal here! You can also watch a video to see how it held up for yourself further up in this post.
Nope! Again, I recommend that you watch the video that is embedded right before the tutorial in this post to see for yourself :)
No regrets. A million, zillion times YES we would do this again! Y'all, this cost us around $20 and we love it! As I mentioned in the tutorial, I do wish we had left the drain stopper in place to begin with. But even if we hadn't fixed that issue, the slight discoloration around the drain would NOT prevent me from doing this again! So, so happy with this project!
This was such a common question, it's answered in the short video below.
No, I definitely wouldn't recommend this in a shower or tub. I just don't think the think concrete could withstand the weight of tons of water (in a tub) or being stood on repeatedly (in a shower).
Theoretically, yes. But getting the concrete overlay smooth in the sink basin would be particularly challenging.
Other posts you may enjoy:
- The Easy Way to Update Bathroom Tile Without Replacing It!
- 15 Affordable DIY Countertops That Will Blow Your Mind
- 25 Stunning Powder Room Makeovers
- Attley's Budget-Friendly Bathroom Renovation
- Avery's Budget-Friendly Bathroom Makeover
- Affordable Master Bathroom Remodel REVEAL
Wondering how I approach transforming rooms and spaces in our home? Check out Designer in a Binder®.

And if you want exclusive content and behind-the-scenes sneak peeks, be sure to subscribe before you head out!

Last Updated on May 8, 2025

What sandpaper grit is used on the electric sander when sanding the cultured marble? And what grit is used by hand to smooth the concrete in between? Thank you!
Hi Leanna- As far as the original surface goes you just need to scuff the surface so 150 grit should be fine. We treated the concrete like wood. When we had big ridges we used 150 grit sandpaper to knock them down and reapplied until we had a relatively smooth surface. Then we finished up with 220 grit.
Is there a way to remove this when you want to have something different?
New house and previous owners did this but did not seal/finish it properly so it’s not holding up as nicely.
Hi Brittany. I don’t know, but I think it would be difficult to remove the concrete overlay without damaging the countertops underneath.
You said it would be better to leave the drain in place…would you mask it off with painter’s tape? Or just wipe it off after every layer?
Hi Noah. I would just wipe it off after every layer :)
Hi Tasha,
Love your vanity! I want to do the same in my bathroom. I have a question about cracks. Do you know if concrete will stick to cracks that have been repaired with JB Weld? It dries solid, but I am afraid the concrete will not stick to it? Also, what do you suggest doing on edges that are contoured? Is there a way of squaring them out with the concrete or before? Thank you for your time,
Michelle
Hi Michelle. We did not have any cracks and I’m not sure how you would go about squaring contoured edges. Sorry!
Very cool project! Thank you for sharing. I’m thinking of doing this for a bar top using a cheap counter top underneath. I don’t have anything yet, so can’t say exactly what material I’d use. Any thoughts or recommendations for something like this?
Thanks in Advance!
Hi Melissa. Thank you. Yes, we have created a countertop for a bar by applying this product over plywood. You can really apply it to any stable substrate (laminate, plywood, MDF, etc.). You cannot put it on top of anything that flexes or bends or is cracked (such as a tile countertop that has cracks or missing grout). I hope that helps.
Do you know if you can dye this concrete? Thinking I want to try on kitchen countertops but want really dark stone type color
I believe you can add pigment to the mix, but we have never tried it.
I love this! Wondering if it would have the same effect in the kitchen and if you would go over a stainless sink or around it?
The owners of the house previously did this and did not seal the vanities. I am trying to now find ways to get the concrete off and start over. How would I do that? I am trying to sand and it’s a mess. Any product you recommend I can use? Please help
danimeshell@gmail.com
I have no idea, but my guess is that you will need to chisel it off, which may be difficult without damaging the countertop surface. Sorry I can’t help more!
Do you think this could be done to a porcelain kitchen sink?
I wouldn’t recommend it in a kitchen sink.
Hello, curious to know about concrete smell?
It smells a bit earthy when it’s wet, but after it dries there’s no smell at all.
I meant how did you frame your mirror
Hi Janice! You can find the tutorial for the mirror frame (with that fun concrete accent on it) here: https://designertrapped.com/reclaimed-wood-mirror/
How did you frame the motor, everything loooks great!!
Hi, do you know if you can add a tint to the concrete overlay? I am wanting to do a different color. If so, any ideas what product/tint is good & where to find it?
Thank you!
I personally have never added any color to concrete so I cannot speak to the best way to do it. I would try googling tutorials for that! Thanks for reading!
Could I do this to my bathtub?
I don’t recommend this for a bathtub. I don’t know how it would react to water pressure that hard over time. Also it may be scratchy in spots!
Hi there! I am writing a post right now about my plans to remodel my master bath and I am linking to your post as an idea I may use during my remodel. Thanks so much for the wonderful tutorial!
Awesome Sara! Good luck with your remodel! Thanks for reading.
Amazing! We moved into a house that has granite, but I really hate the pattern and color they chose. Do you think concrete would adhere to granite?
You can as long as the granite is not cracked or chipped!
how does the finish do when water is left in it – even droplets or the little bit that pools around the drain when you wash your hands?
Our’s has been fine. It is in our powder room bathroom, so it doesn’t get as much traffic as our other two bathrooms!
I formica countertops will this work on them?
Yes, it works wonderfully on laminate counters. We use this over the laminate counters in our laundry room. You can check it out here: https://designertrapped.com/2013/10/the-laundry-room-reveal.html
Is there a way to add a color to the concrete? I was thinking a little purple?
I have heard of people adding powder dye and of staining it. I have never tried either. Good luck!
How was the faucet held up? I’ve read some mixed reviews on Amazon when I was looking to order one from the same brand.
It has held up great, but bear in mind it is in the powder room so probably the least used faucet in the house.
Love it. Will it work with a mobile home plastic sink?
I think a plastic sink would be way too flexible. Sorry!
,We just did our bathroom and are so excited abt this! Thanks for sharing! Can you give me your thoughts on something though? Before sealing it, the counter and sink looked all the same color but after sealing it, there are several large places in the sink area that are much darker, like it looks like those places are wet, but we allowed it all to dry thoroughly. So, my question is this, can I apply another thin layer over the sink to even out the color even though we’ve already sealed it? Wasn’t sure if you could concrete over sealer?
Yes! I did that when we correct the drain issue.
What is the color? It looks gray in one photo. but look tan or brownish in another photo (and in the video)
It is the grey of concrete. I didn’t stain or dye it. Hope that helps!
What if your sink is not one piece like yours? Do you think it would still work if the sink is glued to the counter?
You could just do the counters around the sink and that would be my recommendation if you can live with the sink. I feel like it may look weird to do the whole thing. Thanks for reading and good luck!
My wife and I did this to our main floor bathroom, and it looks awesome. We are now finishing up a much larger counter on an upstairs bathroom, and now that we “know what we’re doing,” it’s looking even better.
One more bathroom counter to go after we’re done. We have so much Feather Finish left in the box I may have to find more things to put concrete on.
Hide the dogs.
Hahahaha that is awesome Jim! So glad it is going well. Thanks for reading!
Did this technique hold up well in high traffic bathrooms? Trying to find less expensive options to replace pink cultured marble.
Thanks!
Gorgeous, love the look.
Thanks Michelle and thanks for reading!
This looks like a possible answer to my vanity color problem. Is it possible to add concrete color to it?
Thank you for posting!
I never have, I really like the grey. But I have heard of people adding the color powder to it! Good luck!
Redoing old farm house on a budget , really like your concrete counter top make over . Think I’ll try it . Will send pictures . Don’t be surprised if contact you with questions . Thanks for the inspiration , Jimmy
Good luck Jimmy!!!
I have a sink very similar to yours, with vanity. Only I have another base next to it that I use as a cabinet. I have a glass on top. Do you think I could carry on with the concrete to the cabinet with the wood top.? Have you ever tried this on wood? Sure would be nice not to have to take off that heavy glass to clean under it. Yes it does get dirty between the glass & wood. The other thing is,the wood is painted with a latex paint. Happy Monday. I really liked your demonstration.
As long as the wood is one solid piece (not planks etc) I THINK it will work. Let me know how it goes!
wondering if this could be done to a bathtub also. Mine is severely rusted and is due for a make over
I would NOT recommend a bathtub. It is hit with a lot of water pressure and would be a lot tougher to get smooth!
how do you choose the color, I couldnt find where you spoke about color for it or is it all one color only? How do you think this would do on tile? My vanity and kitchen counter tops are tiled. Do you think this would go over it well? and they have a wood trim too? How might you suggest I work with all of that? thanks
It is just the color concrete comes in. You can put it over tile but it must be clean, intact, with no cracks. I do not recommend putting it over wood. If you want more details and help, I do FB lives answering reader questions! You must be a newsletter subscriber–the instructions for submitting your questions are in my newsletter each week. If you want to sign up click here: designertrapped.com/where-to-shop-designer-look
Thanks for reading!
Is it still holding up well? I want to do this to my kitchen, currently we have ugly outdated blue counter tops that I hate! I have always loved the concrete look but it was never in the budget. This would be perfect but I worry about chips and cracks.
I find that it wears very well, but we only have it in a powder room. That being said I know plenty of people that have it in their kitchen and love it! Good luck!
What do I do about the caulking I currently have? It does need redone. I only have the back splash part on the back of sink and is caulking between it and the wall but one side of the sink is against the wall with caulking and NO back splash…
I would probably removed the caulking. It expands and contracts and could crack the concrete overlay over time. Good luck!
Is the color of the cabinet the driftwood gray or a different color? The picture looks a little purple. Thanks!
It is Driftwood Gray!
I wanted to do this to the top of a solid wood end table that I am turning into a bathroom vanity. Do you think it wood adhere and work on wood?
I haven’t personally done it on wood, but I can’t imagine why it wouldn’t work. That sounds really cool! Hope it all works!
Would a concrete stain work on this or is it too thin to apply?
I have never stained concrete. I have heard others say they have added powdered pigment color to the concrete, but I have not tried that. I hope that helps :) Thanks for reading! Good luck!
Can you do this in a kitchen to cover over and modernize old tile?
I haven’t personally done it on tile, but it can be done if the tile and grout are in good shape and aren’t cracked, chipping, etc. It would probably take more coats to get full coverage, but it should work! Good luck!
I was wondering if you used plumbers putty when you installed your drain and if it might have something to do with the leakage that occured.
I am sure we did use plumber’s putty. Good point though!
Is the final color more gray or tan? The picture on pinterest looks gray but in the video it looks more tan? I am just trying to figure out if I need to add some gray pigment. Thank you! I am trying it today!
The pictures are a much better representation of the color-they are a medium gray. Thanks for reading!
I’ve always wanted concrete counter tops in my kitchen! Could you tell me if the color is a true gray (as in the photo) or a taupe (as in the video). Thank you!
The photos are a much better representation of the true color. They are a medium gray. Thanks for reading!
Feather finish*****
Mine turned out awful…. I couldn’t find the Henrys feather light so I used a different mix. It does not spread easy…and just falls off when you apply it. Thank goodness I didnt want to keep the vanity!
Oh no! What mixture did you use KC?
Hello I have a galvanized steel counter…go figure… Would this work?? Thanks
I haven’t personally done it on metal, but if it is a stable surface (ie. not damaged or warped) then it should be good. Good luck!
I was searching for pins to makeover our master bath and ran across this and decided to give it a try. I was prepared to spend $400+ on a new double sink top so if it didn’t come out right, oh well. I LOVE the look! Instead of using my hands and a sponge I opted to use a foam brush, worked perfectly! I also found a new flexible sandpaper that worked great in tough areas. Thank you so much for your tutorial!
That’s awesome–so happy to hear it worked well for you and that you love it!!!!
Hi! Awesome job it looks wonderful! I just had a quick question: When you sand it the last time before putting the sealer on do you need to make it really smooth, or will the sealer smooth it out some? I have been trying this, but I think I have been sanding too much because I am on my 3 coat and still haven’t covered it. I just wondered how much of the imperfections would be covered by the sealer. Thanks!
Hi Kari! I LIGHTLY sanded between coats. The sealer makes the surface nice and smooth, but any major bumps/imperfections need to be sanded out first. I hope that helps!
Tasha – I just wanted to say thank you! I decided to do a little makeover to our guest bath and we have the builder grade cultured marble. I think it turned out awesome! I will admit to being completely panicked after the first coat, but I love it!
Yay! So happy to hear that Cathy!
Do you think this would work on an old acrylic sink? Mine is old scratched and yellowed, and could really use an update.
It should, Lisa! As long as the acrylic surface is not chipped, cracked or peeling (i.e., the surface is stable), it should work just fine!
Was the concrete applied to underneath the countertop where the extra lip hangs over the vanity in the front and on the side?
Great question, Natalie. The answer is no. Hope that helps!
Will this overlay work over laminate counters?
Hi Mindy! Yes, it works wonderfully on laminate counters. We use this over the laminate counters in our laundry room. You can check it out here: https://designertrapped.com/2013/10/the-laundry-room-reveal.html
how would this hold up if you dropped something on it, a glass bottle or curling iron etc.. any problems with cracking? I suppose you could just go over it again with concrete ?
also how many coats do you recommend? the more the coats the stronger ? thanks
Hi Miguel! I don’t recall exactly how many coats of the sealer we used, but I would say at least 3.
Hi Miguel! We haven’t had any cracks or problems with dropping things on it. I recently posted an update on how it’s holding up 18 months after we completed it. You can see it here: https://designertrapped.com/2016/02/diy-concrete-vanity-update.html
Can a concrete stain be used with this type of concrete?
Hi Jeff! I have heard others say they have added powdered pigment color to the concrete, but I have not tried that. I hope that helps :) Thanks for reading my blog!
Could you paint the concrete before putting the sealer on?
Hi Monica! I wouldn’t recommend painting it, but I have heard others say they have added powdered pigment color to the concrete, but I have not tried that. I hope that helps :) Thanks for reading my blog!
Can you do this over Formica? This is an amazing idea!!!! We are getting ready to take on a fixer upper & would love this!!! Even in the kitchen….
Hi Candra! Yes, it works wonderfully on laminate counters. We use this over the laminate counters in our laundry room. You can check it out here: https://designertrapped.com/2013/10/the-laundry-room-reveal.html
could you concrete the bath wall tile in the bath/shower area?
I wouldn’t recommend it, Lisa! I think it’s more appropriate for smaller areas.
I love your post! I’m planning on doing my cabinets and kitchen floor. I hate my bath tub, so when I looked up a way to cover it with concrete…. Of course it was the same genius woman!
What do you think, would if be feasible to do an entire bath tub?
LOL, thank you Crystal! I would not recommend it for an entire bath tub, unfortunately. Sorry!
How long will this last? I mean, will it ever crack and chip-especially in the sink? I am considering doing it in a bathroom with a raised sink and would leave the sink white. Just curious if you could speak for the longevity of the countertop part? I don’t want it to ruin in 2 years and have to start all over! Thanks!
Also wondering if it could be stained to look like marble? with acid stain? Thanks so much!
Hi Lacey! I recently posted an update on how it’s holding up 18 months after we completed it. You can see it here: https://designertrapped.com/2016/02/diy-concrete-vanity-update.html
I just love what you have done. We rent but I’m going to do this to the counter tops. I would to do it lighter for the kitchen.
Has anyone ever done this over laminate floors? We have two dogs and they stay in the kitchen during the day. Something has to be done as that floor is not only very old but there are tears in the flooring in many spots.
Any suggestions are welcome.
Thanks for the great ideas. I have been staying up late each night reading all our great ideas. Looking forward to the weekend where I can take my time going through all your great projects.
Hi Pamela! I don’t know how easy this would be to do on floors as a DIY job, but I have painted floors twice with lots of success and they have held up PERFECTLY to our twin girls and 90 pound Boxer. You can see those posts here: https://designertrapped.com/2015/01/diy-stenciled-floors.html https://designertrapped.com/2013/11/how-to-paint-your-linoleum-floors-yes.html
HI! I loved your idea of redoing the bathroom vanity.I followed your step-by step process to a T. However, despite sealing applying the sealer for a fourth time now, there is a darkened area right around the drain hole. Any suggestions on how to remediate the problem? Thanks so much!
Hi Meg! I literally just wrote a post on this exact issue. You can see it here: https://designertrapped.com/2016/02/diy-concrete-vanity-update.html. That should answer all your questions :)
Just wondering if anyone has concreted there bath tub.Ours is from the 1960s and we will have to refinish it anyway.And long will it last under a lot of kids.
Thanks
I don’t think I would recommend it for a tub, Monty. Sorry!
I really like what you do!
Do you think this technique would work on a kitchen countertop made of ceramic?
Thank you!
Carolanne
Hi Carolanne! I haven’t personally done it on tile, but it can be done if the tile and grout are in good shape and aren’t cracked, chipping, etc. It would probably take more coats to get full coverage, but it should work!
I might have to try this on our kitchen counters. We are purchasing a house and the sellers really love hunter green, not my pick, think I’ll try it out once we get settled in, can’t get any worse.
Thanks-
Rebecca K.
It looks beautiful on kitchen counters, Rebecca! Good luck with your new house!
Hi Tasha. I am on the last step- the sealer. How long did you allow the sealer to dry before adding the 2nd coat?
For those asking about color- I stained my concrete before the sealer step. I used soycrete concrete stain in charcoal grey and it turned out beautiful!! There website is http://www.ecoprocote.com/.
Thank you! I have the 1st coat of sealer on and will apply the 2nd tomorrow. I’d be happy to share pictures but will wait until the bathroom is completely done. Right now it is a hot mess!! I am waiting until the counter is completely done and has cured a few days before I start vacuuming and washing walls, floor etc. The sanding process is crazy!
How did you get all of these things under $20? Following the links to Amazon, both the concrete and the finish are well over $20 each! And that’s before buying the tools! Are they perhaps available in smaller sizes somewhere else?
Hi Epiphany! As I explained in the post, I already had all the tools on hand and used a TINY amount of the Feather Finish, so it was well under $20 of the Feather Finish. I do not know of a smaller size of the Feather Finish being sold anywhere.
Hello, the finished product is beautiful. I was wondering how long ago this was e and how the feather finish has held up in the sink being exposed to water on a regular basis.
Thanks….
Thanks so much Lynda! We finished this project about 18 months ago and it is holding up wonderfully! We did wind up tweaking the drain a bit, which will be the subject of an upcoming post, but we are so happy with the durability of this. We only recently re-sealed it for the first time. I hope that helps.
Hi Tasha!
My house is plagued with cultered marble EVERYWHERE! I was beyond excited when I found your blog. Can you tell me what you did to “tweak your drain” before I start this adventure?
Thanks, Aimee
Hi Aimee! YES! I recently posted an update on how it’s holding up 18 months after we completed it. You can see it here: https://designertrapped.com/2016/02/diy-concrete-vanity-update.html
You can learn all about the tweak there :)
Thanks so much for sharing this project! I am a designer who believes you can love your space no matter your budget.
I hope it’s ok, I’ve added this post to my Resource pages on my website (http://www.loveyourspacecs.com/resources.html).
Thanks again!
Thanks so much, Nicole! Of course it’s okay to include it in your resources page.
Can you do this on a solid surface counter and sink combo
Do you mean if the sink is separate, Holly? If so, then I would recommend just doing the countertop.
Can you stain an overlay like that?
Hi Jessica! I have heard others say they have added color to the Feather Finish concrete, but I have not tried that. Thanks for reading my blog!
Can I ask where you found the new cabinet doors for your vanity? I have been looking for something like that! Thank you!!
Hi Jill! They are the same doors, we just painted them and added new handles. I hope that helps!
I am enjoying your website…so creative!
Have you tried the concrete overlay technique on laminate counters? Thanks a bunch.
Thanks so much, Gail! Yes, it works wonderfully on laminate counters. We use this over the laminate counters in our laundry room. You can check it out here: https://designertrapped.com/2013/10/the-laundry-room-reveal.html
Tasha have you tried adding color to the overlay like maybe using grout stain? Wondering if that would work kind of add some variety instead of just the gray color. Just a thought I might try it and see what happens.
R/Keith
Hi Keith! I have heard others say they have added color to the Feather Finish concrete, but I have not tried that. Thanks for reading my blog!
So, what was the “Feather Finish” for? There is no reference to it in your project narrative.
Thanks,
Mike Z.
Hi Mike. The Feather Finish is the concrete. So when I reference concrete, I am talking about the Feather Finish. Sorry for any confusion.
Hi! Love what you did with the overlay for the bathroom. Have you ever tried to add color form maybe a grout dye? My wife and I would like to do this but we would like to try and add a little color just curious if you have
R/Keith
Hi Keith! I have heard others say they have added color to the Feather Finish concrete, but I have not tried that. Thanks for reading my blog!
I would love to try this on my double vanity. I have cultured marble. The problem is those pesky scalloped basins. Do you think it will work? Or is it going to be too hard getting the concrete in there? Is there such thing as a tacky-modern look, lol?
LOL, Carla! Hmmm, I honestly don’t know if I would try this with the scalloped bins. I think it would be more trouble than it’s worth and would be really, really hard to get it smooth. Sorry!
I’m really intrigued with this project and would love to try it. I’m wondering how the new surface handles things being dropped on it? I am notorious for dropping the drinking glass (plastic), and have at times had my hair dryer slip out of my hand and hit the counter top. Have you had any problems with cracking or chipping on surface or edges?
Hi Lyn! I can’t say that we drop anything on it other than toothbrushes, soap or plastic cups, but we haven’t had any problems with chipping or cracking. If you take a hammer to it, it would crack, but I think it should withstand drops without much of a problem. Since this is in our powder room, it doesn’t get as much use as it would as say a master bathroom. I hope that helps!
Hi!
I LOVE this! Would this technique work on A Formica vanity top?
Hi Heather! Yes, it works wonderfully on laminate counters. We use this over the laminate counters in our laundry room. You can check it out here: https://designertrapped.com/2013/10/the-laundry-room-reveal.html
Hi there…I was curious if you could update us readers on how this is holding up. It looks like we are less then three weeks away from the one year anniversary of this awesome makeover post. I’ve been wanting to do something like this for my bathroom sinks and would love to know if this finish is in for the long haul.
Thanks!
Hi Bianca! Our vanity is holding up WONDERFULLY! We haven’t even re-sealed it yet and it’s been completed for well over a year at this point {we finished it about 3 months before I posted about it on the blog}. There is one thing we would do differently. We would set the drain BELOW the surface of the concrete. By setting the drain on top of the concrete surface, water collects around the drain and as the sealer wears down, the concrete can darken a bit around the drain. We plan to remove the drain and chisel out the concrete so that we can sit the drain below the surface of the concrete, but we haven’t had a chance to do it yet, and there’s no reason to rush it. I think if we had done that from the beginning, we wouldn’t have had any problems at all! I hope that helps!
Just to clarify… what do you mean “set the drain BELOW the surface of the concrete”? Does that mean if you would do it from scratch again, you would leave the drain in it’s original place and apply concrete/sealer over it? Thanks!!
Exactly, Mila! We actually worked on our sink today and will have the update posted next week. I wouldn’t completely cover the drain ring, but yes, yo would want the concrete to overlap the drain ring a bit. I hope that helps!
It’s about 3 weeks shy of a year since this post and I was curious how this is holding up. I really like the way this came out and I have two sinks that are good candidates! Any update would be super appreciated!!
Thanks :-)
I want to redo my vanity it’s the standard white particle board/laminate countertop or whatever you call it. Do you think this technique would work on it?
Hi Ashley! Yes, it works wonderfully on laminate counters. We use this over the laminate counters in our laundry room. You can check it out here: https://designertrapped.com/2013/10/the-laundry-room-reveal.html
I hope that helps!
Hi
I’d love to give this a try, but my countertop is laminate and my basin porcelain. Would you recommend it?
Thanks
Hi
I would love to do this to my countertops – only the basin is porcelain and the top laminate. Would you suggest it? Or something else?
Thanks!
Hi Rebecca! Yes, it works wonderfully on laminate counters. We used this over the laminate counters in our laundry room. You can check it out here: https://designertrapped.com/2013/10/the-laundry-room-reveal.html. That said, I would probably leave the basin porcelain, since it’s not a totally integrated sink. But I think that would look great! I hope that helps!
Hi , I Love all your makeovers! I want to try the concrete overlay and paint our kitchen cabinets as well. Question about the concrete. Can you add something to stain the concrete a different color? Curious, just don’t know if I want the grey color. Thanks, Cathy
Hi Catherine! I have heard others say they have added color to the cement, but I have not tried that. Thanks for reading my blog!
Hi Tasha,
You’ve inspired me to do the same to my very similar 80’s marbled bathroom sink. However, mine is even classier because it has a seashell soap dish built in. I bought some preface concrete mix to try to fill it in before I start using the Ardex mix. What are your thoughts on that?
Thanks for the inspiration.
LOL, Patty, that does sound classy :) I think it’s a great idea to fill the seashell soap dish in first–I would certainly be willing to try it, but I’m pretty fearless. Fingers crossed it works well! Good luck with your project!
I absolutely love the concrete look on my countertop and sink….but am disappointed in the sealing process as well. I followed the directions on the sealer and it said to do two coats 20 min. apart. It is still a little tacky after 3 weeks or more and stains easily. I also have a leak somewhere around the drain yet I was very conscious of being thorough with the sealer there so it is disappointing. I would love input as to what I do next to correct this. I will take the drain stopper out again but do I just let it dry and apply more sealer? Do you think I should sand off the top layer and apply more concrete then seal again? I went back to the paint store the sealer came from and their “theory” is that I didn’t let the concrete “cure” enough prior to sealing as well as there being too much humidity in the room for the sealer to dry. It didn’t appear that anyone else had “cured” their concrete prior to sealing…..thoughts please! I love the way the sink and counter look….would just love to be able to use it as well!
Hi DeLynn! We did not have that problem at all. Did you use the sealer I used and linked to in my post? That is the only sealer I have any experience with and ours was never tacky. We occasionally have some darkening around the drain, but only when the sink has been used a ton. The spots will dry out if you going without using the water for a day or so. You could then remove the drain and apply more coats of sealer. If your drain sits too high and is causing water to collect and sit around it, you could also chisel out a round spot for your drain to sit in, which should also eliminate the issue. As for the sealer, I would sand off what you used and use the sealer that I linked to in my post. I hope that helps!
Can I do this over laminent kitchen counter tops? How do you clean them?
Hi Nancy! You can! We did it on our laminate counters in our laundry room. Lots of bloggers have done it in their kitchens–check out the blog Design Dining and Diapers for her tutorial on how to do it on laminate counters. We clean ours with Lysol wipes or Ology cleaning spray and paper towels. It cleans very easily.
Love the idea and the tutorial. Can you stain the concrete before sealing it?
I believe so, Lisa, though I have never tried it.
Our sealer has been drying for a week now and it still has a slight stick to it, has anyone else experienced that? How do you get the concrete off the wall?
We applied several coats of the sealer and left plenty of drying time in between coats and it has been about a week and the counter is still a bit sticky, has this happened to anyone else? Not a lot just a little bit. And how did yall get the concrete off the wall of you were a little messy?
Hi Jennifer! That’s very odd about the sealer. Did you let it dry completely between coats? It is a polyacrylic sealer like the one we used? We never had any tack to ours.
Oh, and the concrete should come off the wall really easily. Just scrape off what you can and wipe any residue away with a wet cloth.
Have you noticed scratching? Am thinking about doing kitchen counters, but have read a lot of negative reviews about scratching.
I have not noticed any scratching, Nichole, but I would think there would be more of an opportunity for scratches in a kitchen as opposed to a bathroom.
Would this be feasible for large kitchen countertop?
Absolutely, Terrie!
Hey Tasha! I just wanted to let let you know that I just did this to my bathroom sink this past weekend (not cultured marble or laminate-I’m not sure what material it’s made out of!). Although it’s not nearly as smooth as yours, I’m really happy with the result. I actually kind of like the look that the imperfections give it (kind of like carved stone).
Just a word of advice to anyone that tries this: truly do make sure that you apply enough sealer around the drain. I thought I did, but it’s pretty clear that water is seeping into the concrete. I will hopefully get it taken care of, but I might have avoided it if I’d been even more cautious…
So, so happy to hear it Hannah! Yes, sealing around the drain cannot be over emphasized!
I did this in my bathroom and I love the way it looks. I got the concrete from Home Depot you recommended. Applied 3 thin coats and then sealed with 3 coats of concrete sealer (also the only one they had available at Home Depot – don’t remember the name). PROBLEM: it didn’t seal anything. Every drop of water showed. Then we spilled a drop of oil on it and that stayed in the concrete. I sanded out the spots, concreted ANOTHER layer or two. This time I used a different seal that was oil based (says on the can it seals wood, mortar & concrete) which stunk to high heaven for a week but STILL is NOT sealing the concrete. Now I have another spot that won’t come out and will need to do this AGAIN. If I wipe it off with a wet cloth I can tell the sealer is coming off too and now there is concrete showing again. What am I doing wrong?
Oh no, Daisy! That is so strange. I have no earthly idea what is going on. Ours sealed well the first time and it has been over a year and we still haven’t had to re-seal it, so that sealer worked amazingly well for us. Did you use the Ardex Feather Finish underneath?
I used “Henry Feather Finish (Engineered with Ardex technology #549) Underlayment patch and skimcoat” for the concrete (Home Depot)
Sealer: Home Depot’s Quickrete Waterproofing Sealer Concrete & Masonry No 8800-05 (The first time) and something horrible and oil based the second time but I don’t have the name.
I have made stepping stones for the garden in the past and they are kind of shiny and slick on the bottom when the concrete dries flat. This countertop “Henry’s finish” dries almost chalky, not shiny smooth. Did your concrete dry shiny smooth like Portland cement would?
I mixed the concrete thin enough to spread on by hand (glove) so I could control it in the corners. Maybe I mixed it too thin? I now have many spots all over the countertop. I can not set a water glass on there without it leaving a ring. If I sprinkle water on the countertop, some places the water beads up and other places it soaks right into the concrete so it is obviously not sealed. I did not concrete the sink, since it was plastic and I just replaced it – I only did the countertop.
I will do it one more time this fall when I can have the windows open to let out the fumes but I would love to know what to do differently. Thanks for your help!
Hi Daisy! I wouldn’t think the spot have anything to do with the underlying concrete application–I used the exact same Henry’s Feather Finish (made by Ardex) that you did. Mine dried chalky as well. I had to sand it and then seal it. It sounds like the issue is your sealer. This is the exact sealer that I used and we have no spots at all: http://amzn.to/1PE4yor I would say you are probably going to have to apply another thin coat of concrete and then try to reseal it with a different sealer. I hope that helps!
Hello Tasha! I am about to apply the sealer…how is yours looking? I am going for the one you recommended.
Thanks!
Ours is looking PERFECT, Yasmin! We haven’t even had to re-seal it yet and it’s been well over a year!
can you color the feather finish to get a different color?
Hi Betty! I have heard others say they have added color to the cement, but I have not tried that. Thanks for reading my blog!
Can you add color to concrete
Hi Donis! I have heard others say they have added color to the cement, but I have not tried that. Thanks for reading my blog!
I love this idea for a great DYI project to fix up a countertop without a big cost. I love anything with concrete though being in the concrete lifting business. Thanks for sharing!
Thank you, Jason!
Would the same products/process work on a kitchen sink?
Hi Deb! I would be nervous to use it on a kitchen sink, if your kitchen sink gets used as often as ours does. Our powder room sink only gets used a few times a day for hand washing. Our kitchen sink gets used constantly for longer periods of time–I feel like it would require a lot of resealing to stand up to a kitchen. I hope that helps.
This is just awesome, I love it!! I have started practicing on an old countertop on the garage and if I’m happy with the results will do my kitchen counter tops. How long did you wait between coats of cement? Thanks so much for sharing this!
Thanks, Allison! I tended to wait overnight between coats, because I was usually doing it at night. I hope that helps!
Do you think this could be possible with a laminate counter top? I am not familiar with what concrete will adhere to. The outcome is so classy and beautiful!
Hi Jessica! Yes, it works wonderfully on laminate counters. We use this over the laminate counters in our laundry room. You can check it out here: https://designertrapped.com/2013/10/the-laundry-room-reveal.html
THANK YOU for sharing. This is a good solution for me. I have a 9 ft vanity, which I already painted with Annie Sloan Chalk Paint & applied image transfers, but the cultured marble top takes away from the look. I certainly can’t afford to replace it anytime soon on a fixed income. The gray tone will be perfect.
Hi there! I’m wondering about your thoughts on using the feather concrete for a small bathroom floor? The bathroom is our second bathroom for the house and gets plenty of use. I’m considering using a contactor to put concrete floors down, but would love to tackle myself to save money. Would love and appreciate you input. Than kyou!
Hi Kris! Is the floor tile? If it’s tile or some other stable surface, it should work–in fact, it’s really meant to be used to level floors! I haven’t personally done it on tile, but it can be done if the tile and grout are in good shape and aren’t cracked, chipping, etc. It would probably take more coats to get full coverage, but it should work!
Can this be done on granite tile and ceramic or porcelain tiles?
Hi Aldrina! I haven’t personally done it on tile or granite, but it can be done if the tile and grout are in good shape and aren’t cracked, chipping, etc. It would probably take more coats to get full coverage, but it should work!
Do you think I could do this to my bathtub too instead of reglazing it?
I really wouldn’t recommend it for a bathtub. Sorry!
Do you remember what color you used on the cabinet? I love it!
Hi Toni! Yes, I used Driftwood by General Finishes Milk Paint. I hope that helps!
Can you use the concrete on a laminate surface? I have a kitchen island that has laminate
Hi Leah! Yes, it works wonderfully on laminate counters. We use this over the laminate counters in our laundry room. You can check it out here: https://designertrapped.com/2013/10/the-laundry-room-reveal.html
Think this would work on a bathtub?? I have a really old icky one that never looks clean even when it IS clean.
Hi Dani! I wouldn’t recommend it on a bathtub.
Does this process work on formica counters?
Hi April! It works wonderfully on laminate counters. We use this over the laminate counters in our laundry room. You can check it out here: https://designertrapped.com/2013/10/the-laundry-room-reveal.html
I am curious, I have an outdoor bar top that is made of plywood. Do you think this would hold up outdoors?
Hi Cecelia! It certainly should hold up outside, though you may have to re-seal it more often. I hope that helps!
I am curious, I have
outdoor bar top that is plywood. Do you think this would hold up outside?
Can you add a concrete stain to change the color?
I have heard others say they have added color to the cement, but I have not tried that. Thanks for reading my blog!
Great tutorial! Will PIN.
Thanks so much, Sherry!
Do you think this would work on a kitchen formica countertops? and can the concrete be stained or have some kind of colorant added to it? I want a dark brown in my kitchen and am not sure how to do it.
Hi Emily! Yes, it works wonderfully on laminate counters. We use this over the laminate counters in our laundry room. You can check it out here: https://designertrapped.com/2013/10/the-laundry-room-reveal.html I have heard others say they have added color to the cement, but I have not tried that. Thanks for reading my blog!
Is it possible to tint the Henry’s Feather? I love the greenish hue of your countertop without adding colour. My whole house is green toned and I love this colour. However my bathroom is more earthy, brownish sandy tones. I am afraid this greenish grey colour would clash with the current sand coloured tiles. It looks like we have the same floor tiles and it wraps around my whole bathtub. I’m also a bit confused about the colours. The video shows more red or brown, and the final pictures show more green. I know the computer can’t give back the exact colour but I just want to relax more about the colour combination given the current tiles that we will probably not replace.
Hi Andrea! I have heard others say they have added color to the cement, but I have not tried that. The color is much more accurate in the finished photos. The video was taken at night with overhead lights on, which skews the color quite a bit. I hope that helps. Thanks for reading my blog!
Hi,
When do I apply the Henry feather finish? I didn’t see when to use it in the instructions. Thanks!
Hi Amanda! The Henry’s Feather Finish IS the concrete. Does that help?
We are in the process of doing this project!!!! We used Henry’s Feather Finish, after each layer dries it is to me a brownish/sand color. When the sealer is put on the countertop will the finished product be a grayish color?? That’s the look I am after.
Hi Shelley! I do feel like the sealer brings out more of the gray color.
Love this idea!! I have been wanting to update my high maintenance/ugly ’tile’ counter tops. Do you think this would work over tile as well? And if so, is it durable enough to use in the kitchen?
Hi Cathy! I haven’t personally done it on tile, but it can be done if the tile and grout are in good shape and aren’t cracked, chipping, etc. It would probably take more coats to get full coverage, but it should work! Many bloggers have used it in kitchens, so I do think it would be durable enough!
Looks great! Thank you for the tutorial! I am going to try this.
My pleasure, Michelle! Let me know how your project turns out!
I have granite tile countertops in my kitchen that I hate, mainly because they are separated by about an inch of grout. I’ve thought about using this process, but wondered how I can get the concrete a lighter color? Everything in my kitchen is dark-stained wood and dark-brown floor tiles. I really want to lighten things up. Is this possible using this product?
Hi Jill! I think there is a product that Ardex makes that is the same, but is white/ivory in color. Perhaps that would work!
Question. Do you think I could add some sparkle to the concrete? IE: big glitter?
Hmmmm, I honestly don’t know, Kathy. You could try it on a piece of scrap wood to test it out! My only concern is that the sanding may pull the glitter right out. Good luck!
Just a thought, maybe add the glitter to the sealer.
Thank you so much for sharing this look awesome! My question is, does it look more gray in person or more brown? Or does it depend on the light? Because in the video it looks like it has a brown tent and in the pics looks more true to concrete color. Thanks again!
Hi Denise! It’s definitely more gray like in the finished photos. It looks brown in the video and some of the “in progress” photos because they were taken at light with the lights on. I hope that helps!
That is sooo sick! (I hear sick is now “AWESOME!”) I do wonder – do you think I could paint the concrete before I added a sealer to the top? I like the look of the concrete, but it wouldn’t work with the bath I’m thinking about remodeling.
Hi Gilmer Gal! I don’t know whether you could paint it. I have heard others say they have added color to the cement, but I have not tried that. Thanks for reading my blog!
I really like the look of your sink! How do you think this’d work on a sink that is a separate piece from the vanity top? There are no cracks, chipping or movement – but the sink sits higher than the vanity top so there is a seam around the sink. Thanks.
Hi Nicole! Hmmmm, I am not sure how that would look. It’s hard for me to visualize. It should work, but I can’t decide if it would look strange along the seam or not. Sorry! I wish I could be more helpful.
what do you think about trying it on a bathtub?
Hi Debra! I don’t think I would recommend it for a bathtub–sorry!
our bathroom has needed a make over sense we moved in but due to expense we put it off till we both lost our jobs and almost our home! S now its even worse, this looks like a good solution to at least the nasty sink part!! thank you
Looks good, I am doing it.
Question:
Since the concrete layer is so thin, is there an issue with it cracking in the basin when tightening down the
drain ring?
Thanks,
Eddie
Hi Edwin. We didn’t have any issue with the drain ring and have not had any cracks. Bear in mind you don’t want to over tighten the drain ring–the plumber’s putty provides a good seal. I hope that helps!
Can this technique be used on other surfaces? I love this and would like to do it on both my bathroom and kitchen…I know I know…go big or go home I always say lol
Kim
Hi Kim! Yep, I know it works wonderfully on laminate counters. We used this over the laminate counters in our laundry room. You can check it out here: https://designertrapped.com/2013/10/the-laundry-room-reveal.html
This is amazing! I love how it turned out, and I would really love to know where you found the vanity light fixture if you don’t mind sharing!
I will be doing this to my guest bathroom this weekend! :)
Thanks so much, Alex! The light fixture was a DIY makeover. You can read all about it here: https://designertrapped.com/2014/07/industrial-bathroom-lighting.html
I was so excited to see this Pin in my email…Concrete your vanity. I’ve been trying to figure out the way to do this but haven’t had any luck finding advice. I also have a tub that I tried to paint a few years back and it’s all peeling now. The reason was to hide the rusty edges of the drain. Do you think a concrete treatment could work in the tub? I love the stone pin for the exterior to dress it up and was thinking to bring the stone up to the top and then meet it with the concrete. Thoughts? Warnings? Bad Idea? Any advice is welcomed.
Hi Brad! I would be nervous about applying this to a tub that will be subject to a lot of weight/pressure from water AND from a person in it. I would be nervous about cracks with all that weight. Sorry! Wish I could be more helpful!
I came to your post from Pinterest just in time. My mom was ready to pay for her bathroom vanity to be re-done, and I think this might save her an awful lot of money.
I am wondering, however, if you could use this technique on a previously-tile countertop. I noticed your reply to several other people was that you could use it on a countertop with “no cracks” — does that mean you would not recommend this as a cover for a tiled counter that has grout lines? I would expect it to take extra coats in order to smooth out the final surface, but is there any reason it is not advised or just flat out wouldn’t work?
Hi Lanea! I believe you can use it on tiled and grouted surfaces as long as the tiles and grout are in good shape and aren’t cracked, chipping, etc. I hope that helps!
Counters look great!!! Do you know if this process would also work on a bathtub?
Hi Gail! I wouldn’t recommend it on a bathtub. Sorry!
Do you think this process would also work on a tub?
Can this be applied over a laminate bathroom counter/sink as well?
Hi Adrienne! This works wonderfully on laminate counters. We used this over the laminate counters in our laundry room. You can check it out here: https://designertrapped.com/2013/10/the-laundry-room-reveal.html
Hello Tasha!
Lovely idea and transformation! Do you know if this may work on other surfaces, like formica? Any ideas where I could cheek it out? Thanks a lot!
Thank you! Yes, it works wonderfully on laminate counters. We use this over the laminate counters in our laundry room. You can check it out here: https://designertrapped.com/2013/10/the-laundry-room-reveal.html
Where did you purchase your light fixture above the sink? Love that!
Thank you, Karla! That was a DIY light makeover. You can read all about it here: https://designertrapped.com/2014/07/industrial-bathroom-lighting.html
I am in the middle of this project. I am covering a corian countertop and corian utility sink. you think it’s ok if I do NOT remove drain … and just surround the metal ring…and then seal around THAT (I am having an unbelievably hard time removing the drain!!)?
THANK YOU
Hi Jamie! It’s certainly worth a try if you can’t get the drain out! I would think that will work.
PLEASE tell me you can do this to a Formica or just cheap countertop from the 70’s!!! It’s now sort of a Denim blue and I bought a used countertop thru Craigslist….. I didn’t measure correctly and now it’s sitting in our garage. Gee anyone want a two bowl vanity in a medium green composite stone???
Hi Sharon! Yes, it works wonderfully on laminate counters and should work on Formica. We use this over the laminate counters in our laundry room. You can check it out here: https://designertrapped.com/2013/10/the-laundry-room-reveal.html
how do you clean this once finished?
Hi Hayley! The answer to that is in the video that is linked to in the post. We use Lysol wipes to clean it. Easy, peasy!
Im So doing this to my kitchen counter! We apartment live and the counter is beat, my landlord wont replace it till we move.(saving for a house) It was probably the cheapest thing offered 30 years ago! ha ha.
Its so beat I will be able to pull the laminate off the pressed wood and apply to that, should make it adhere nicely.
Thanks for sharing this, I saw the pin on Pinterest and why didnt I think of that? Ha ha. I’ll share when I do it. :)
Ive enjoyed browsing around your blog.
Thanks so much, Katie!
I’ve been searching for ideas to update our bathrooms. So far I know I’m going to spray paint our fixtures and hardware ORB and frame the builder’s mirror. Now that I see this easy concrete makeover I might just do that too! I LOATHE our laminate countertops with gold hardware! *shudder* I wasn’t sure if I wanted to strip and re-stain the vanity cabinets or paint them, but your grayish blue tones are lovely. I like the dark wood of the mirror against the gray too…hmmm…so many possibilities! :)
Thank you, Theresa!
I want to thank you so much! I did mine and added stain and I love it!!!!! So many compliments and such a great tutorial!!!! If I can share pics I would!
YAY! So happy to hear it, Jenn!
What do you think about trying this technique to cover some old bathroom counter tiles??? I’m game-any advice? karen
Hi Karen! It should work well on tiled counters as long as the tiles AND grout are in good shape and aren’t cracked/chipping. It may take a few more coats to get good coverage. I hope that helps!
Hi Jen did you add stain to the same concrete product that Tasha used?
Hi Lis! I have heard others say they have added color to the cement, but I have not tried that. Thanks for reading my blog!
Can this be done on a kitchen countertop that is covered with formica?
Hi Vicki! This works wonderfully on laminate counters. We used this over the laminate counters in our laundry room. You can check it out here: https://designertrapped.com/2013/10/the-laundry-room-reveal.html
YAY, Jenn! So glad you love the results! Thanks so much for reading my blog!
Thank you for all the great tips. I can’t wait to redo my bathroom and kitchen.
I like your bathroom. I’m interested in knowing what you do for the edge of the countertop? Were you able to wrap concrete around it, or is that paint?
Hi Julie! The edges are concrete as well.
Will this work on molded plastic sinks and lamanent countertops?
It should work on any completely stable {no cracks, chipping or movement} surface. If you use it in a kitchen, you need to be sure to use a food safe sealer.
Hi,
What a great idea!
What are your thoughts – Would this work on my wooden kitchen tabletop?
Thank you,
Charlotte
It should work on any completely stable {no cracks, chipping or movement} surface. If you use it in a kitchen or on a table, you need to be sure to use a food safe sealer.
I was wondering do you think the process would work on a laminate kitchen counter top?if I sanded it a bit? & can you add color to the cement?
Hi Debbie! It should work on any completely stable {no cracks, chipping or movement} surface. If you use it in a kitchen, you need to be sure to use a food safe sealer. As far as I know, you cannot add color to this particular product, but Ardex makes something similar that you can color. I just don’t know the name of it. Hope that helps!
Can I use this on Formica? I have the ugliest counter top in my kitchen….
It should work on any completely stable {no cracks, chipping or movement} surface. If you use it in a kitchen, you need to be sure to use a food safe sealer. Hope that helps!
I’m a little confused. (well, it’s a state I stay in sometimes). What kind of concrete did you use and when does the feather finish stuff come into play? Is the feather finish actually the concrete?
Hi Amy! The feather finish is the concrete. Hope that helps!
we have a shower stall that needs a new update on the floor. It has small 1 inch tile. Can you use this product to coverup the old tile look and will it hold up from showers. Thanks
I wouldn’t recommend it in a shower. I have never tried that.
GORGEOUS! I love the final look of the bathroom!
Thank you!
hi! I was curious as to how this holds up to areas that get much more wear. I.e, the kitchen! Do you think this would work in the kitchen over a typical kitchen countertop?
Hi Nicole! It should work on any completely stable {no cracks, chipping or movement} surface. If you use it in a kitchen, you need to be sure to use a food safe sealer. Several bloggers have used it on their kitchen counters and it looks AMAZING!
HI there
really want to try this – is it easy to color the concrete? I am thinking of doing kitchen counter tops
thanks
It should work on any completely stable {no cracks, chipping or movement} surface. If you use it in a kitchen, you need to be sure to use a food safe sealer. As far as I know, you cannot add color to this particular product, but Ardex makes something similar that you can color. I just don’t know the name of it. Hope that helps!
Hi, I want to concrete my kitchen counter. Is there brown concrete.
It should work on any completely stable {no cracks, chipping or movement} surface. If you use it in a kitchen, you need to be sure to use a food safe sealer. As far as I know, you cannot add color to this particular product, but Ardex makes something similar that you can color. I just don’t know the name of it. Hope that helps!
Help!!!!!
My husband and I did this to our bathroom and it looks amazing!!!!! We were so happy with the outcome. We did it about two weeks ago. This weekend I got an OIL ring from a bottle that penetrated three layers of sealer. ANY ideas on what I can do????? I’m so sad
Hi Crissy! Oh no! I would recommend trying to sand off the oil ring and then reapply a bit of feather finish on top of just that area and re-seal. That’s what I would do. Hope that helps. Good luck!
Hello, I love your DIY project and results using concrete. I’m curious to learn if you believe the same technique would work on a fiberglass tub and enclosure?
Thank you,
Karen
Hi Karen! I wouldn’t recommend it for a tub or shower because I have not tried that and just have no idea how it would hold up. Sorry!
Hi! Love this idea. Do you think it would work on kitchen counters?
Thanks
Hi May! It should work on any completely stable {no cracks, chipping or movement} surface. If you use it in a kitchen, you need to be sure to use a food safe sealer. Hope that helps!
do the concrete work on “plastic” sink
It should work on any completely stable {no cracks, chipping or movement} surface. If you use it in a kitchen, you need to be sure to use a food safe sealer. Hope that helps!
Do you know/have you tried dyeing/staining the concrete? Looks awesome…. I know what I am doing this weekend!
As far as I know, you cannot add color to this particular product, but Ardex makes something similar that you can color. I just don’t know the name of it. Hope that helps!
Thank you, Betty! I have heard others say they have added color to the cement, but I have not tried that. Thanks for reading my blog!
I don’t have a website but I love all things diy and this cocrete redo is wonderful. Can you add color to the concrete or stain it? I am in love with this project and it is something we could do cost wise. Can’t wait to show my husband he was just laid off after 27 years and really needs something to do. Thanks for sharing this marvelous idea.
Thank you, Kathy! As far as I know, you cannot add color to this particular product, but Ardex makes something similar that you can color. I just don’t know the name of it. You may be able to Google it or call Ardex for some guidance. Hope that helps!
Hi Kathy! I have heard others say they have added color to the cement, but I have not tried that. Good luck! Thanks for reading my blog!
I luv the way your concrete vanity turned out! Do you think this would work on kitchen counter tops? Mine are that awful laminate material. :) Thanks.
Hi Brenda! It should work on any completely stable {no cracks, chipping or movement} surface. If you use it in a kitchen, you need to be sure to use a food safe sealer. Hope that helps!
What an incredible transformation. I have the same exact marble and faucets! They are so outdated. I can’t wait to give this a try. With four young kids, I’ll get a good lesson in how durable this is. Thanks for sharing!
Thank you, Melissa!
You just blew my mind. I had no idea. Thank you! Is this worth waking up a sleeping husband over? Yes! I’m so excited!!!
LOL! So glad you are excited about it, Kate!
Do you think it would work over laminate? I have laminate throughout the bathrooms and kitchen. They’re all in good shape. They’re just laminate… :)
It should work on any completely stable {no cracks, chipping or movement} surface. If you use it in a kitchen, you need to be sure to use a food safe sealer. Hope that helps!
I have OLD pink marble Formica in my kitchen. Do you think the concrete method would work on that or do you have instructions on painting it or something. I can’t afford new tops….(single mom). Thanks in advance
Leiann
It should work on any completely stable {no cracks, chipping or movement} surface. If you use it in a kitchen, you need to be sure to use a food safe sealer. Hope that helps!
Hey! So I have a question. My vanity is actually made up of tile. Would this project still work on tile? I hope so, you have an awesome looking bathroom. Thanks!
Thank you, Erik! As long as your tile is not cracked or chipped and is totally stable, yes, you should be able to use this. It will probably require more layers over tile. Hope that helps!
what kind of concrete did you use? One of the quikrete products? With or without sand?
Angel
The product is listed in the material list. It’s called Henry’s Feather Finish and it is made by Ardex. I purchased it at Home Depot. Hope that helps!
What are the colors you used on the vanity/cabinet and wall? What store did u purchase them at?
Hi Gretchen! The wall color is Palace of Versailles by Clark & Kensington (sold at Ace Hardware) and the cabinet is painted in Driftwood Milk Paint by General Finishes, which you can purchase on Amazon here: http://www.amazon.com/gp/product/B00JE8TCDU/ref=as_li_tl?ie=UTF8&camp=1789&creative=390957&creativeASIN=B00JE8TCDU&linkCode=as2&tag=destrainalaws-20&linkId=TNFKBN5YZ72TPCNV I hope that helps!
Hi I was wondering how durable this is. Would it work on shower tiles do you thing?
thanks
Hi Louise! I would be reluctant to do it in a shower just because there is SO much moisture all the time.
We have a bunch of sack Crete is that OK to use?
I don’t think so. I am not aware of a Sakrete product that is comparable to the Feather Finish. Sorry!
You used it on marble but do you think it would work on builder-grade vanity tops? I don’t even know what it’s made of that we have. I know it’s made of a lot of ugly. A lot of ugly! This would be beautiful in our daughter’s bathroom.
Hi April! Ours were cultured (fake) marble and were definitely builder grade. That may be what yours are as well. As long as the surface is stable, not cracked, chipped, etc., this should work well! We did it on the laminate counters in our laundry room, too!
FYI: it’s called grout not concrete. Concrete consists of cement water sand and rock. Grout has no rock. I’m sure if there was rock in there this wouldn’t work. Just trying to help so people don’t get confused and pissed off.
Hi Ben. Actually, you are correct that it is not “concrete.” According to Ardex’s description, it is cement. It is not grout.
What area of home depot is this product feather finish ardec or Henry’s asked employees and I get a blank stair. Is it by grout or concrete area any help is appreciated!
Hi Chanda! It is in the flooring department. Tell them it is used to level floors. That should help :)
What do you think about doing this to a kitchen counter? I love this idea! Thanks!!
Hi Emily! I did it on my laundry room counters and LOVE IT! I think lots of people have done it on their kitchen counters. Check out Design, Dining and Diapers blog–she did it in her kitchen and it’s GORGEOUS.
Hi Tasha!
We’re about to do this in our bathroom. How long did you wait to apply the sealer after finishing the concrete? Was the concrete fully cured or did you apply it while still wet?
Thanks in advance for your reply!!
Hi Jessica! We let the concrete dry overnight and then applied the sealer. I hope that helps!
I LOOOOOOOOOOVE this!!! I’ve ruined my counter with hair color and jewelry oxidizing chemicals and intended to paint the cabinets anyway, but THIS!!! I want to do these sinks as well!!! I’ll have double the work since there are double sinks where I want to do it, but this is GORGEOUS!
Thank you, Mamie! Good luck!
I want to try this but I am curious, can you stain this concrete product?
I am not sure, Nan. I believe there is a similar Ardex product that you can add color to, but I have never tried it. I bet if you call Ardex, you will get a quick answer. I hope that helps!
Hi Nan! I have heard others say they have added color to the cement, but I have not tried that. Thanks for reading my blog!
Does anyone have an idea as to how to add color to the concrete before using. I would like a have a light tan color. Any suggestions?
Hi Karen! Ardex makes a product that is VERY similar to the feather finish, but that you can add color to. Google it or call Ardex to get the name of it. I can’t remember what it is called.
Can I stain it like other concrete counters?
Hi Brooke! I do not believe you can color the Feather Finish, but I believe Ardex has a very similar product that CAN have color added to it. Try Googling it or calling Ardex. I hope that helps!
Hi Brooke! I have heard others say they have added color to the cement, but I have not tried that. Thanks for reading my blog!
Thank you so much for your idea and wonderful instructions. I did this to my vanity sink and I absolutely love it
YAY! So, so happy to hear it Christy!
Great tutorial! My countertop is tiled and the sink edge is raised above the countertop. Do you think this would still work? Thanks!
It should still work, Marie, as long as the tile is in good shape and isn’t cracked or chipped at all. The underlying surface has to be totally stable. Good luck!
Does this hold up well? I would like to try this, but if it cracks and chips, I don’t think it would be worth it. I do love the look though :)
It is holding up perfectly so far and we finished it about 6 or 7 months ago!
Hi! Just love this project idea! Thank you for sharing. Do you think this would be possible with a laminate counter and old raised marble type sink?
Hi Cassie, as long as the laminate and sink are in good shape and aren’t cracked, peeling or chipped, it should work! We did it on the laminate counters in our laundry room and love it!
I would LOVE to see your laundry room…pretty please?? I really want to do a budget friendly concrete countertop over my washer/dryer so I have a shelf to fold etc. Pricing out actual concrete countertops it’ll be about $1300 for the space I need. So buying a plain old countertop and doing this is much more appealing. Thoughts or suggestions on how I could do it?
LOL, Kelly! Of course you can see my laundry room! It was my first post ever. Here you go: https://designertrapped.com/2013/10/the-laundry-room-reveal.html. You could just buy plain wood and use this product on top of it. It would be beautiful!
I am in the process of doing this and I have on light sanding and then the sealer to apply. My family can’t wait to see how this is going to look. Since I have a house full of boys I am constantly amazing them with my DIY projects. They think I’m crazy and I should just hire someone to do things. But I love to create unique things myself. I love character !!!! Thanks so much for posting!
My pleasure, Amy! I hope you and your family love the finished result!
I was wondering if you can do this to your kitchen counters? I currently have old laminate counters.
Hi Terra! Yes, as long as your laminate counters are in good shape (not cracked, chipping or peeling) you can! We did it on the laminate counters in our laundry room and it looks great!
do you think this could be done to a shower stall? It’s nit a tub just a standard shower stall.
I honestly don’t know, Shelley, but I would be concerned about doing it in a shower since there is so much moisture all the time.
We are going to replace that tub at some point anyways, so I might try this first. It couldn’t hurt and it may save us some money! If I do, I will let you know how it goes!
Do you think this will work on a floor.
Hi Susan! I have never tried it on a floor, but this product is actually meant to be used to level floors, so my answer is yes! The subfloor needs to be completely stable (not cracking, peeling, etc.), but it should work :)
Do you think this would work on a bathtub? My bathtub is a hideous “biscuit” color and this would be much easier than replacing it!
Hi Corie! Other people have asked that and I am just not sure. I would be nervous about trying to use it on such a large surface and in a tub where water will sit for a while. I have biscuit colored tubs as well and am trying to think of another solution. You can check out my friend’s guest post on painting her tub and tiles: https://designertrapped.com/2014/10/how-to-paint-shower-tiles.html
could I do this around the existing sink or would I have to take it out do you think? The previous owners of our house did a diy granite look (but not really) kit over vinyl but never took the sink out so it’s stuck in there. I was gonna test it in the ensuite to see but just thought I’d pick your brain first.
Hi Lindsay! I tried to do it around the sink in our laundry room, but it was too difficult, so I wound up popping the sink out and then putting it back in when I was done. If you absolutely can’t get the sink out, it is doable, but you will have a cleaner look if you can pop it out and put it back later. Have you tried using mineral spirits around the edge of the sink to see if you can get the paint to loosen up?
What color did you use to paint your vanity? I love that color and how well it went with the concrete countertop!
Hi Jennifer! Thank you! The color is Queenstown Gray by General Finishes. You can read all about it in my post on painting my kitchen cabinets: https://designertrapped.com/2014/06/paint-your-kitchen-cabinets.html I hope that helps!
do you think I could do this over laminate and ceramic?
Yes, as long as there are no cracks, chips, etc. The underlying surface has to be totally stable. We did it over the laminate countertops in our laundry room and it looks great! You can check them out here:
What would happen if there were hair-line cracks at the base of the drain? Do you think it would still work?
I would not use it on an cracked surface.
what do you think about doing this method over regular countertops? and where the sink is not integrated like this? the counters in my new place are awful. and they even used the counter material all the way up my walls in the kitchen for the backsplash. not good.
Yes, as long as there are no cracks, chips, etc. The underlying surface has to be totally stable. We did it over the laminate countertops in our laundry room and it looks great! We just took the sink out and then put it back in when we were done. You can check them out here: You could probably even do it on your backsplash, though I opted to paint ours, which you can see here: Good luck!
Thank you!
The links didn’t show up. Would you mind posting them again?
What if I do not have a marble counter top? My counter top in vinyl. Do you think that would work?
You can apply it to any counter top surface, as long as there are no cracks, chips, etc. The underlying surface has to be totally stable. We did it over the laminate countertops in our laundry room and it looks great! You can check them out here:
LOVE LOVE it! Can’t wait to try on my kitchen counters. Thank you so much!
My pleasure, Katie!
Hi,
I was wondering if you can add concrete dye to make a colored countertop?
Thanks
Hi Sheryl. There is another Ardex product that can be colored, but I cannot recall the name. Try Googling it. I hope that helps!
It looks great, but I must admit I’m skeptical to how it will hold up over an extended period of time. I have been toying with the idea of doing paintings on concrete and wondering just how thing I could pour concrete into a mold or over a surface. Maybe I’ll test it out on a piece of plywood first. I’ve previously considered doing concrete counters for my kitchen, but was planning to make molds and pour them with a significant depth (1.5″ – 2″) and reinforcing it wire or small rebar. However, if this method words well, it would be quite a time and money saver.
Thanks, John! We finished it about 5 months ago, and it is holding up perfectly so far. I plan to post an update at the year mark, so check back then. We also completed our DIY concrete fireplace well over a year ago using this method and it is in perfect condition. It didn’t even crack when we hung our TV on it. You can check that out here:
do you think this could work in a kitchen over laminate countertops? I am concerned about knife marks or heavy pans chipping it. Great job and thank you, April
Yes, as long as there are no cracks, chips, etc. The underlying surface has to be totally stable. We did it over the laminate countertops in our laundry room and it looks great! You can check them out here: I don’t know how it would hold up to knifes, but you would have to drop something REALLY heavy on it to chip it, I think. We used this on our fireplace { and it didn’t crack or chip at all when we had to drill into it to mount our TV. Good luck!
Im wondering about colors. I want a bright white, how do I get that?
Hi Steph! Call Ardex. I think they have a product that is VERY similar, but is white in color and resembles white marble. I hope that helps. Good luck!
I am so excited to try this on my powder room that looks exactly like your before pic!
Yay! Good luck!
Can you use this same technique on formica counter tops?
Hi Glenda! As long as the existing counters are in good shape {not cracked, peeling, etc.}, it should work fine! We did it on the laminate counters in our laundry room and it looks great! Good luck!
What about mixing color to the concrete mixed?
We have never done that Sajee, so I don’t know. Sorry! You could probably contact Ardex and ask.
Amazing! I love concrete countertops, and even better that it is so inexpensive. Any thoughts on how well it would work for kitchen counters?
Hi Veronica! Loads of people have applied it to their kitchen counters, so I am guessing it works great! Hope that helps!
would this work on a laminate bathroom counter? I have a porsilin sink that I can remove. Thank you.
Hi Penny! As long as the counter is in good shape {not cracked or peeling} it should work well! We applied it on the laminate counters in our laundry room and it looks great! Hope that helps!
would this work over a laminet (sp) bathroom counter? I have a porsilin sink that I can remove.
You had me at $20 renovation! This turned out amazing!
How do you think this would work on a ceramic tile floor?
Hi Sarah! I have wondered that exact same thing. The product is actually intended to level floors, so there should not be a problem using it on a floor. And as long as the tile is not chipped or cracked and is “stable,” it should be okay. The reason I haven’t tried it in our foyer is because I cannot imagine sanding such large space. But, theoretically, it could work! I hope that helps!
I was wandering how this would do over porcelain tile.
Hi Carl! As long as the tile is not chipped or cracked and is “stable,” it should work just fine over porcelain tile! Hope that helps!
Would this work in a shower that has cultured marble? The house we bought has yellowed cultured marble surrounds in both showers. I would love to see if someone has done this. The cultured marble is in great condition, just ugly.
Hi LM. Theoretically, you could use it on any stable surface that is in good condition. I just don’t know how it would hold up to daily showers. It works well in our powder room sink because it doesn’t take long to wash your hands. Showers take much longer and I just don’t know how long the sealer would last, etc. Sorry I can’t be more helpful!
Thanks, those are good thoughts. Would hate to end up with a big mess!
I have the same kind of vanity but it has a few cracks near the drain. Do u think the concrete would cover those or not?
Hi Meg! I think the concrete would cover the cracks, but the manufacturer specifies that the product should only be used on stable surfaces, i.e., not cracked, chipped, etc. I think you would run the risk of the concrete cracking where there are cracks beneath the surface. I hope that helps!
Have you ever tried this on formica counter tops? I have some ugly countertops in my kitchen and this looks like a really cool idea.
Hi Melissa! I used it on our laminate counter tops in our laundry room and it worked like a charm. You can check out that post here:
Hi Tasha-
Is this possible to do on a corian counter top in a kitchen?? We moved into our new place a few months ago, and they had these unsightly lime/teal looking corian counters. I just hate them, but we can not afford all new counters at this time. Thank you in advance!
Tara
Hi Tara! As long as the Corian is in good shape (not chipped, cracked, etc), it should work. Just be sure to sand it well to get the sheen off so that the concrete will stick. I hope that helps!
Can this be done to laminate vanity countertops? Thanks!
Yep! Check out the post on my laundry room: . I did it on top of the laminate countertops in there!
Is it possible to stain the concrete before sealing it?
Hi Anna! There is a product made my Ardex that you can stain before even applying it, but the name escapes me at the moment. I have never tried it and it is more expensive than the Feather Finish, but it can be done. There is also a product that is white, which I am anxious to try it! Hope that helps!
How is the durabiity of the concrete? Would love to do it my bathroom, which has, surprise, surprise, the same old style that you had.
INCREDIBLY durable, Sarah! I am amazed by how durable it is. We stand on the concrete fireplace that we made with the same product AND mounted our TV on it without any problems–you can check it out here: .
This is incredible Tasha- I can’t believe how well it turned out! It looks amazing!!
Hello! We are looking at doing this very soon! I am wondering if you are able to do this and install new sinks?
Hi Brittany! I don’t see why not, as long as you don’t have integrated sinks to begin with. I would just take the old sink out, apply the concrete, seal it and THEN install the new sink. Let me know how it turns out!
I really love this! Might try this on my own bathroom counters since mine are booo-rrrringggg!
Watch for cracks in the concrete. If concrete breaks up and goes down drain it’ll ruin your pipes. (Husband has worked w/ concrete 30 years and advised caution).
Looks great! Love thinking outside the box ideas!
Will do, Vickie! Thanks for the tip!
I would stuff either paper towels in the drain or old washcloth
can you do this concrete treatment over old, cracked, nasty ceramic tiles, if you sand them well, to rough-up?
There is no glazing left on the tiles; about 60 yrs. old.
I’m afraid not, Lyn. The surface that you apply the concrete to has to be “stable.” That means no cracks :( Sorry!
Love this update, Tasha! So incredibly cool. It’s giving me the confidence to do my counters.
I have to admit you are a brave soul — I would be terrified to do this in a vanity and I’m pretty sure my husband would say no to the idea {hee-hee}. Turned out great though :)
Thanks so much, Kelly! I’ll admit I was terrified that it wouldn’t work, but it turned out just the way I wanted!
Can this process be done on top of laminate counter tops?
Hi Timmery! Yes, you can see that I did it on my laminate counter tops in our laundry room here: https://designertrapped.com/2013/10/the-laundry-room-reveal.html
This is so cool. I love the look, too!
Thanks so much, Amy!
i just love this and want to do it on kitchen counters and one of the bathrooms too your tut is very easy to follow also but i do have one question concerning step 3 when can you mail me your putty knife? xx
oh after reading it again i guess i will need your drywall tray too please xx
:) I’ll hang on to my drywall tray, too. But, you could use some tupperware if you don’t have a drywall tray!
LOL, Chris! I have a certain fondness for my putty knife, I am afraid :) They are pretty inexpensive, though!
Awesome!! What a great idea using concrete! I really love how it looks all finished. We might have to try this on ours!! Pinned!
Thanks so much, Amanda! I am sooooooo happy with how it turned out!
This turned out so great! I love the color you chose for the cabinets too! :)
Thank you, Sarah! I had no idea if it would work, but it did and we love it!
Ok..this is awesome! I am about to start our mini bathroom makeover and have the same marble vanity.May still your idea, Friend!!♥ Pinned!
Go for it, Aniko! It’s a fun project!
That “still” meant to be “steal” -haha:-)
did you paint your cabinets too? Or did you change them out?
Looks great!! :-)
Thanks for sharing!
Dena
Hi Dena! Thank you. We painted the vanity cabinet and changed the knobs. We painted them the same way and with the same milk paint that we used on our kitchen cabinets–you can read all about that here: I hope that helps!