From Carpet to DIY Hardwood Stairs: Step-by-Step Tutorial
If you're looking to upgrade your home's staircase, hardwood stairs are an excellent choice. Not only do they look beautiful, but they're durable and long-lasting. If you're a DIYer, you might be wondering if you can install hardwood stairs yourself. The answer is yes! Removing carpet from stairs and replacing it with wood stair treads is a very doable do-it-yourself project. It only took us a day and a half to remove our carpeting and install new wood stair treads. And in this post, I'm sharing the full tutorial!
* UPDATE: We installed the our DIY hardwood stairs and published the original tutorial for this project in 2015. They still looked perfect when we sold this home in 2020. We were very happy with the quality! *
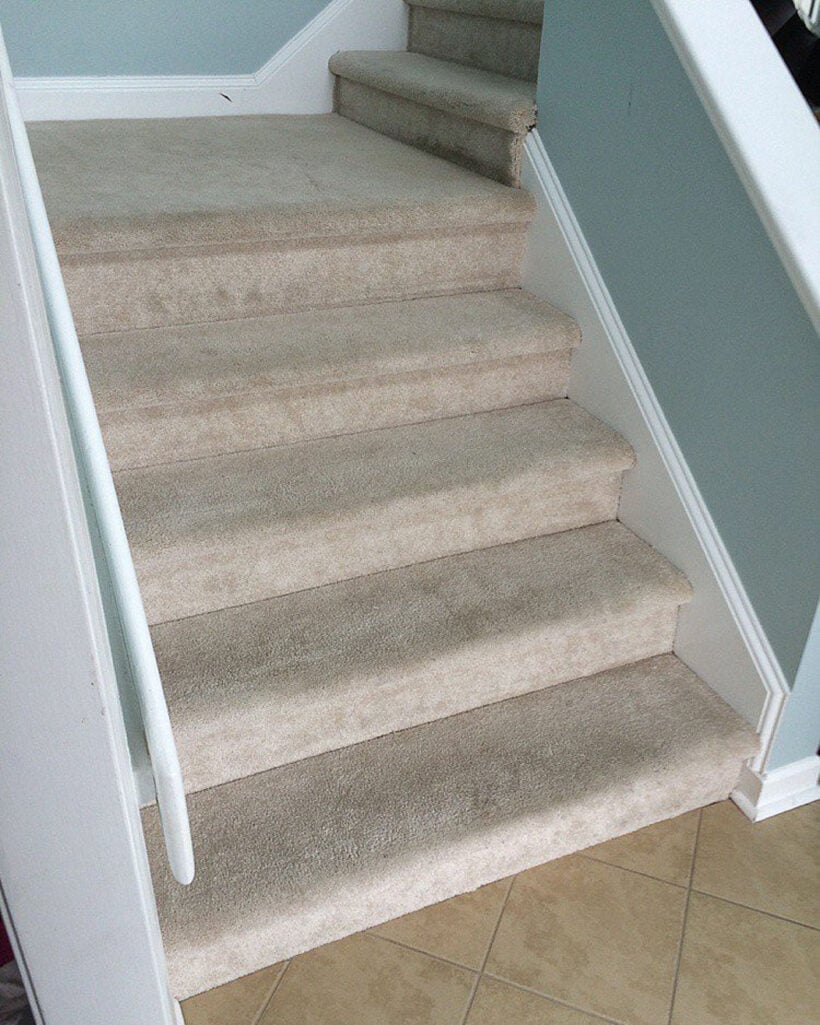
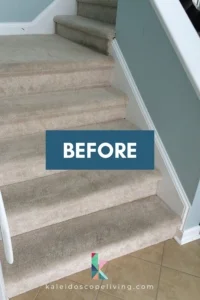
We did not like our dated staircase covered in beige carpet. It was boring and uninspiring. So we modernized the staircase by ripping out the carpet and installing hardwood stair treads. It only took 1 1/2 days!
I thought installing wood stair treads would be so hard. It was NOT. We have done a lot of DIY projects and home improvement projects over the years. And we've installed our fair share of flooring, including installing new laminate flooring throughout our entire home. Installing these new stair treads was FAR easier than installing flooring, which really surprised me. And it was also much more affordable than hiring it out to the pros (which we did in a previous house and I am still a bit shocked by how much we had to pay for it)!
This post contains affiliate links for your convenience. Click here for my full disclosure policy.
How to Remove Carpet and Install Wood Stairs
Materials Needed
- Wood treads /hardwood treads(they are sometimes called “retreads”–you can learn more about the exact stair retreads we used below)
- Construction Adhesive
- Nail puller
- Utility knife
- Hammer
- Crow bar
- Circular saw (at a minimum–inexpensive and would get the job done)
- Miter saw (makes it easier)
- Table saw (also makes it easier–this is the table saw we have and love)
- Caulk, painter's tape and touch-up paint (if you don't have leftover paint, you can use these tips to match a paint color that is already on your walls)
- Wood Stain
There are LOTS of stair tread options out there y'all. Sometimes you can even find them inside an actual home improvement store like Home Depot (though usually you have to order them since they don't always stock them).
In the end, we chose theNuStair hardwood stair treads because it's 1) high-quality and 2) all of the materials you need, even the adhesive, are shipped directly to you and that really appealed to us since it would save us lots of time.
And I have to tell you, installing our DIY hardwood stairs moved smoother than ANY of our projects in recent history. I believed the system would work well and would be beautiful, but I honestly did not expect that it would be as simple as it was. We had 95% work done in one weekend. ONE WEEKEND. Really, in 1 1/2 days. It was awesome.
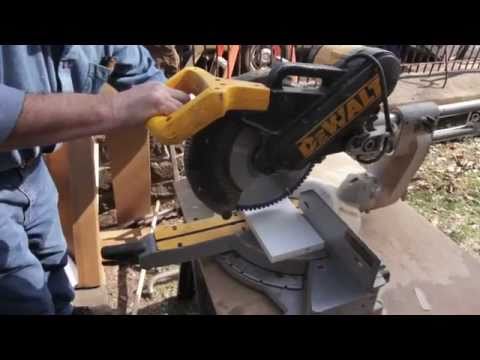
Helpful Installation Video
I highly recommend watching this installation video before you get started. Even if you go with a differentstair retread product, the installation should be very similar.
Step-by-Step Tutorial
Time needed: 1 day and 4 hours
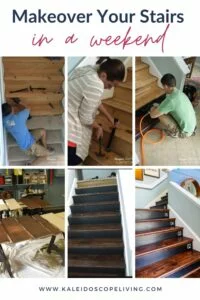
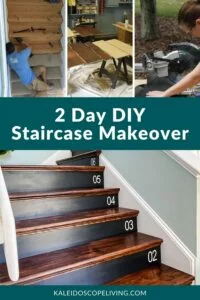
It took us 1 1/2 days to rip the carpeting off of our stairs and install new wood stair treads. Read on to learn how we did it.
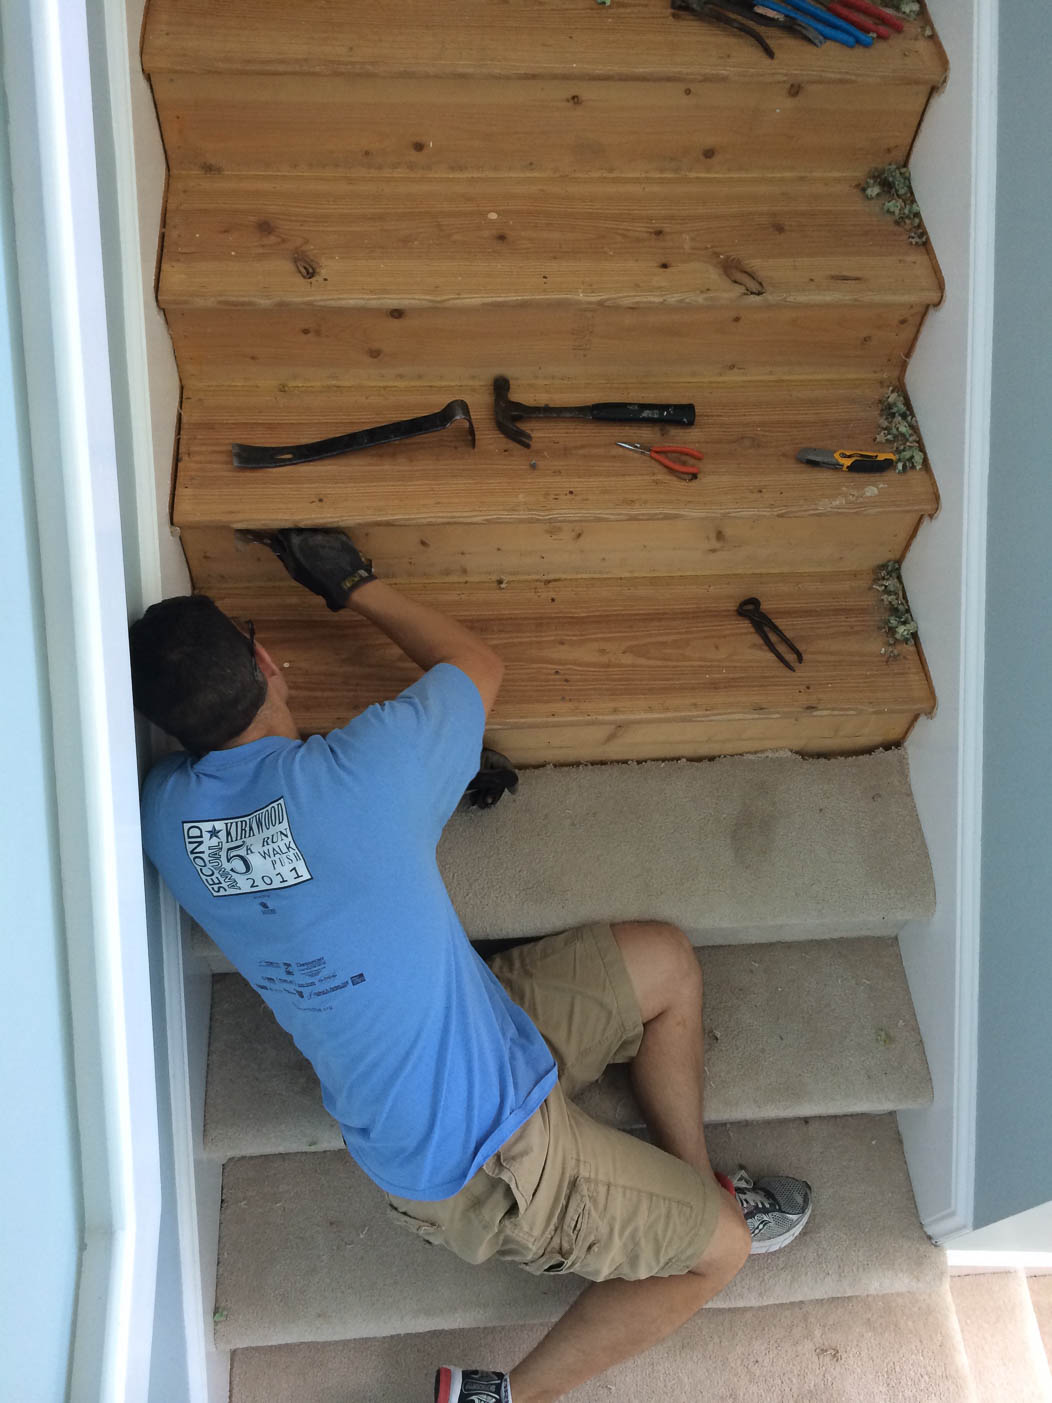
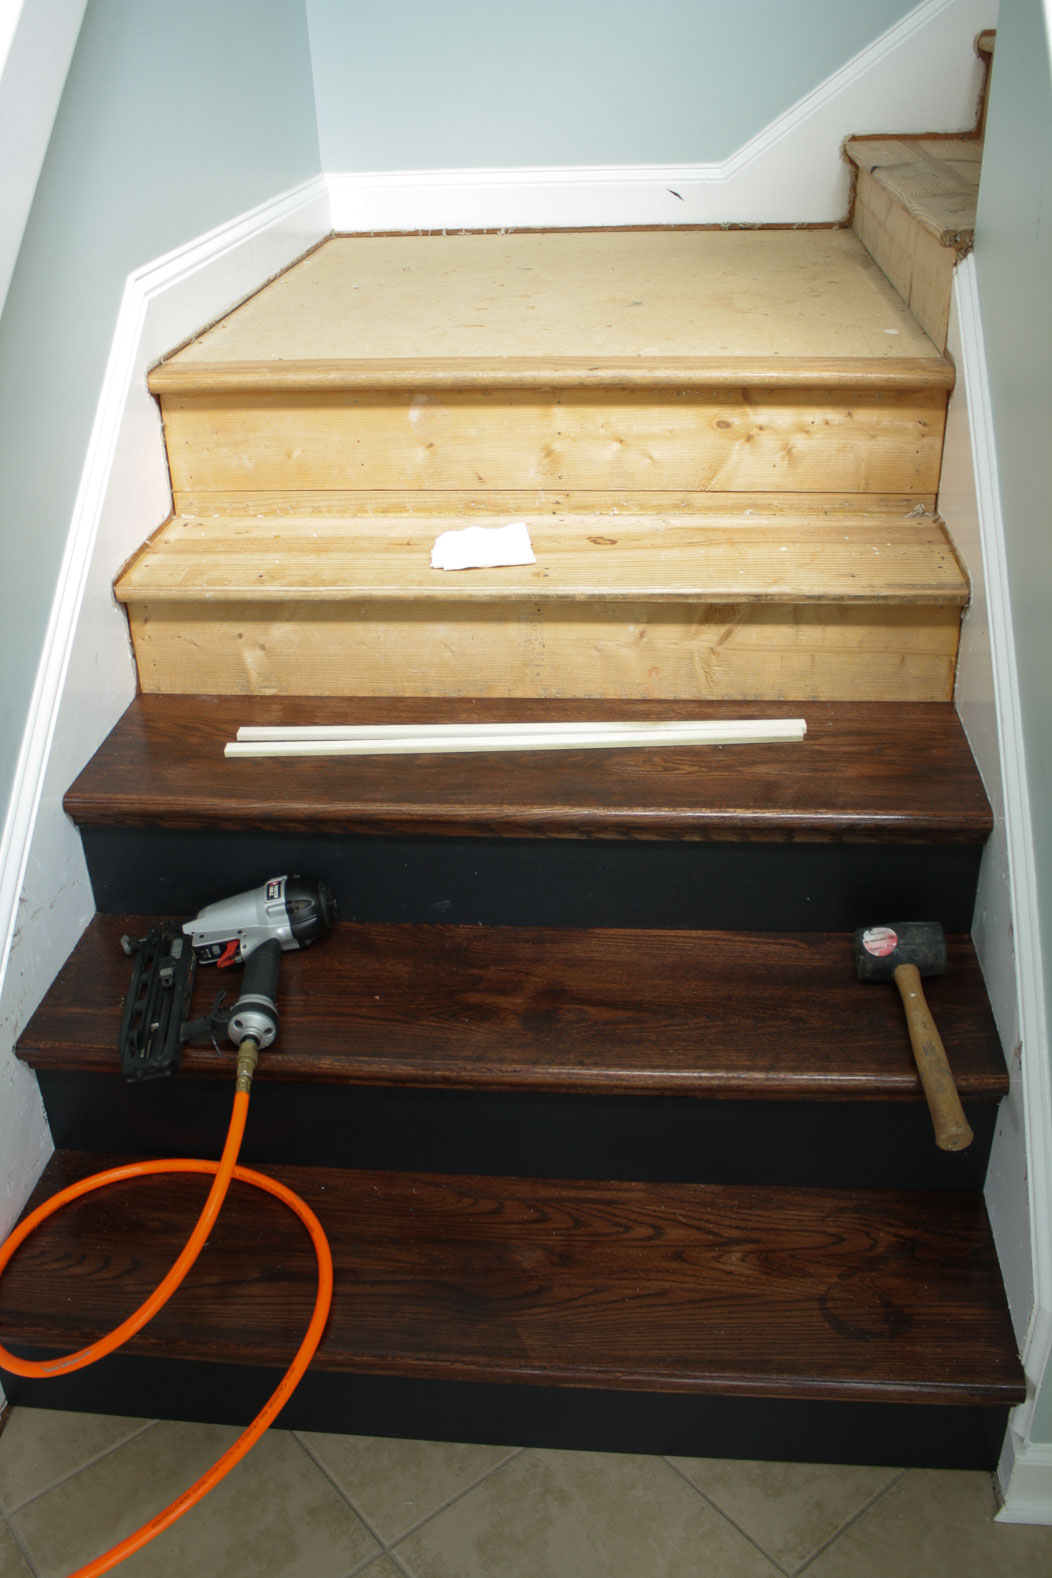
- Remove your old carpet & tack strips.
The first step is to remove your old carpet and carpet pad. use a utility knife to cut the carpeting into manageable sections. That part wasn't bad. Removing the tack strips and staples was a lot less fun, but it moved relatively quickly. You may need to use pliers to remove any remaining staples or carpet tacks. The entire “demo” step took about 4 man-hours.

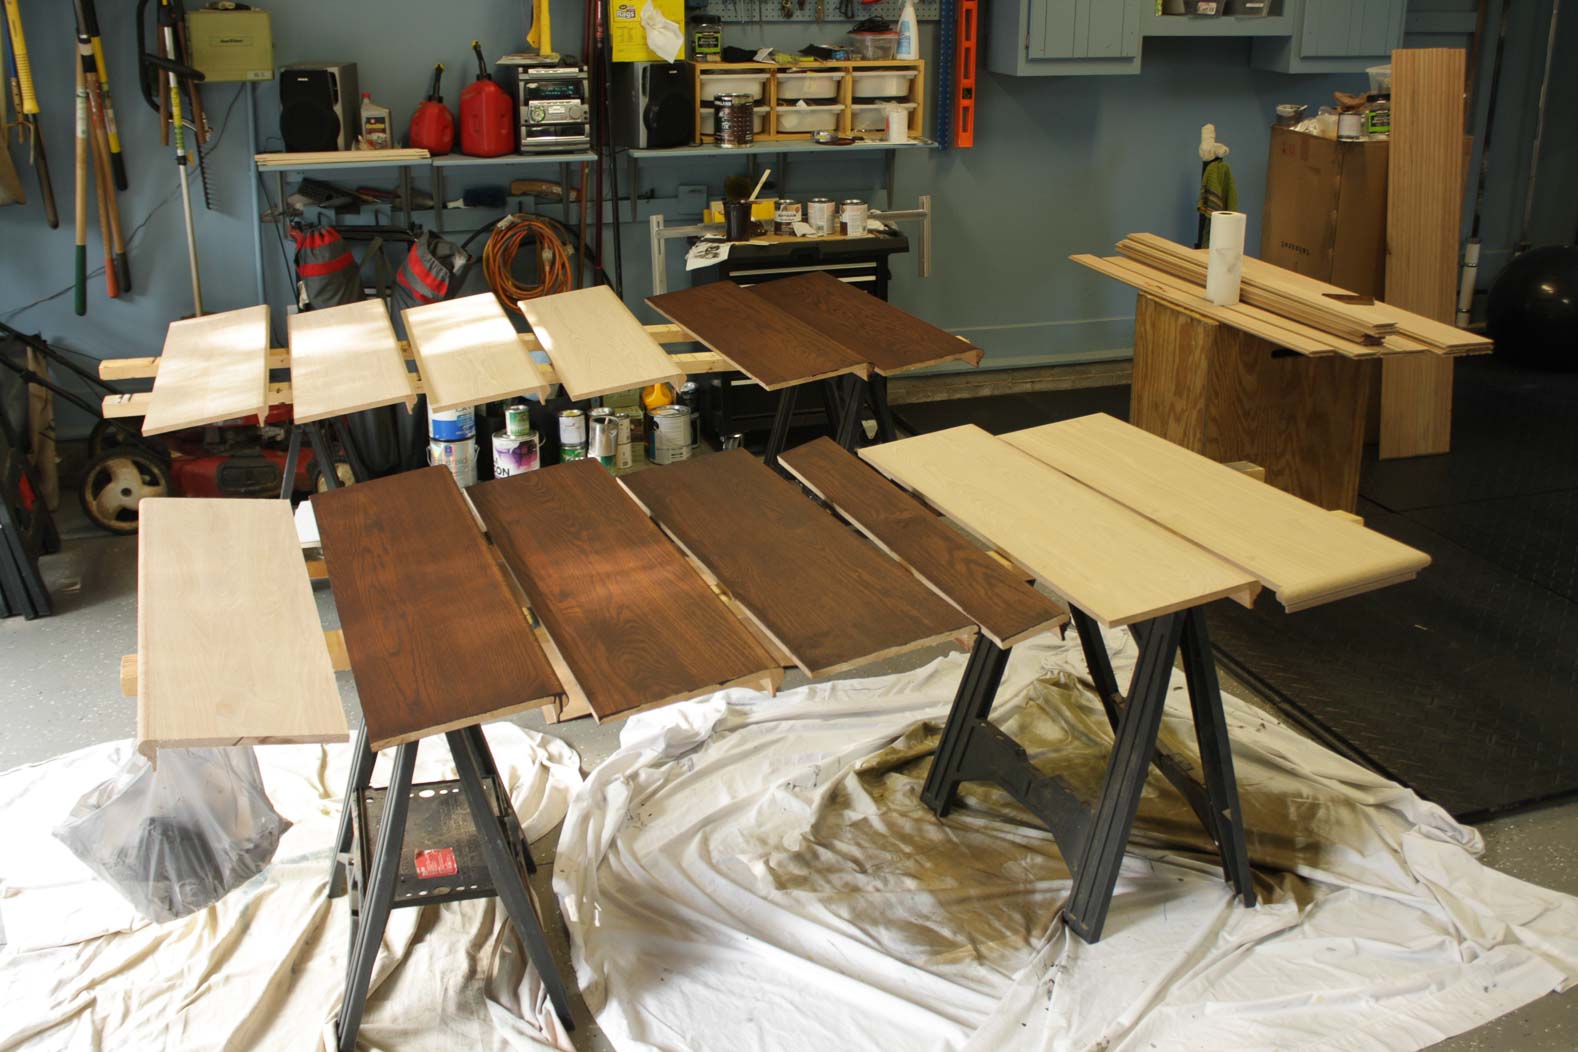
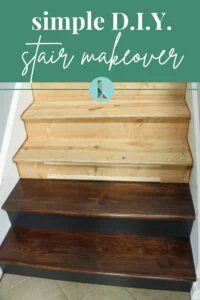
- Stain your hardwood stair treads.
The next step was to do a whole lot of staining. You can order pre-finished wood treads, but we chose unfinished red oak so that we could stain it ourselves to match the laminate flooring we have in our home. So, after custom mixing a stain to match our laminate floors, we stained, and stained, and stained. Fortunately, we only had to apply one coat of stain. It dried quickly and we were able to put a coat of water-based polyurethane on before we went to bed that same night.

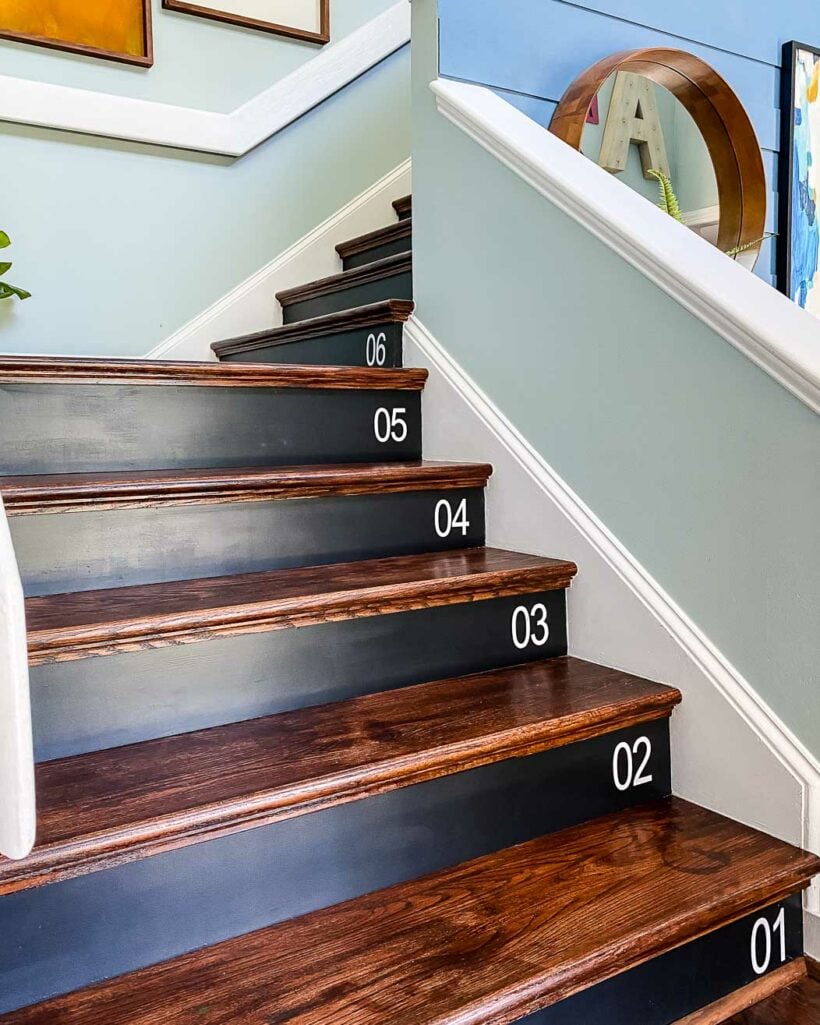
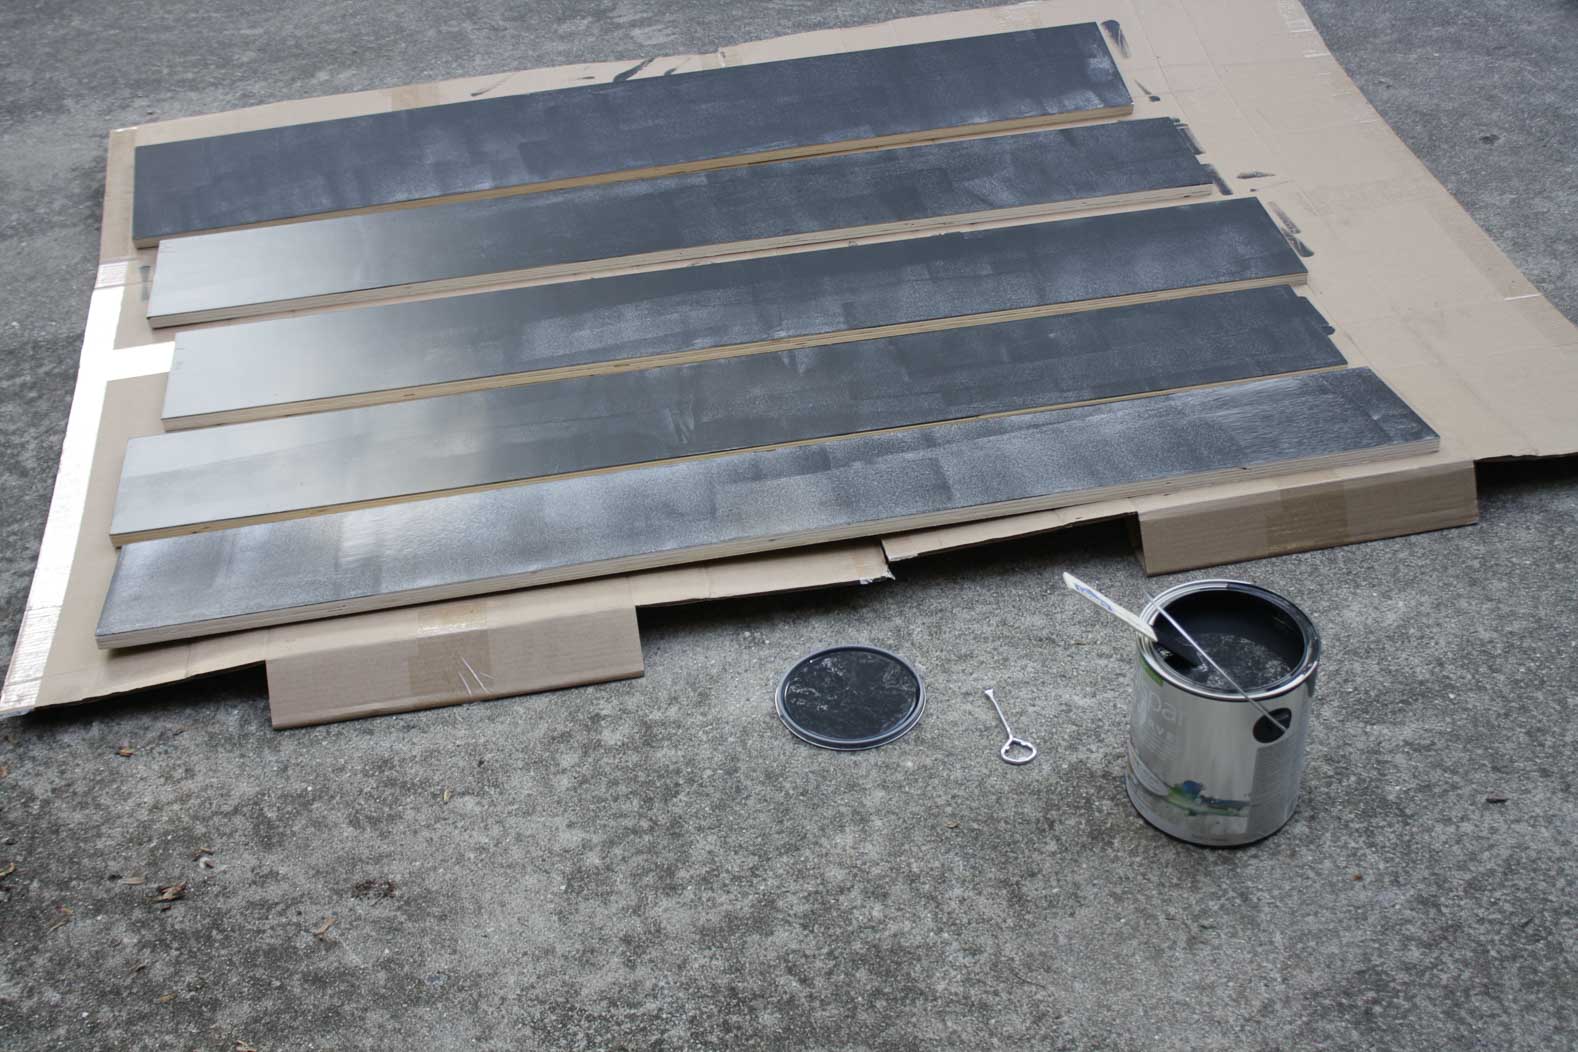
- Paint the stair risers.
The NuStair retread kit we used also came with stair risers, which is pretty customary. We chose to paint our stair risers black. They come primed, which is awesome because it saved us a step. We had to apply 2 coats of black paint for good coverage, but it moved really quickly. It took about 4 hours to do all the staining/sealing and painting, with both Joe and me working on it.
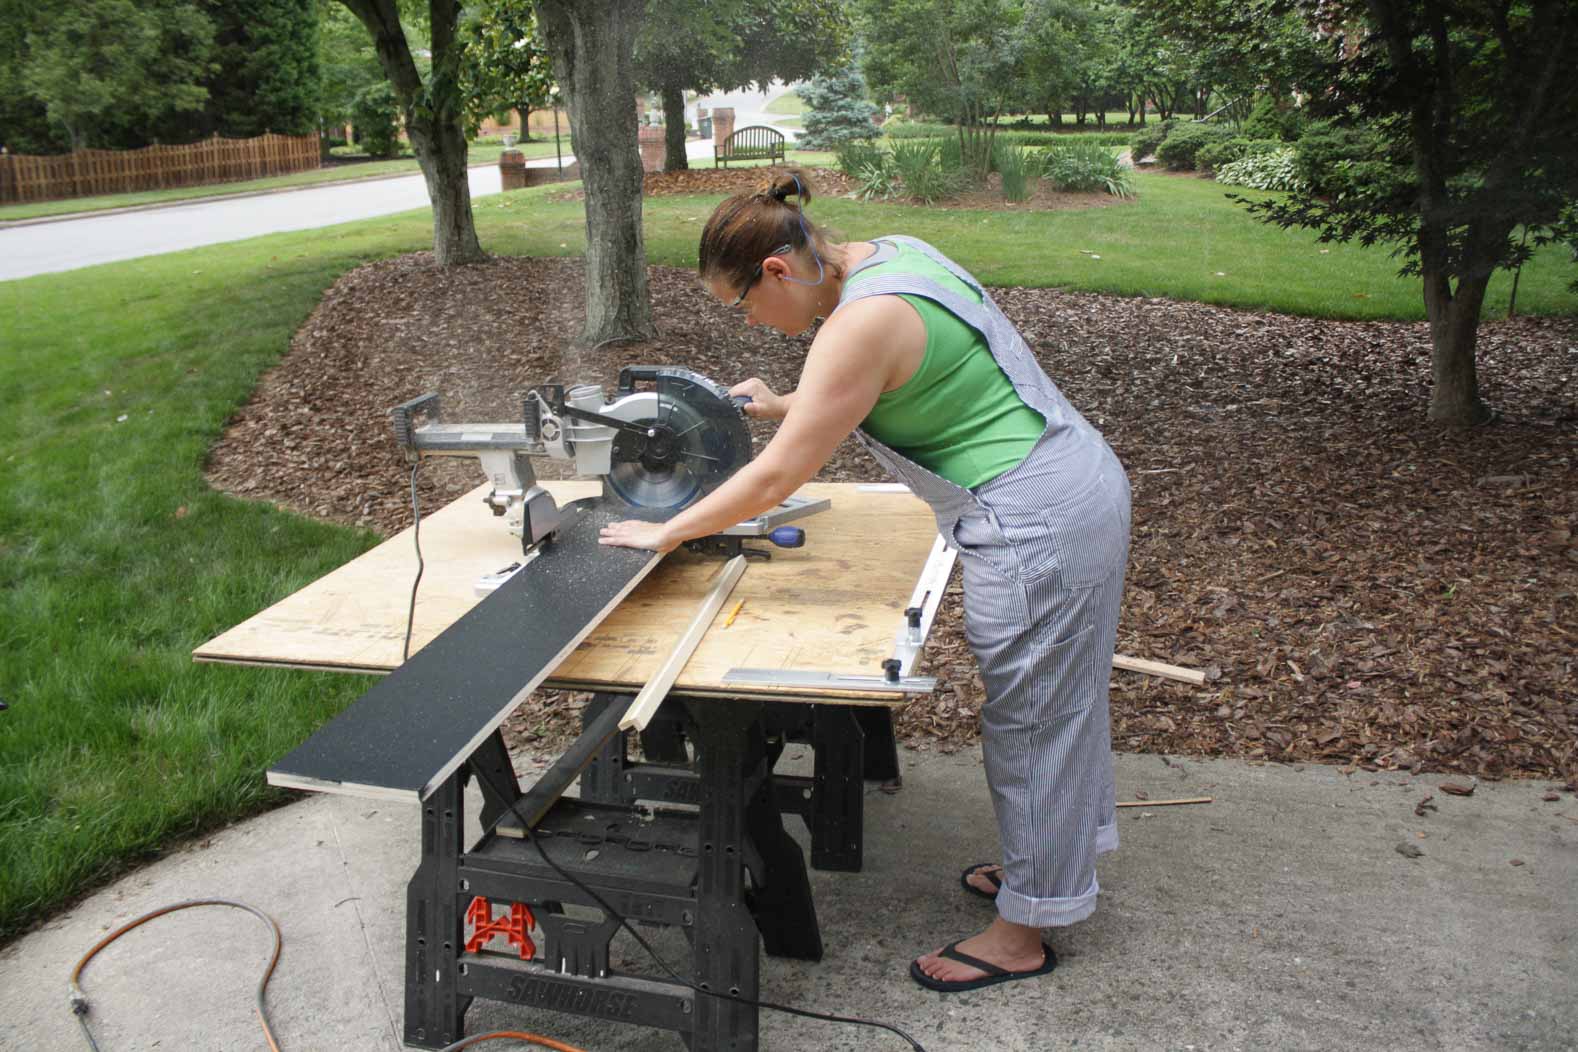
We let the stain/poly and paint dry overnight and got to work installing the stair treads and risers the next day. - Trim all of your stair treads and risers to size.
I know it sounds hard to believe, but the installation really could not be more simple. NuStair provides something called a “NuScribe,” which acts like a slide ruler and can be positioned on top of each step, with the edges fitting tightly against the the stair stringers. Once you have a snug fit, you lock down the arms and then remove it from the stair. Then you position it on the NuStair tread, make your marks and your cuts.
- Install the first wood stair tread.
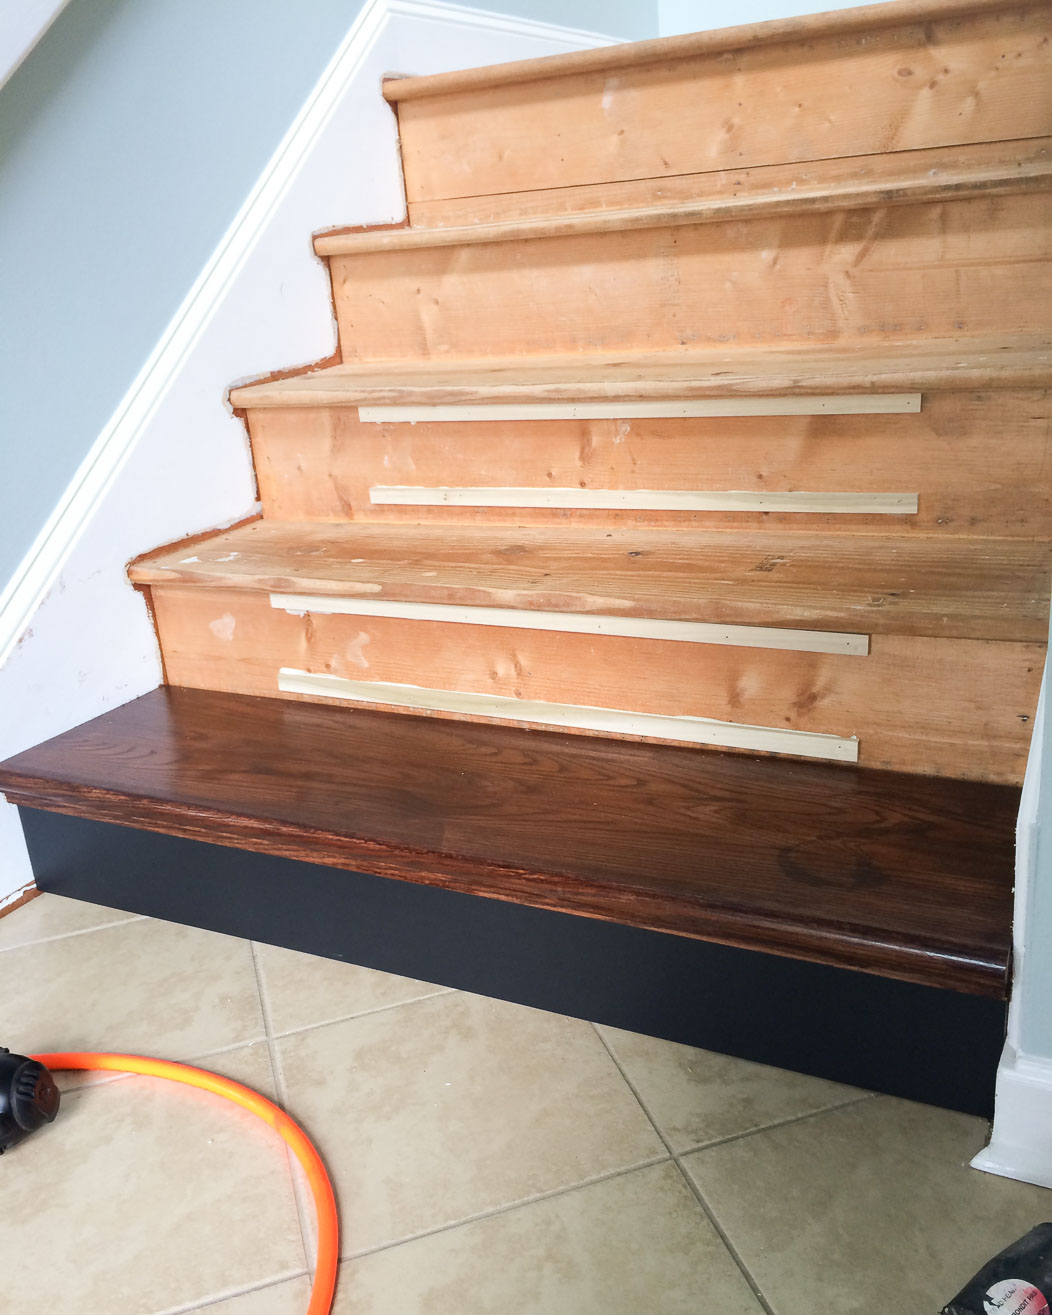
Install the 1st stair tread using a urethane-based adhesive. Secure your 1st pre-finished stair tread by nailing the back edge so that it will be disguised by the riser.
Then install a set of shims (that also come with the kit) using adhesive and nails. Shims behind the stair risers are necessary if you don't want to remove the bullnose from your plywood stairs. The stair nose / bullnose would cause the new tread to sick out too far, but shims behind the risers ensures that problem doesn't occur. You could certainly cut any bullnose off your plywood stairs if you want, but it was much faster (and tidier) to use shims behind the new risers.
Then install the 1st riser with the cut edge facing up and the factory edge against the floor.
You can see how our first stair tread and riser look installed below. You can also see how the shims are installed on stairs 2 and 3.
- Keep installing your wood treads and stair risers until you are done!
Just keep installing your risers and stair treads one at a time until you are finished!

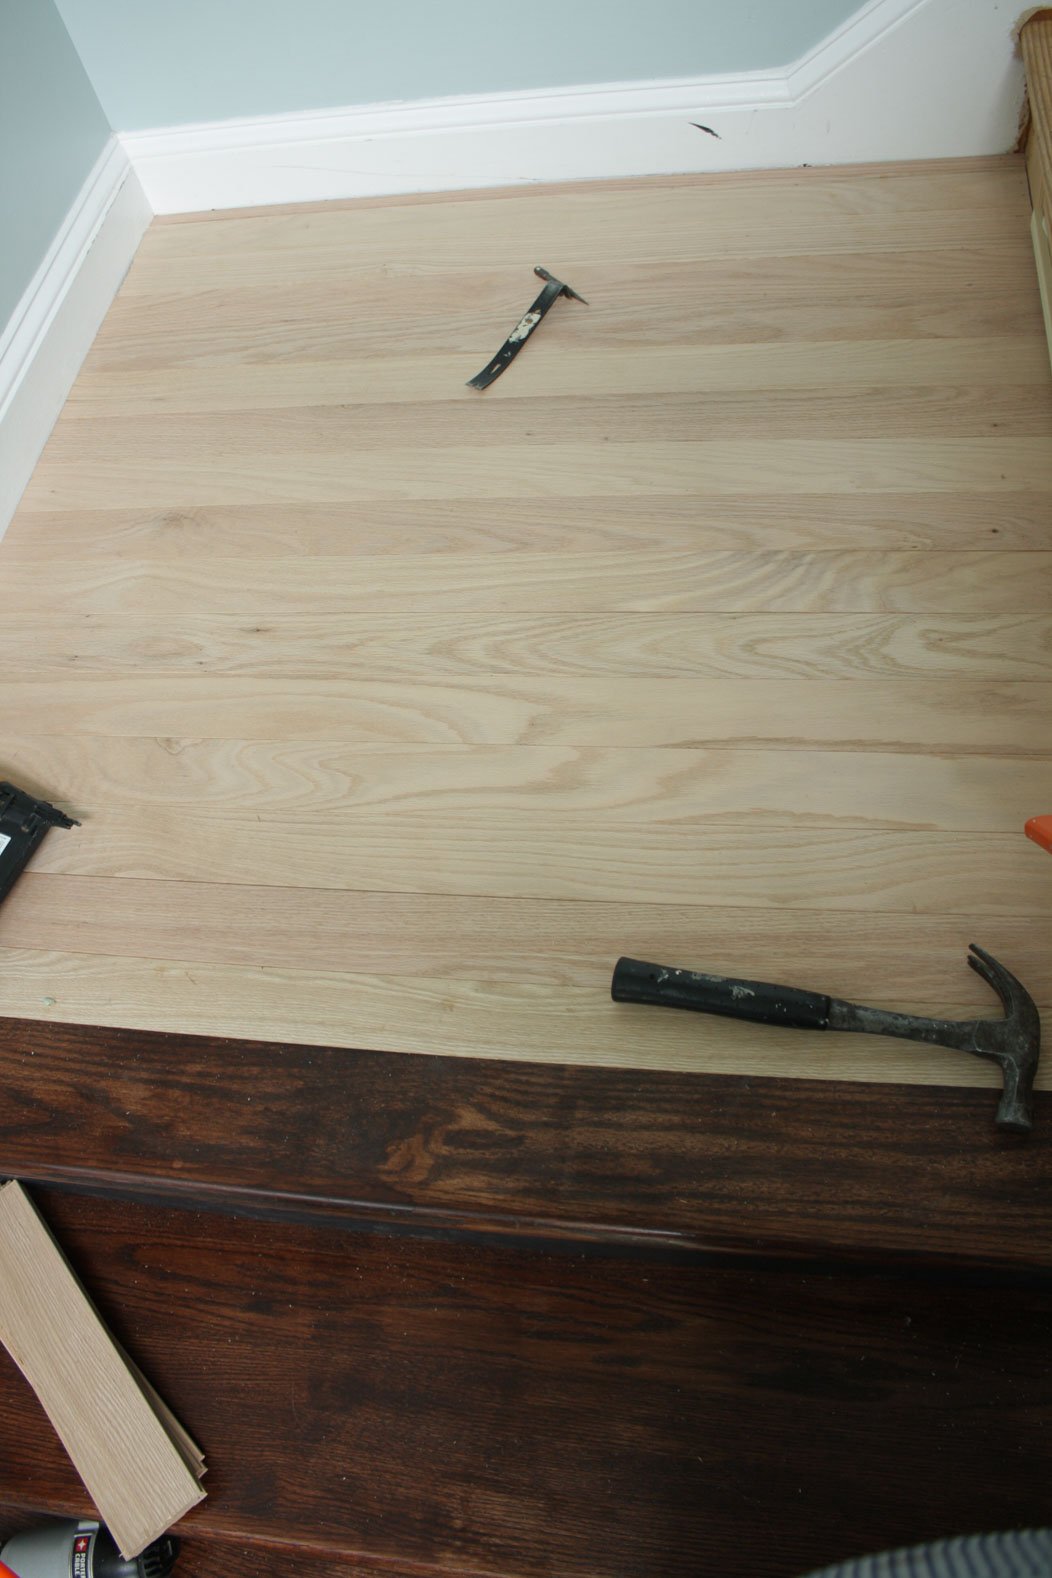
- Install hardwood flooring on your landing (if necessary).
We have a small landing where our staircase turns, so we installed hardwood red oak flooring on it and stained it to match the stair treads after it we finished everything else. We were able to order the small amount of hardwood planks that we needed for this landing from NuStair as well.
- Caulk and touch-up paint as needed.
Once we were totally done installing the new wood treads, we caulked along the edges and touched up the paint on the baseboards and banister/handrail and then we were DONE!
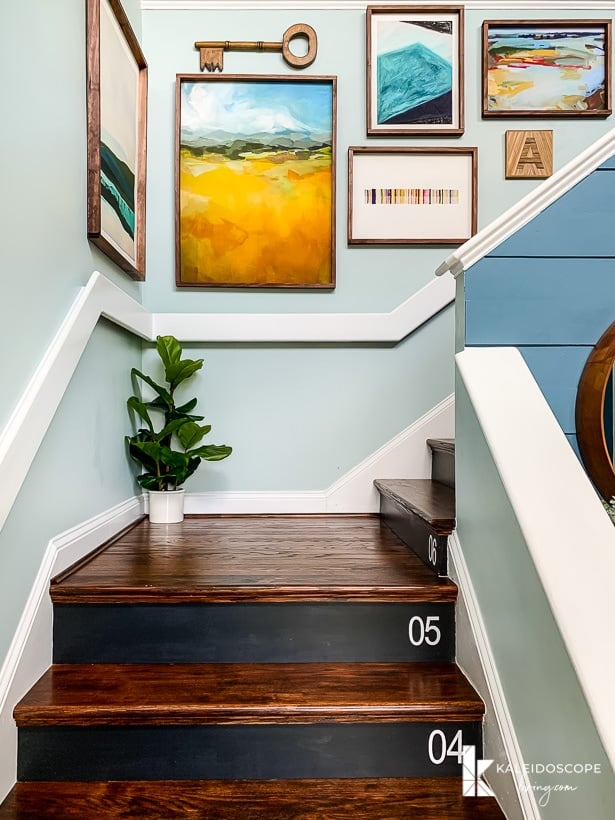
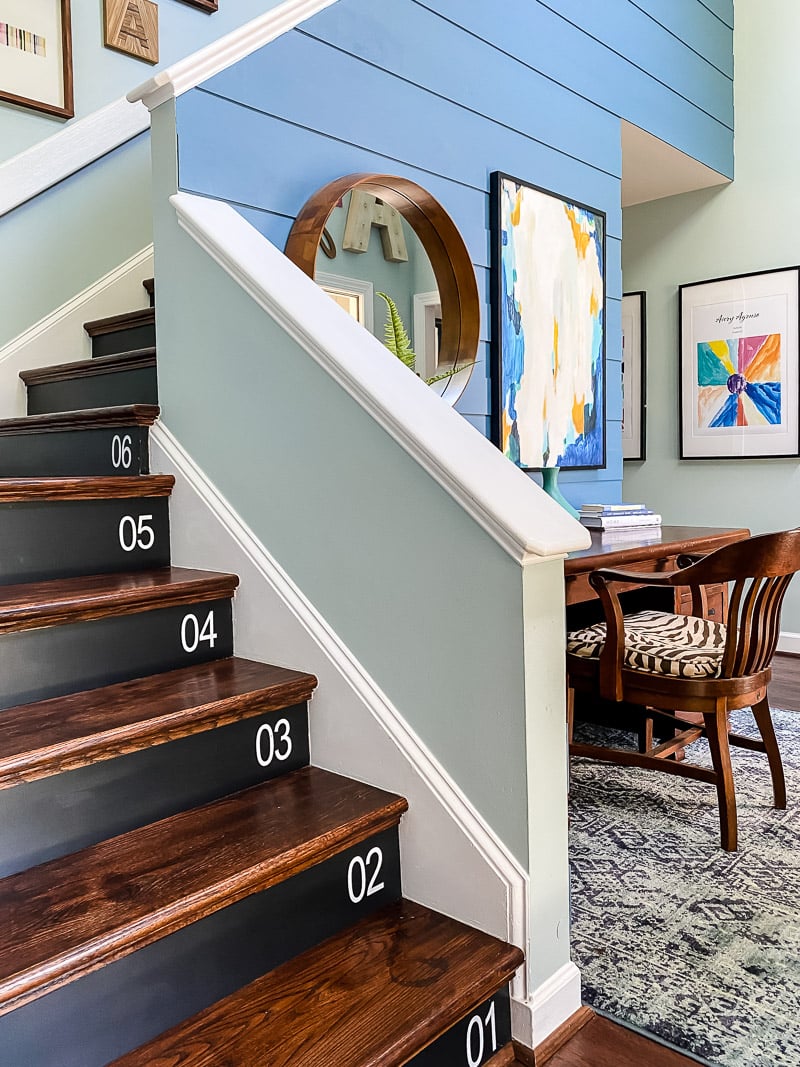
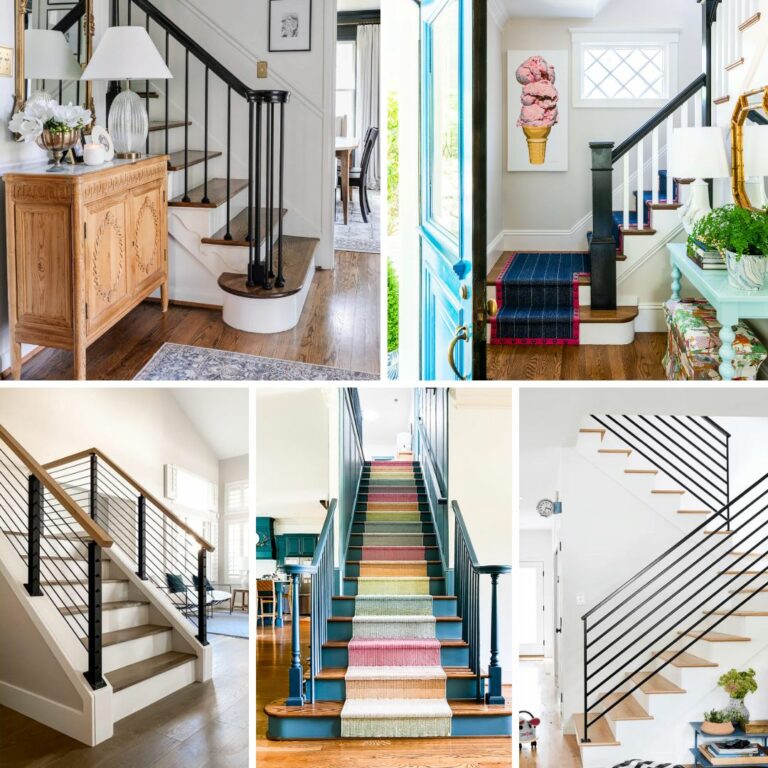
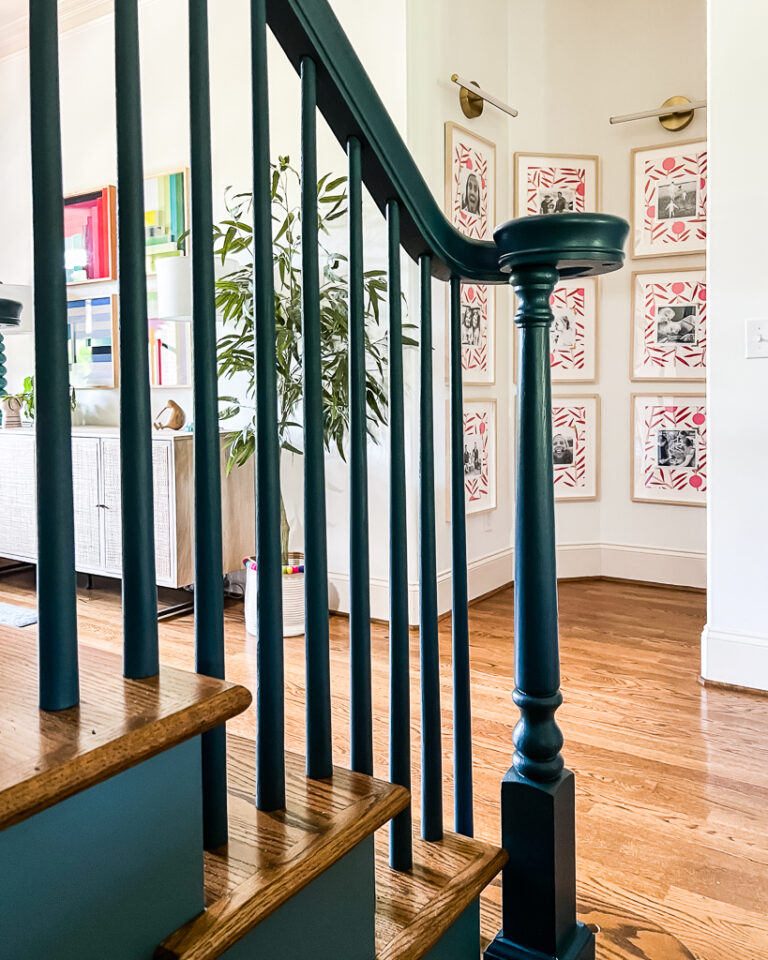
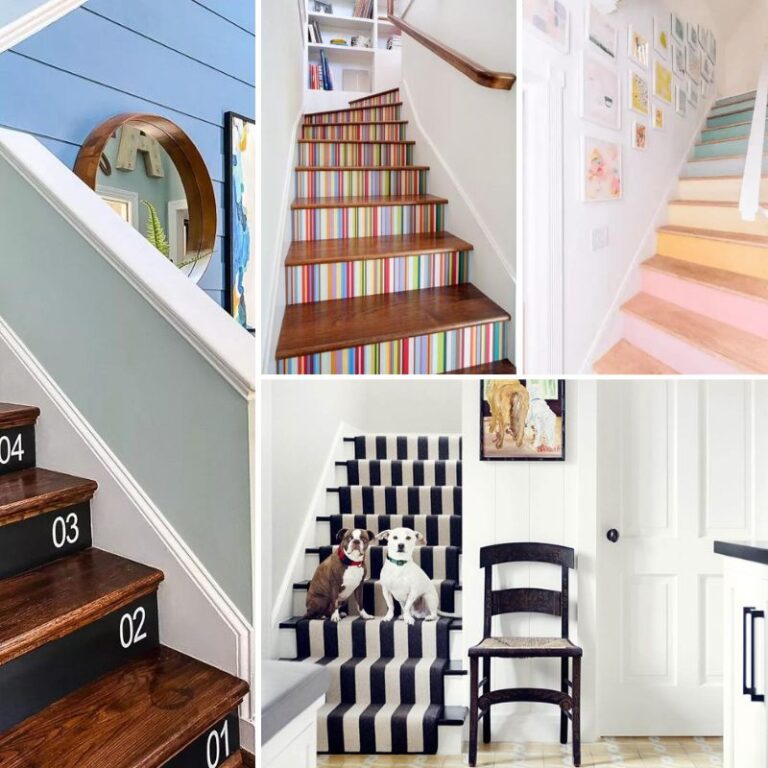
We decided to add a bit of a stylish touch to our new stair risers by numbering them. When we were thinking about what to do in the stairwell, I considered a fun stair runner, but I really wanted to enjoy the clean new look and all of our hard work! So instead I used durable peel and stick vinyl (you could also use a little paint and a stencil).
And you know I couldn't resist adding an eye-catching gallery wall (check out my gallery wall tips) with my inexpensive DIY frames. And we also installed this modern plank wall and painted it one of my favorite blue paint colors to finish off the foyer.
We are so happy with the finished look.
Frequently Asked Questions
If you hire a stair renovation job out, it can be pretty expensive! Generally, the cost of replacing carpeting with wood stairs can range from $3,000 to $5,500. The price will vary from project to project, obviously, depending on whether you have a short set of stairs or a longer staircase. Also whether you have a landing, balusters, and open or closed railings factors into the price.
We have had hardwood stairs professionally installed in a previous home that we owned and I was SHOCKED by how expensive it was. It's been almost 20 years since we did it, so I don't recall the exact price, but the stairs cost more than having hardwoods installed in the entire first floor of the house.
If you install DIY hardwood stairs yourself, it's reduces the expense significantly! The cost for everything we needed was right at $2,000 for all the wood treads, risers, wood for the landing, adhesive, shims and the NuScribe. It is one of the best home improvement projects we've ever tackled, and I know it helped us sell our home quickly when we moved.
If you're willing to put in the time and effort, installing hardwood stairs is a very worthwhile DIY project. By following these steps, you can remove the carpeting from your stairs, finish the wood treads, and install them for a beautiful polished look. While it may take a couple of days, the result will be a stunning addition to your home that will last for years to come!
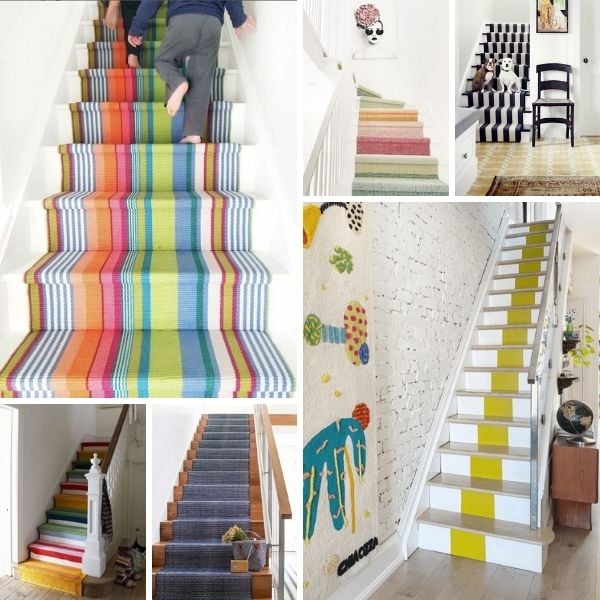
What do you think? Are you now convinced that you can tackle your own staircase makeover on your own? Seriously, you can do it! If you want more more inspiration, check out these DIY staircase makeover ideas.
More STAIR Posts

You may also enjoy these posts:
Wondering how I approach transforming rooms and spaces in our home? Check out Designer in a Binder®.

And if you want exclusive content and behind-the-scenes sneak peeks, be sure to subscribe before you head out!

Last Updated on April 21, 2023

Where would I find the tutorial for the stair numbering.
Hi Jennifer! It is coming in the New Year, so be on the lookout!
What does the very top stair look like? How was the wood stairs transitioned to the flooring in the second level?
I used the stair landing tread and it meets up directly with the laminate in the hall. It matches because I custom mixed the stain for the stair treads.
What wood species and color did you use for your reno?? We are looking to use NuStair also for this DIY job!
Hi Tabatha! You can read about how we did our stairs here– https://designertrapped.com/how-to-install-wood-stairs/ It explains the colors we used, etc. Thanks for reading!
Love the stairs. What color is the paint on your walls? They compliment each other great and I have been looking for something similar.
The color is Babbling Brook by Olympic! Thanks for reading!
WHat color are your walls? They look GREAT with those stairs
Thanks! They are Babbling Brook by Olympic.
Such a beautiful job, I’m looking to tackle my stairs in a couple weeks! I couldn’t help but notice the gorgeous blue on the walls, what shade is it? Thanks!
It is Babbling Brook by Olympic! Thanks for reading and good luck!
Hi Tasha: these are amazing! Our house seems to be the same set up as yours: nice big bright foyer with horrible carpeted stairs. I am dying to rip it out and go with wood, but we have three dogs! How does your guy handle the bare stairs? Does he slip/scramble on them a lot? Mine are prone to come bounding down when someone comes over, it’s dinner time, etc, so I’m just wondering what your experience has been with your pup! Great job. :)
He is not super spastic so he does okay :) Lol. Good luck
Fabulous job on this!!
What is the aqua color on the wall?
Babbling Brook by Olympic!
OMG these are beautiful and the numbers and just a little surprise. Beautifully done!
How did you transition at the top? Is it carpet or wood up there too. I would love to do this but don’t know how to transition at top. I would like to leave the carpet upstairs with the bedrooms.
Ours is wood so the transition looks seamless. Good luck!
Before you stress about how much money it cost, remember that to carpet them would cost at least $15 per step before you count the carpet and pad. That is what I am considering. It wouldn’t be a lot more to just make them wood and it’s so much more beautiful and easy to keep clean. Maybe. I still have carpet, you tell me.
I’m am so thrilled that you were featured on Better After! We have stairs that were carpeted and we removed the carpet because I was so tired of taking care of grey shag. Underneath was builder grade stairs with particle board treads. We’re going to replace/resurface the treads so in the meantime I painted the pine risers white ’cause I like the look. Bad idea . . . hubby somehow manages to leave black scuff marks on the risers from his shoes. I never thought of painting them black . . .brilliant idea! As soon as a few more projects are completed, the floor and stairs are ready for a make over.
Thanks Darlene! Good luck on your stairs makeover. I think black may be the answer to your scuff mark issue!
How did you handle the top landing? Is it still carpet?
Hi Rachel! No, we replaced the carpet with laminate flooring upstairs, so we have a wood landing strip at the top that meets up with the laminate. I hope to blog about it soon!
Hi I was wondering what the stain color and black color are on the stairs… Its stunning and want to have the same look
Thanks so much Mary Beth! The stain on the stairs is Mahogany gel stain by General Finishes and the black risers are Kettle Black by Valspar.
The stairs look great! We are going to do this to ours as well. I love the paint color on the walls. Do you mind to tell me what it is? Thank you!
Thanks so much Tina! The wall color is Babbling Brook by Olympic!
Super amazing Tasha- I love how these turned out!!
Love the finished look. My husband is also a firefighter and I love the prints you framed. Can you tell me where you got them? Thanks!
Hi Laura! Of course! You can find those awesome prints here: http://tidd.ly/789ecb5f
Did you use paint for the numbers or decals? Also, what paint and finish did you use on the risers?
Hi Anna! We used vinyl for the numbers. The risers are painted with Kettle Black by Valspar in Satin finish, I believe.
Hi,
Maybe I missed it but what paint color did you use on the stairs? It looks like a charcoal color?
Thanks!
Olivia
Hi Olivia! It’s Kettle Black by Valspar. I hope that helps!
Can you post a pic or send me a pic of what the very top of the stairs looks like after you finished and removed carpet? Did you take the carpet out from the 2nd floor? Add an edge to join and seam the carpet on the top floor?
Hi Gina! I haven’t had a chance to write this post yet, but we added a wood landing strip at the top and then installed laminate floors in our hallway after ripping the carpet out. I hope that helps!
We redid the bulk of our house in laminate flooring and planned to do it on the stairs. However when we removed the carpet we found hardwood underneath and just refinished that. It looks like you had hardwood under your carpet also. Just wondering why you didn’t work with that instead? The new stairs are beautiful but just curious because working with what was there would have been so much cheaper.
Hi Melissa! We had builder grade, poor quality pine wood under the carpet which was not the look we were going for. If it had been a hardwood like oak, we definitely would have refinished it :)
Can you tell me where you got the handrail for your stairs? Love it!
The handrail was here when we bought the house, so I have no idea. Sorry, Tami!
Hi again! OK… now that I have seen the cost comparison for ordering the Select Surfaces Stair Bull-Nose, which butts up against a single board of Select Surfaces 14mm thick planking from Sam’s (exact Select Surfaces flooring that you purchased (don’t you LOVE it?!)).
I can share with you and your readers that it is actually about 1/4 the cost to use the Select Surfaces Stair “nosing”, which is specially designed to wrap around the front of the tread and click into a cut to measure plank of the flooring. Unlike when lying the principal flooring, it is glued and brad nailed to the stair treads, per manufacturer instructions.
It was shipped from Canada to Indianapolis, IN, and the shipping cost more than the product did – (which made my heart sick). The outcome looks identical to your gorgeous stairwell… but it’s not made in the USA, nor is it hardwood… but it is an exact match to the rest of the flooring, as it is the same planking used on the floor, but with the special-order bullnose from the manufacturer to complete the finished look.
I cannot stop raving over this flooring, and I’ve had it down for almost four years! People ALWAYS mistake it for hardwood. You are so right when you say that laminate flooring has come so far in the past few years.
Best,
Lisa
We have ugly beige carpet on our stairs and have considered tearing it out since we believe there is hardwood underneath…but I am so worried about the slipping and falling issues. My kids are always going way too fast up and down the stairs and I can only imagine how terrible the falls will be when we combine socks, speed, and hardwood stairs. Any feedback on slipperiness yet?
Hi Heather! Slipping has not be a problem for our girls, but most of their socks have non-slip grip on them (not really deliberate on our part–Old Navy just seems to put it on the bottom of all their toddler socks). My husband and haven’t had any trouble either. I hope that helps!
I love this! Question – I have carpeting in my upstairs hallway. How did you finish the top step? I apologize if I missed it.
Seriously?! I LOVE these stairs, so gorgeous! The whole space is perfect!!
Thanks, girl! I am so happy with how the stairs turned out!
Absolutely stunning!! I’ll definitely be checking out the NuStair system for our basement stairs. By the way, I love the numbers painted on the front of each step – I’m weird and count in my head every time I go up & down the stairs. LOL! (Too much Sesame Street as a kid or something…) Beautiful job girl! Love it!
Thanks so much, Kirsten! I actually was super lazy and used vinyl for the numbers on the stairs–so much easier than painting. That tutorial will be coming soon :) PS- I am glad I am not the only one who counts stairs!
Mind.blown Tasha! I love the contrast of the dark wood with the white trim and beautiful blue. Way to go guys!!!
So beautiful!!! Y’all did a fabulous job. Your stair base looks amazing (the part after you pulled up the carpet). My stairs were so horrible with huge knot holes, uneven treads and texture overspray that wouldn’t scrape up or sand down. I’m still wishing I would have known about this before I did our stairs. I love the hardwood treads. But my stairwell is really dark, so I can get away with how we did our stairs. Thank you for sharing. I look forward to your next project. ;-)
do dog toenails scratch the finish? Really beautiful stairs!
Hi Laura! Thank you! Our 90-pound Boxer’s nails are not scratching the treads, but they have made some marks on the landing, despite the polyurethane. I think the stair treads must just be harder wood than the wood on the landing. Unfortunately, it’s just the reality of wood :( That is why we have been putting laminate in the rest of the house–I just did not care for the laminate options for stairs. I hope that helps!
Love it! How is the dog handling the wood vs carpet? Do you know if puppy nails will scratch up stairs? And if so what would you do to protect?
Hi Diane! Our 90-pound Boxer’s nails are not scratching the treads, but they have made some marks on the landing, despite the polyurethane. I think the stair treads must just be harder wood than the wood on the landing. Unfortunately, it’s just the reality of wood :( That is why we have been putting laminate in the rest of the house–I just did not care for the laminate options for stairs. I hope that helps!
I would love to know the name and make of the color you used in your stairwell. I absolutely love it!
Hi Pam! Isn’t that color lovely? It is Babbling Brook by Olympic, sold at Lowe’s.
drooling.
Tasha this is so so beautiful! I bet you can’t take your eyes off it every time you go past! Congrats on your hard work :D
I am dying to know how you did the numbers. Love the stairs!
Thanks so much, Laurie! That info will be coming soon!
I’m swooning – the stairs are GORGEOUS! The fire blueprints are dear to my heart as my hubs is a chief here. Then the boxer (we have one too) I LOVE it all!!!!
Thank you SO MUCH, Gina! I didn’t know your husband was a fire chief and that you have a Boxer, too :) So fun!
Oh Wow, this looks amazing, it would be my favourite too if this were my home. Love the numbers on the stairs and the beautiful wood. Absolutely stunning!
I love all the diffents fonts of the “a”. I have been wanting to do this with “g”. Any idea on where to get the different ones?
Thanks,
J
Thank you, Jill! You can see a lot of my sources here: https://designertrapped.com/2013/11/how-to-create-your-own-monogram-gallery.html. I just look around wherever I go. I hope that helps!
Wow, wow, wow! Your stairs look amazing, Tasha! I love how you guys went with black risers and the numbers are the perfect touch. It looks so much better. Man, you’re making me wish I had stairs, haha! Great job!
Love your work, been following you on Facebook and love love love the before and after blogs…..brilliant. Keep it up. @niudesigner.com
Thank you!
This turned out just beautiful. I am a little disappointed that you didn’t post a picture of what the stairs looked like after you removed the carpet.
Hi Lisa. You can see all the details of the carpet removal and installation process here–there is a link to it in the beginning of the reveal post, but you must have been too excited to get to the photos and missed it! https://designertrapped.com/2015/07/how-to-install-wood-stairs.html
Toward the top of the post, there are 3 side-by-side pictures which do show some of the stairs bare after carpet removal, during the staple removing stage.
Those are some fine stairs. I love the grain on the wood – it really stands out. The black is also a welcome surprise. Is that black chalkboard paint? A really great makeover! And now that you have added the art it makes all the difference. But most of all it is the wood that has caught my eye, makes a world of difference. Also your wall color stands out more and looks fresher with the darkness of the stairs. Bravo!!!
I agree that the stair makeover really lets your wall color shine. What paint did you use for the walls?