Our Budget Kitchen Remodel REVEAL ~ Part 1
Budget kitchen remodels are totally possible! Check out how much we accomplished on a tiny budget.
THE KITCHEN REVEAL IS FINALLY HERE! Can you believe it?! As I started working on the budget kitchen remodel post, it became pretty clear that I would have to break it into two parts because there is just so much awesomeness to cover, so this, my friends is Part 1. Part 2 is now up on the blog! Be sure to check that out, too! And, if you are curious about where I purchased certain things, you can check out the full source list for the kitchen here or by scrolling to the bottom of the post.
Before you dive into my kitchen remodel, check out my FREE design guides that will help you help you design spaces you absolutely love! Subscribe now and you will receive a password so that you can access everything in one convenient digital library.

***** UPDATE *****
Click here to check out our new kitchen backsplash! We love it!
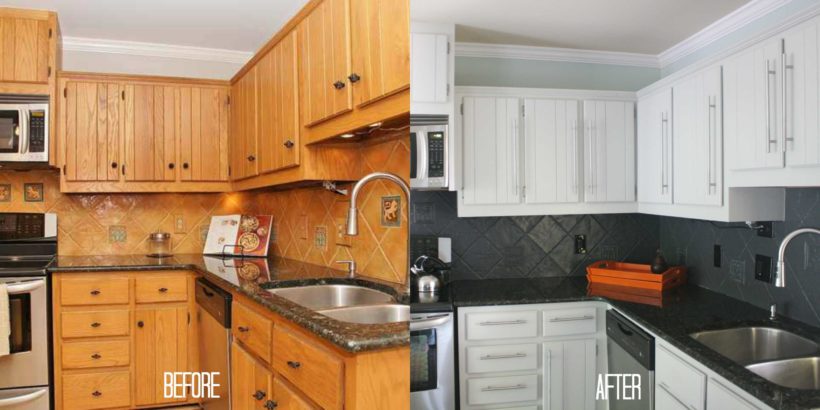
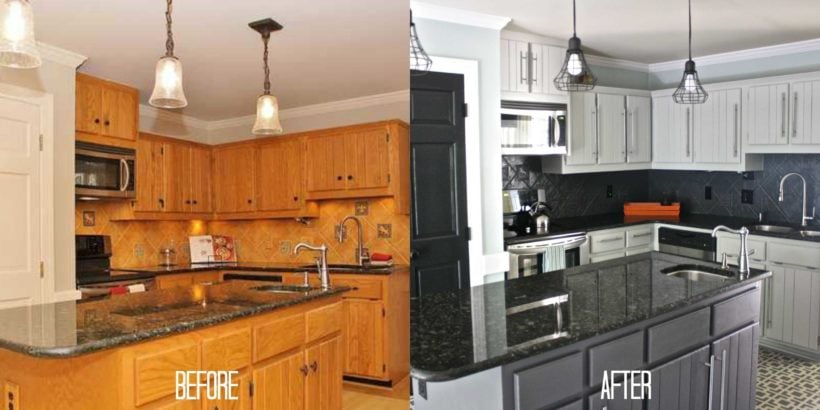
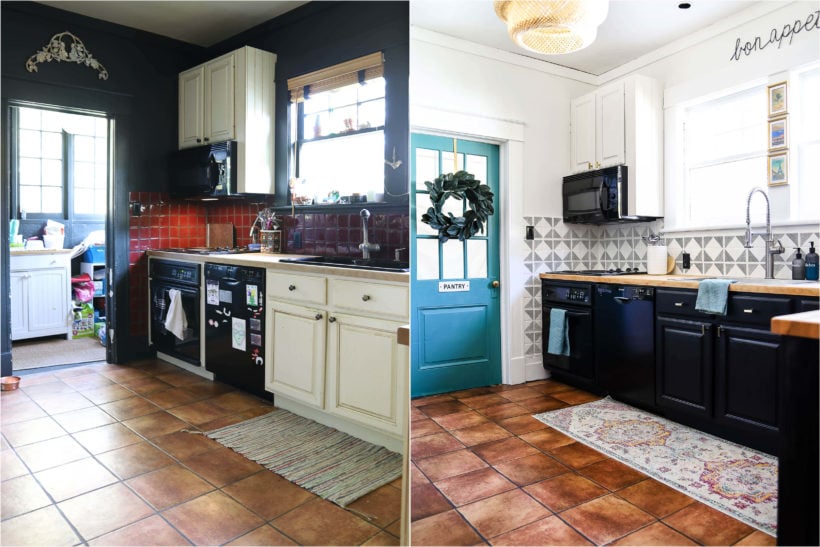
Now, I must remind you what we started with, so that you can fully appreciate the transformation.
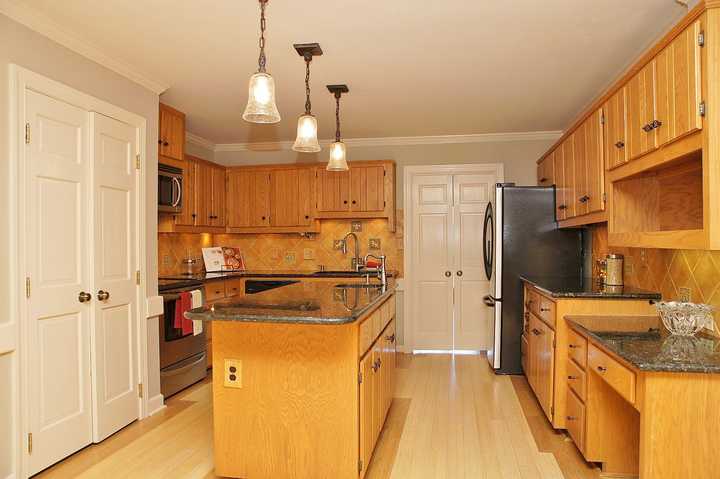
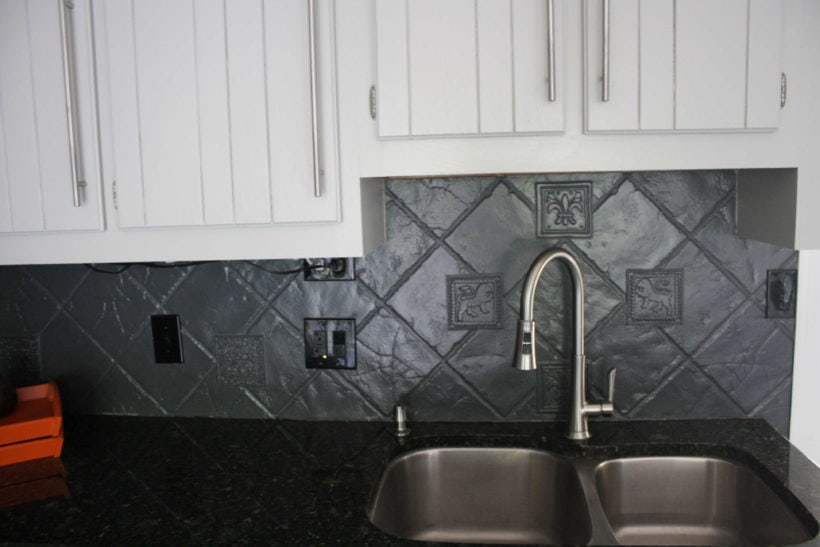
I know you all just want to get to the photos and not have to read all my babbling first, so here is the first photo of our budget remodel!
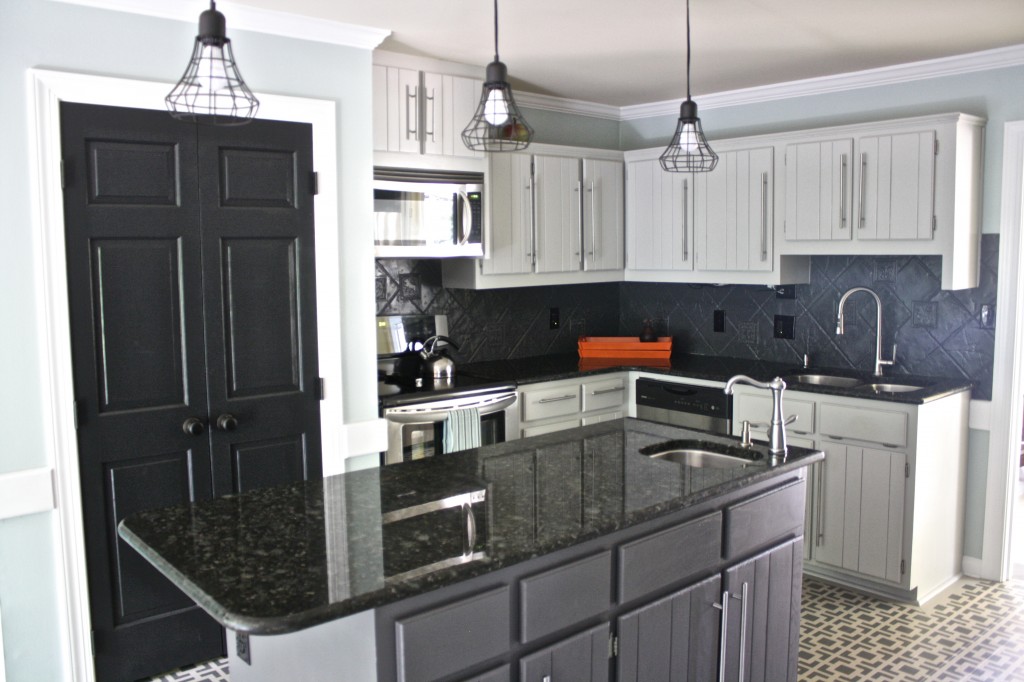
 Now, before you get to enjoy more photos, let me tell you that 90% of our budget kitchen remodel was accomplished by simply PAINTING nearly every surface! We painted the tile backsplash, the walls, the trim and doors, and of course, the cabinets. You can check out all the details on how we painted our kitchen cabinets without sanding or priming here.
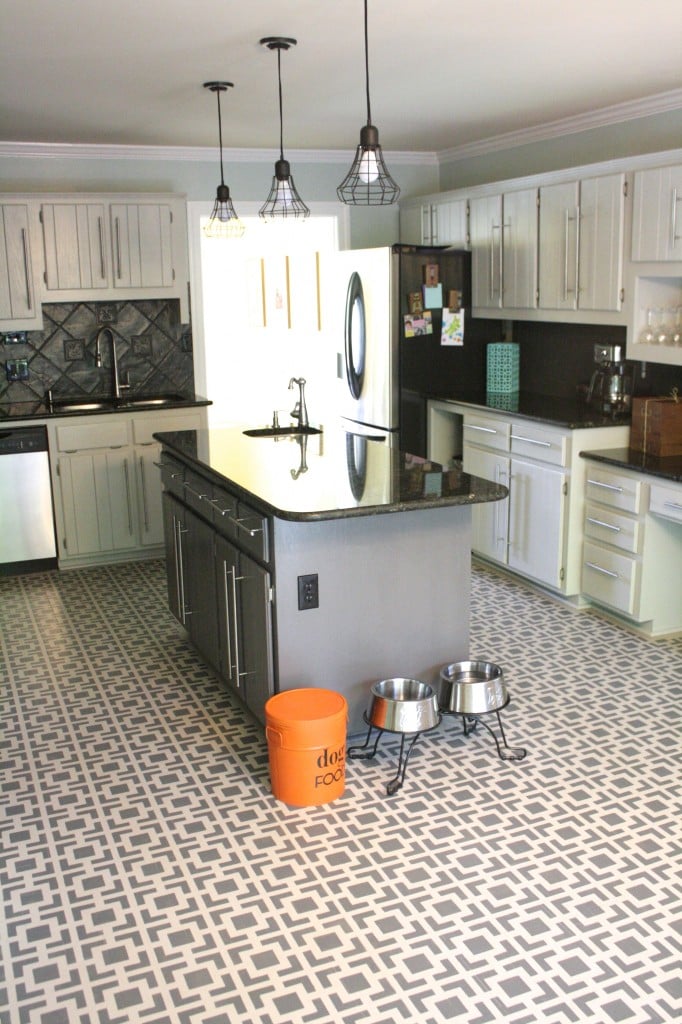
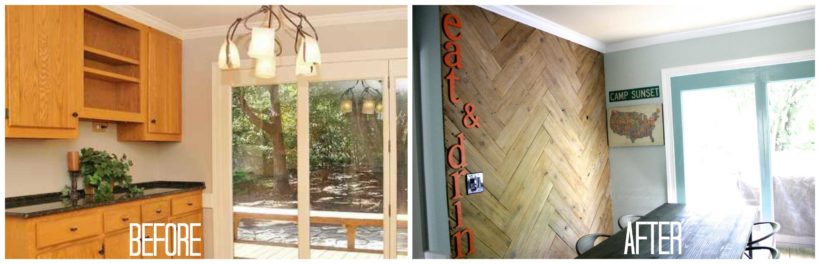
We also painted the floor and stenciled it using the amazing Hollywood Squares stencil from Royal Design Studio Stencil. All the details on paint choices will be coming soon, but as you can see, we selected a light blue for the walls, light grey for the cabinets, and dark grey for the island cabinetry. We also used dark grey to paint the backsplash.
Paint even brought life to some of the decorative accents you see, like the dog food storage bin and the orange trays. And there is no doubt that the painted floors drastically transformed the space as well. The bottom line is that the creative use of paint enabled us to complete this budget kitchen remodel for around $700! Not too shabby!

I think it's fair to say that painting the cabinets and backsplash has the most dramatic impact in the space. You can see the trim and doors.
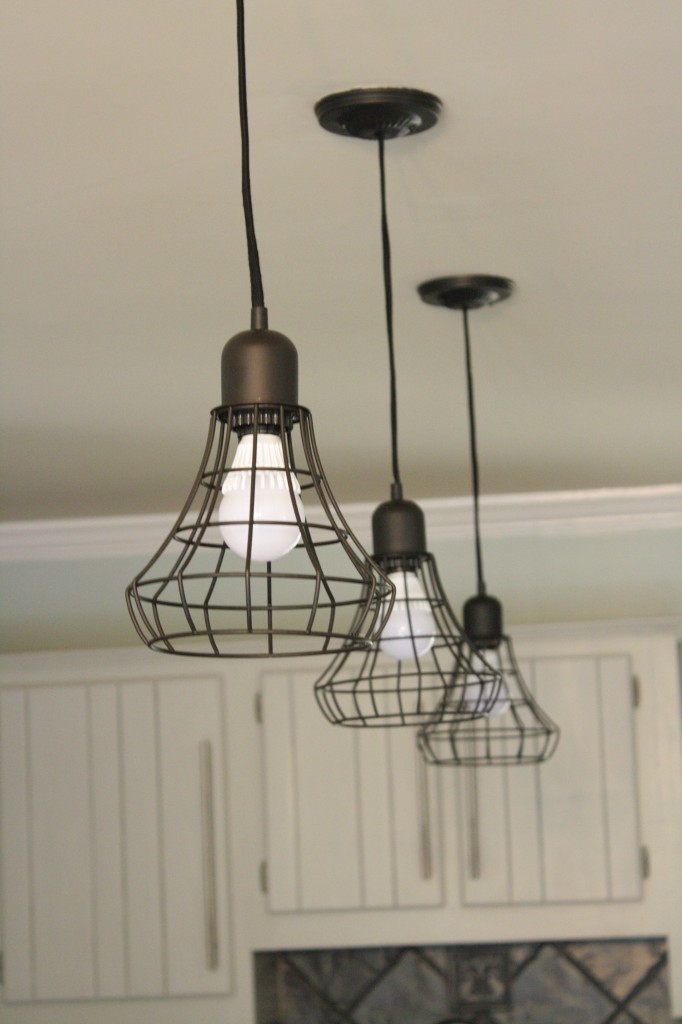
Updating the lighting also has a huge impact in the space. I ADORE these light fixtures that we hung about the island. I purchased them at Target about 1 year ago on clearance. They were only $20 each. LOVE THEM!
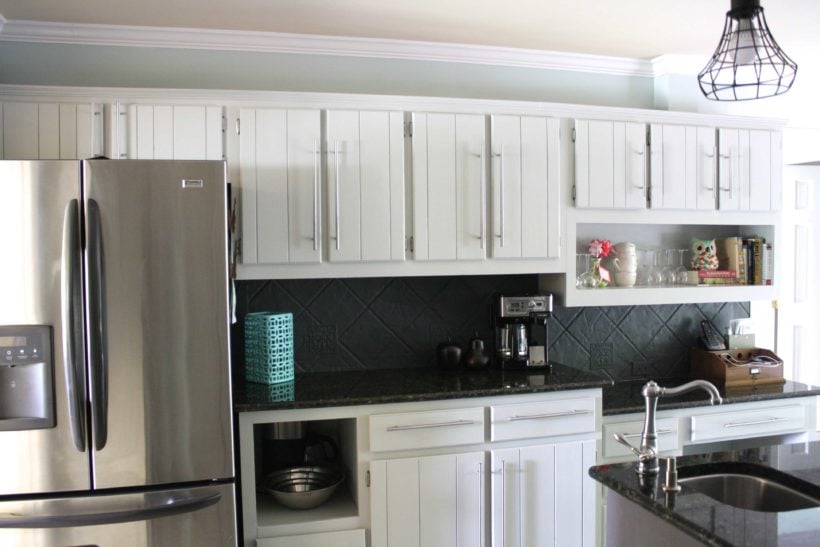
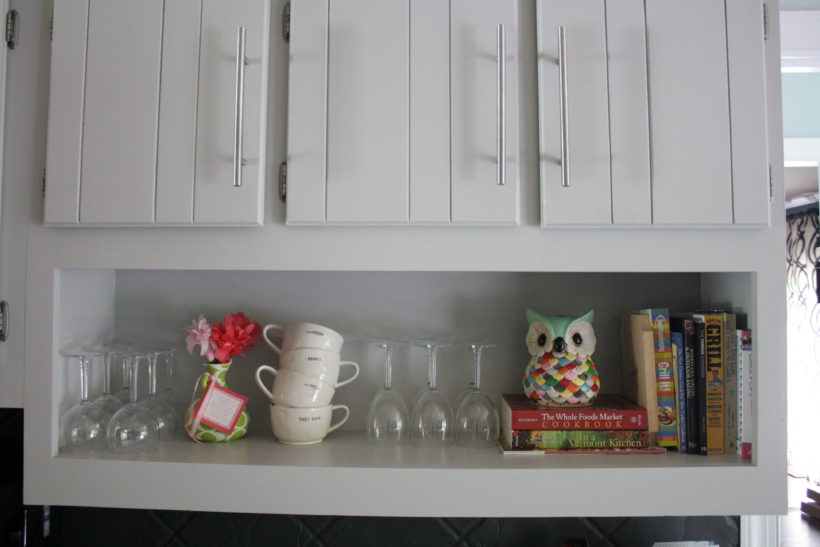
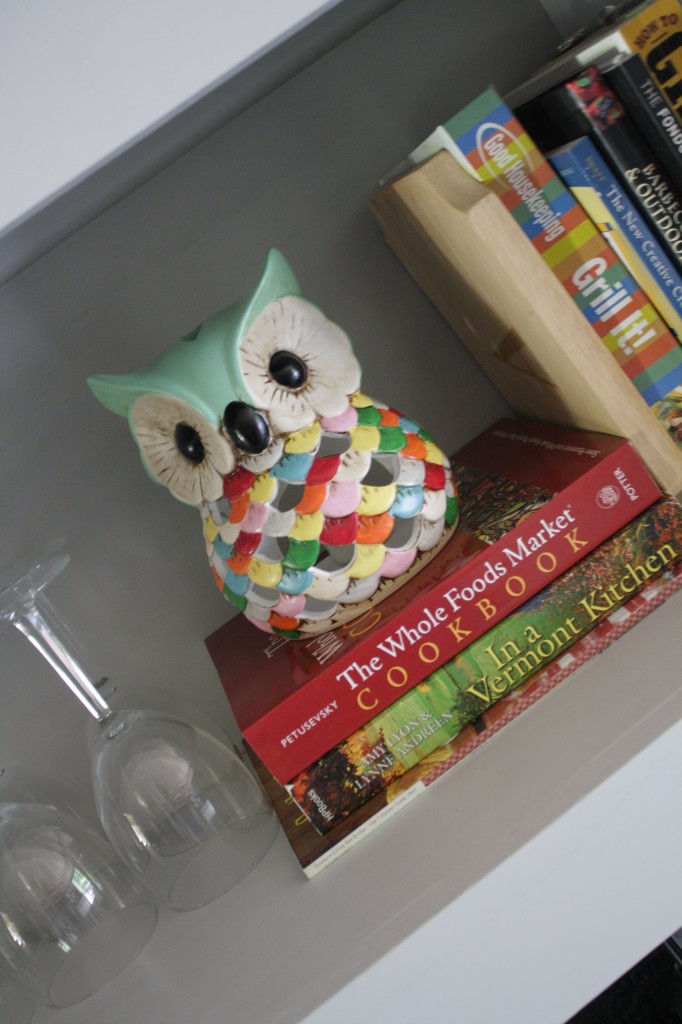
And with the cabinets painted, I now love how this open shelf displays some of our cookbooks and my favorite owl {who has appeared in lots of photos, but this shelf is where the owl really lives all the time}.
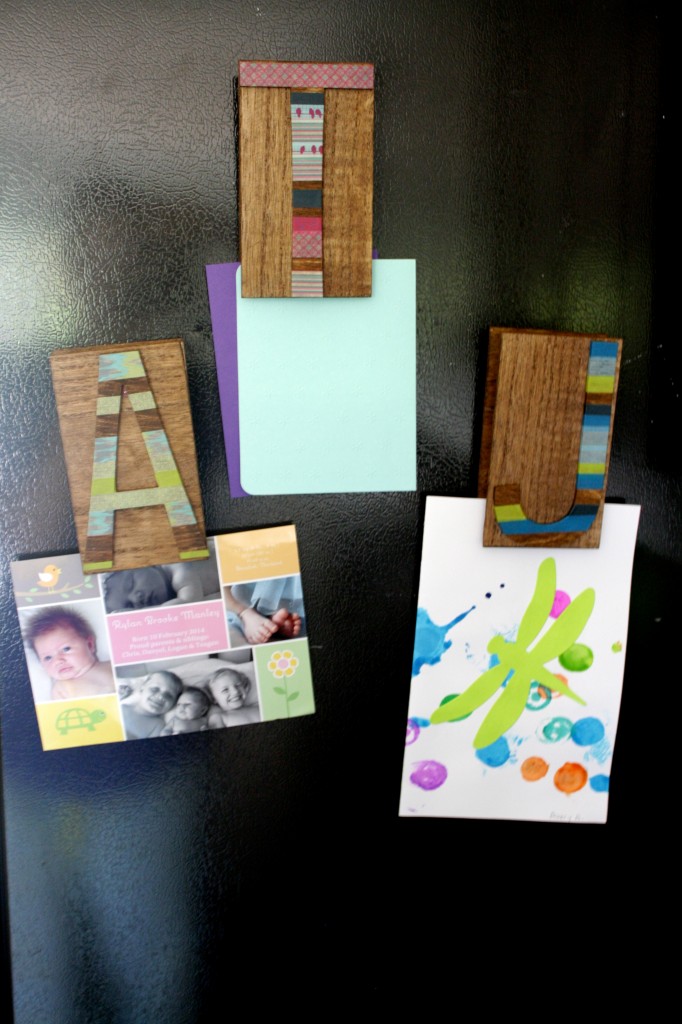
I also decided to add some magnetic strips to the Anthropologie knock off candied letter desk clips that I made so that we can use them on our refrigerator. They look so cute and are more functional for us hanging on the fridge then they were sitting on the desk.
Budget kitchen remodel source list:
- Industrial Cage Lights
- That fabulous owl on the shelf with the wine glasses came from Urban Outfitters and is no longer available :( I have searched high and low for one like it and have come up with two alternatives for you. The first one I love–it is from Anthropologie. The second one is from Urban Outfitters. The third one is from Target--it could easily be painted to mimic the one in my kitchen. I actually LOVE the one from Target and plan to order it for myself to put somewhere!
- Cafe Au Lait Mug
- Hamilton Beach 49983 2-Way FlexBrew Coffeemaker
Paint Colors:
- Babbling Brook by Olympic, sold at Lowe's Home Improvement {eggshell finish}.
- Kettle Black by Valspar, also sold at Lowe's Home Improvement {semigloss finish}.
- Driftwood Milk Paint by General Finishes. You can read all the details about how we painted our kitchen cabinets and about the protective top coat that we used here.
- Seagull Grey Milk Paint by General Finishes.
- Queenstown Grey Milk Paint by General Finishes.
- The floor is two colors: Ocean Storm and Weathered Oak by Valspar {porch and floor paint–you can see what I am talking about here–it must be tinted in the store, satin finish}. We stenciled it using the Hollywood Squares stencil from Royal Design Studios.
Let's see a couple more side-by-side comparison shots before I leave you today.
What do you think so far? Can you believe how much we transformed the space on such a small budget?

I dare say that the transformation you will see in Part II is even more dramatic that Part I of this reveal! UPDATE: Part 2 of the reveal is now up on the blog! Check it out by clicking here. Here are two before/after previews to wet your appetite!
Want to see another incredible budget-friendly kitchen makeover?
If you want to see a $1,000 kitchen makeover that will seriously blow your mind, click here to check out what I did in my friend Thea's kitchen. It's a seriously budget-friendly kitchen makeover that will leave you feeling inspired!
Before you head out and get started, be sure to check out my FREE design guides that will help you help you design spaces you absolutely love! Subscribe now and you will receive a password so that you can access everything in one convenient digital library.

[mv_create key=”3″ type=”list” title=”Room Reveals” thumbnail=”false”]
Last Updated on May 8, 2025
Hello, did you clean your hinges before spray painting them? If so what process did you use? How are the hinges holding up after 2 years? Thanks for your help!
I didn’t. They weren’t yucky so it wasn’t an issue! Thanks!
Hi there. I’m in the process of redoing my kitchen and I’m stuck between paints. I wanted to know if you had any close up photos of the doors I good lighting. I can’t really see the results from your far away after photos. I love the thought of not sanding or priming. Thanks
If you watch the video in this post https://designertrapped.com/diy-painted-kitchen-cabinets/ it will give a close up! Thanks for reading.
I was so inspired by your approach to painting cabinets that I followed your direction exactly. The results were amazing! I will say that it took quite a few layers of paint for. Full coverage… as in 6 coats!!!! But it’s great. I do want to emphasize the ” not for the faint of heart”! Now onto painting floors! Thanks for your blog…really inspiring but down to earth.
Awesome Jeannette! Glad you love it!
How did you stencil the floor? It looks superb – just like expensive tile
Check out the full tutorial here: https://designertrapped.com/stenciled-floor-remodelaholic/
Thanks!
Thanks for reading Patti!
I did not see anything about how you painted your back splash? I want to paint a decorative tile, on my back splash, but do not know what paint to use that will not come off.
Do you have a link for that story? I did not see one.
thank you!
Check out the directions in this post: https://designertrapped.com/2014/05/paint-a-tile-backsplash.html Good luck!
I have a DIY question and I am not sure this is the place…can I ask the group a question about my new home somewhere
Did you just use regular wall paint on the floors? Did you have to deal it with anything?
It is not sealed. The paint I used and all the directions are in this post: https://designertrapped.com/2015/01/diy-stenciled-floors.html Good luck!
Hi! you did such a beautiful job :)
I’m wondering how you contacted them for samples? I’m on their site and can’t seem to find any form of contact to them.
Thank you!
Hi Katie! They actually reached out to me about trying their paints (one of the perks of being a DIY blogger). The samples were just their pint size cans, which you can purchase on Amazon here: http://amzn.to/1RaGg6O
Hi Tasha! Great info here!! Does the milk paint still show the wood grain?
Hi Jane! Yes, the grain does still show through a bit.
What type and color of paint did you use for the trim?
You can check out all the paint colors here: https://designertrapped.com/2014/08/shop-budget-kitchen-makeover.html
Is there anything you can share about how you painted the tile backslash?
Thanks
Hi Fiona! You can find all the details of the painted backsplash here: https://designertrapped.com/2014/05/paint-a-tile-backsplash.html. I hope that helps!
Hi! I love this! I am researching on how to remodel a kitchen for cheap, and I found this! I wanted to know… How did you change the floors?
Would love to learn more! Love your site!
Thank you, Nitya! We painted the floors and stenciled them. You can find all that information here :) https://designertrapped.com/2015/01/diy-stenciled-floors.html
Hello! Your kitchen looks wonderful, I am so happy I came across your post! This is going to save us so much money! I was wondering about the gray colors… is the queenstown gray very dark? I am trying to decide what color to do for my island. I am going to do the perimeter cabinets white, because our walls are a medium-dark gray and I don’t want the room to be too gray. I would like to island to be gray, however, but want your opinion on the shades because you know computer screens don’t always show the colors correctly. Thanks!!
Hi Kirstin! The Queenstown gray is very dark. Have you thought about choosing one of the colors for your island? That could be fun!
Love your remodel and tutorial! I have started on my cabinets with the seagull gray, quick question, did you use top coat on the cabinet boxes?
Hi Stephanie! Yes, I did use a top coat on the exterior of the cabinet boxes as well {I did not paint or top coat the inside of the cabinet boxes/shelves}. I hope that helps!
Why did you not use milk paint,on pantry doors?
Your transformation is inspiring me.
LOVE this kitchen transformation. It exactly what I want to do and seems MUCH more my level of DIY! lol I have black/green granite countertops, they look really similar to yours. Do you know what color yours are? I THINK mine are Verde Butterfly.
Thanks!
Thank you, Nicole! Our countertops were in the house when we moved in, so I have no idea what the name is–sorry! Good luck with your project!
What type if paint did you use for the tile? I’d like to paint my tin back splash =)
Hi Andi! You can find all the details about the painted backsplash here: https://designertrapped.com/2014/05/paint-a-tile-backsplash.html
Do you think the concrete countertops you did in the bathroom would work for a kitchen?
Hi Sheri! I know lots of bloggers have done it on their kitchen counters. What I can’t answer is how they are holding up. But it’s certainly worth exploring. Check out Design, Dining and Diapers. Her kitchen counters using this product are stunning!
Outstanding transformation! Well done!
Thank you, Anna!
What paint did you use for the backsplash? Won’t it peel off tile?
Hi Julie. You can find all the details here: https://designertrapped.com/2014/05/paint-a-tile-backsplash.html. I used General Finishes Milk Paint and a top coat. We haven’t had any peeling or chipping. Hope that helps!
I can’t get over the painted backsplash. It’s amazing!
I was curious if you knew if you could paint over existing latex paint with the mil paint??? Our cabinets were painted and are chipping really bad and we are looking for a paint to go over them that we wont break our back doing.
Hi Shannon! I believe you can apply it over latex paint, since latex paint is also water based, but I would suggest calling General Finishes to confirm. I hope that helps!
How beautiful! You certainly have vision.
All I can say : WOW
FABULOUS Job! It really looks amazing.
Congratulations! Your kitchen looks wonderful Tasha, and thanks for sharing your ideas, resources and photos. I have a question though… How did you protect the floor? I would worry that paint on the floor would be quick to chip. Did you use a paint which is specially formulated for floors (e.g. more durable?) or a top coat of some kind? If not, how has the floor weathered so far?
Again, thanks for sharing and have fun in your new space!
Hi Stephanie! Thank you! We used special porch and floor paint that we purchased at Lowe’s. We did not use a top coat on the floors and they are holding up PERFECTLY. The porch and floor paint we used is incredibly durable! I hope that helps!
I love your kitchen but you didn’t talk about the door handle how much it cost you to replace them.
I have small door handle on my kitchen door i need to replace them with bigger handle. I ecently changed my countertop and the back splash
Hi Samira! We purchased the cabinet hardware at Ikea. It cost about $325 for all of the hardware–about half of our budget!
Hey! Love, love, love your kitchen re-do. I am working on my own kitchen and love those projects that are so much bang for the buck. Can’t wait to savor the rest of your blog.
Where did you find the large raised dog bowls and stand please?? I can only find ugly ones!
Hi Julie! We found that at Ikea!
Your kitchen looks incredible! I have a couple questions: did you paint the inside of the cabinet doors? I’m fascinated by the floor, how exactly did you paint it with the stencil?
Thank you! We did paint the inside of the cabinet doors. The flooring tutorial is here: https://designertrapped.com/2015/01/diy-stenciled-floors.html
Can you tell me what kind of brushes you used to apply the primer, color & top coats?
I used a regular bristle brush to apply the paint in the ridges of the doors and the top coats. I used a dense foam roller on all of the large surface areas. Hope that helps!
Wow-Wow-Wow is all I can say. By far one of the best makeovers I have ever seen. Still can’t believe this cost less than $1000. Absolute genius and I will be on the lookout for that adorable owl look a-like. Great job !
Thanks so much, Armissa!
Hi Tasha-
Your kitchen looks great. Congrats! I love your blog. I’m also a lawyer. I don’t think I’m creative enough to say that there is a designer trapped in my body. Maybe just a pinterest addict :) :)
I’m going to tackle the kitchen cabinets soon. But first, the walls. The hubs and I have gotten as far as the space that is not near the kitchen cabinets. And, now we need to paint behind the cabinets. I keep looking at them and saying hmm.. how does this work exactly? I see that your kitchen cabinets are similar in that they don’t go up to the ceiling, so there is a gap. Any tips on successfully reaching that area to paint? I have not tried it yet but can see it’s going to be hard to tape the ceiling off too. My arms are not that long! Any thoughts? Thanks again.
Thanks so much, Christine! I am a bit of a Pinterest addict myself. I stood on our counter tops to reach the area that you are talking about. I don’t tape anything off–but I have a very steady hand when I cut in. I hope that helps!
Hi Tasha, Thanks to Chelsey, another blogger I follow, I’ve come across your fantabulous site. Love your kitchen transformation and now I’ll check out your other diy projects. I’m so glad to read about the idea of using the acrylic sealant: General Finishes High Performance Top Coat. Because I was worried about the longevity of such a high traffic and usage space as a kitchen. Your new fan, Tanya Freedman w/d Gloria Silk
SO happy you are here, Tanya! The GF high performance top coat is seriously amazing! Let me know if you give it a try!
Kate,
I have never ever liked the color of our vintage, metal “St. Charles” kitchen cabinets. I was so pleased when I read your blog describing a paint job free of brush strokes!!! I wanted to ask your opinion on using the same type of paint on our metal cabinets? In our bathroom we used a metal finish spray paint, in hammered bronze, to paint the mirror frame, outlet covers and the floor vent. They look great!
krista c.
Hi Krista! I think if the metal were lightly sanded or deglossed before painting that this paint would work well on metal, too! I would just test a small section first :)
Hi – Love your blog, and I’m not generally a blog-lover. :) I am in the beginning stages of planning a kitchen cabinet painting project, and yours is the best/only information I can find so far on painting with milk paint using a fraction of the prep as other methods tend to require. It seems too good to be true! Also, I’m looking into using the specific line of paint that you used, and it’s very limited in the area. In your experience with the brand, would you think that a white or cream cabinet would have the same professional-looking appearance, or are the shades of gray just the magic colors? I’m SO apprehensive about such a large undertaking!
Thanks SO MUCH, Hillary! You can order the paint from Amazon, which makes it easier to purchase. I do think that a cream color would have the same professional looking appearance. There is nothing magic about the grays that I chose–just personal preference! I would stick with a cream rather than a stark white. I hope that helps!
Tasha, I am in LOVE with your kitchen makeover! Paint is the best! One question… I’ve been admiring those light fixtures at Targt for a while, but they are just plug-in fixtures. Do you have them hardwired? Was that a lengthy process?
Hi Ashley! Yes, we hard-wired ours and did it ourselves because we are fairly comfortable with electrical work. It doesn’t take long at all. If you don’t want to do it yourself, my guess is a handyman or electrician could do it pretty quickly/affordably. I hope that helps!
HI Tasha! I love your makeover! My husband and I are purchasing our retirement home now in order to take our time decorating and downsizing. I have no eye for decorating but know I need to redo the kitchen (white cabinets, ss fridge, black cooktop) obviously owned by a male! My question to you is where do I start and how do I start? I’m so afraid to make a mistake!
Thanks so much! I would start by deciding if you want to change the color of the cabinets. Then I would decide on a cabinet color and go from there in deciding the rest of the color palette. Let me know if you have any other questions! Happy new year!
Hi Tasha
I’m hoping u can help me, I want to add a back splash but I have NO money for it, but I have contact paper that has the perfect design on it and thought about using it, so my questions are 1- Can I use it and if so what should I put on top of it to protect it from grease and grime? I was going to use wallpaper glue on the back to hang it and 2-Will that be enough to hold it or do I need something else?
Thanks………………Kate
Hi Kate! Hmmmm, I love the idea of using contact paper, but I am just not sure how to get it to stay on really well. I bet it will be fine except for areas that water might splash on it. I wouldn’t use any extra glue on the back, but I would try coating the top of it with the General Finishes High Performance Top Coat (an acrylic sealer–you can find it here: goo.gl/HGB3LC I would try it on a small area first. Splash some water on it to test it out! Hope that helps. Good luck and happy new year! PS- Let me know how it goes.
I’ve used contact paper on counter tops walls bookcases, shelves,etc.. It’s a quick fix until you can do something more permanent. The contact paper is sticky enough and adding glue would render it useless. Clean the wall with TSP Trisodium Phosphate( home depot has it and it doesn’t take much.) it removes grease. Let the wall dry well so the contact paper will stick.. Only remove a few inches of paper at a time. No need to seal it.it is plastic. Best part if it gets damaged you just replace it or go over it with a new piece matching the pattern. Hope this helps.
Thanks for the tips, Deb!
Were in the world did you get all those cabinet handles, I count upwards of 40, at a price that kept the budget so low? The best pricing I have seen for that style has ranged between $10 to $17 depending on the overall length and I notice many of yours are the longer ones. I did not notice them in your source list, anxious for a reply because I would love to grab some at a bargain.
Hi Shawn! We purchased them at Ikea. The hardware ate up a good portion of our budget, about $350. Ikea has fabulous cabinet hardware at phenomenal prices. I hope that helps!
The makeover looks fantastic! Are the hinges from IKEA as well? We have older cabinets and I’ve been struggling to find the visible hinges that look good in a nickel or chrome finish. Thanks!
Hi Gwynne! We actually spray painted our hinges and screws and they are holding up very well!
What did you use to paint the countertops?
Hi Victoria! We did not paint the countertops. They are the same granite as seen in the before photos–they just look different with everything else painted :)
Hi, I don’t know if anyone has asked before, but I’m so curious as to where you got your ‘doggy leg’ pet feeder! It doesn’t look bulky and is tall enough for medium/large dogs. I’d love to get one for my pup!
Hi Emily! Isn’t that dog feeder great?! I purchased it at Ikea years ago, but I think they still have them. Hope that helps!
I am considering painting my 4×4″ white tile backsplash this weekend with the General Finishes paint like you did, but am wondering how durable you think it would be painted on my extremely ugly 4×4″ white tile countertops as well? I have an island I can experiment on without having to commit to the entire kitchen – my other option is the Ardex feather finish concrete like you did in your bathroom.
Would love any thoughts on this! Your color choices are phenomenal by the way, and are the same as mine! Love gray kitchen cabinets!
Every time this link pops up in my feed, I have to come back over and check it out. I love what you guys did!
Love the re-do!
I just added under cabinet lighting to my kitchen and it gives it a pop! I bet that would look great in yours too!
Hi Sarah! Thank you! We actually do have under cabinet lighting, it’s just not on in any of the photos. It really does add a lot to a kitchen, doesn’t it?
Your new kitchen is spectacular! I’m encouraged to move ahead with our kitchen re-do. I’d already decided to use paint, as our cabinetry is built in and it seems daunting to pull it all out. You truly have whetted my appetite!
Thanks so much, Pat! I am so glad you are inspired to move forward with your own kitchen. It’s a lot of work, but soooo worth it! Let me know how your kitchen turns out!
What color paints did you use?
Hi Linda! My post about how we painted our cabinets and what products we used just went live this morning. All of your questions are answered there :) https://designertrapped.com/2014/06/paint-your-kitchen-cabinets.html
I love everything about this. Especially the floor transformation. You’ve officially inspired me to redo our bathroom floors!
Thanks so much, Kat! Did you also see how I painted our vinyl laundry room floors?
Great reveal. May I ask what paint did you use for the cabinets?
Thank you, Robert! My post about how we painted our cabinets and what products we used just went live this morning. All of your questions are answered there :) https://designertrapped.com/2014/06/paint-your-kitchen-cabinets.html
Love the transformation! Can you elaborate on painting the backsplash? Did you use a special paint?
Hi Kerry! Thanks so much. All the details about our painted tile backsplash can be found here: https://designertrapped.com/2014/05/paint-a-tile-backsplash.html We did use a particular paint, which is the only reason I think it worked. Check out the post when you have a chance. Feel free to ask any remaining questions!
I KNOW you must smile every time you walk in there…. having it done is THE best feeling, isn’t it?
love your new kitchen, great job Tasha!
catching you!
Thank you so, so much, Gail! Thank you for the feature AND your sweet comment! YES, it feels amazing to have it done and we are loving it. Have a great weekend!
Wow! Amazing! I would love it if you joined and contribute your awesome posts at my link party at City of Creative Dreams, starts on Fridays :D Hope to see you there at City of Creative Dreams Link Party.
Thanks so much for the invite, Shanice! And thanks for your sweet comment :)
What a beautiful remodel! I love white cabinets and so wished we went with that when we designed our kitchen. Thanks for stopping by our Cook it! Craft it! Share it! Link Party. I hope you can join us tonight at 8:30 PM EST – Doree
Thanks so much, Doree! I love linking up to your party every week!
Wow it looks amazing!!! Paint is totally your best friend right now! I love what you did and the floor and lights are awesome!
Paint IS my best friend, Mindi. It is so inexpensive and transformative. Love it!
Oh my goodness, Tasha!!!! Your new kitchen is GORGEOUS!!!! I am drooling over your floor!!! Pinned!
Wow! Paint really does make such a difference. I really like the pattern you chose for your floor.
Thank you, Nikki! Isn’t that stencil awesome?! It’s Hollywood Squares by Royal Design Studio Stencils. Love it!
Your kitchen looks amazing! I love that you didn’t tear everything out and only spent $700. Wow, great job!
Thanks so much, Sabine! We are so happy with what we did on such a small budget!
Shock and awe! WOW! Great transformation and just encourages me to do my kitchen. My kitchen is full of knotty pine, yikes!! I hope it’s just as successful as yours. Did you paint inside the cabinets too?? Thanks! Enjoy your kitchen :) -Bev
Thanks so much, Bev! I did not paint the inside of the cabinets. I would have loved to, but it would have taken about 3 times longer. Fortunately, the inside of our cabinets were in great shape, it was only the doors that were damaged, so it doesn’t bother me too much :)
This is amazing Tasha! I love a frugal transformation and you hit the nail on the head with this one! The kitchen is lovely–so bright and inviting!
Wow, what a transformation. I think it is awesome that you painted the backsplash, I’ve been looking into painting tile and I think you just gave me the courage to do it! I also seriously love that owl…;)
Thanks so much, Kat! You should go for painting the tile. I do think using the General Finishes Milk Paint and high performance top coat (or something similar) is pretty crucial. Good luck! Oh, and isn’t that owl the best? Picked him up at Urban Outfitters a couple of years ago!
Tasha!!! I am so proud of you. What an amazing transformation. I bet if feels great to walk in your “new” kitchen every morning and see how much it has changed.
You are so sweet, Carmody! Thank you so much. We really are loving our “new” kitchen!
I thought I had left a comment here a couple days ago but first saw this on my phone and think it was screwing up. Tasha, this is freakin’ awesome and all of the details are AMAZING! What an incredible transformation and to think most of it is due to paint. LOOOOVE everything about this – especially your painted floor and those cage lights! I’m off to check out part 2!
Thank you, Katie :) You are so sweet.
Wow! Your kitchen is simply stunning! the back-plash is my favorite part of the remodel. You have really outdone yourself… ( PS I think we have the same fridge!!!) :)
x Crystelle
Crystelle Boutique
Thank you so much Crystelle! The fridge came with the house, but we love it :) Have a fantastic weekend!
Whaaat! No way that is the same space, and all because of a little paint?!! You kids are so talented. It’s gorgeous!
Thanks so much, Kelly! Paint is my best friend. Period. Part 2 of the reveal is going live tomorrow morning. I hope you will check it out–I think you’ll like it even more than Part 1. So happy you stopped by!
Wow….WOW!! This is incredible! I love the light cabinets and the dark backslash together! Your painted floor is also A-M-A-Z-I-N-G!Pinning!
THANK YOU, Aniko! You are so sweet! Can’t wait for you to see part 2 :) Going live tomorrow morning.
WHAT?!?!?! Girl, this is totally and completely amazing! $700?! That is incredible! And I love all of your design choices– so beautiful! Thanks so much for sharing, Tasha!
~Abby =)
Thanks so much, Abby! I can’t wait for you to see part 2–going live on the blog in the morning. SO EXCITED for your e-book!
Totally amazing Tasha and I am seriously impressed you did this for $700! Pinned!
Awww, thanks Trish! I appreciate you taking the time to comment and pin!
Your kitchen is gorgeous! It is absolutely amazing what simple things like “paint” can do to brighten up our projects. Thank you for sharing. :) – Tracy
Thanks so much, Tracy!
Your after is absolutely gorgeous, Tasha! Pinning for my dream house. :)
WOW! $700???? What did you do to the couter? It looks darker or is it my computer? I need to do something to my counter tops short of replacing them. How do you feel about those new marble looking stick on pape that says its 12 times thicker and guaranteed for 5 years. They would cost me only about $60 to do my kitchen. any other ideas?
Yep, we came in under $700 INCLUDING furniture, which will be shown in Part 2. Believe it or not, those are the same granite countertops, they just look so much darker (and better) because the colors around them changed. I also think the lighting in some of the before photos was not fantastic. I have not heard of the marble stick on paper, but if you like the look of concrete, you can use Ardex Feather Finish to coat your countertops with it. It looks AMAZING. Check out my post on my laundry room reveal and/or DIY concrete fireplace to see what I am talking about. Thanks so much for stopping by!
What a fabulous transformation, Tasha! We inherited a bespoke oak kitchen, which has aged to a lovely shade of orange similar to that in your before photo. You have re-ignited my desire to plan a paint makeover :-)
Hi Sue! It’s amazing how orange the oak can turn, huh?! Glad to hear I have inspired you to plan a paint makeover. I truly think the success of ours is due to the General Finishes Milk Paint and topcoat. I don’t make any money or get paid to say that! It’s just amazing and holds up BEAUTIFULLY.
This looks amazing! I can’t wait to hear all about how you painted your cabinets. My paint brush has been itching to attack my kitchen cabinets. Only two things have been holding me back: (1) my hubby’s insistence that it’s a crime to paint stain-grade wood (even if it’s oak) and (2) my worry that I won’t be able to create a picture-perfect, durable finish).
Thanks so much, Tasha! My husband was reluctant to paint also, until we tested the General Finishes Milk Paint out and fell in love with its amazing finish. It’s way more durable than latex paint {which I used on our laundry room cabinets and have had some chipping}. The Milk Paint plus the General Finishes top coat is proving to be extremely durable and the Milk Paint leaves no brush strokes. Seriously, it’s amazing. And I don’t get paid to say that or make any money off of it–it’s just THAT amazing that I think everyone should use it :) Good luck convincing your husband–it took me a while, but he came around.
It looks great! Where did you get that dog bowl set??? I am obsessed!
Hi Marie! Thank you. I got the dog bowl set at Ikea years ago, but I bet Ikea still sells them. LOVE it.
What a transformation! I know paint does a ton, but wow! Great job, Tasha!
Thanks so much, Ashley! I can’t wait to post part 2 later this week!
Looks amazing Tasha! Its always so inspiring to see your renovations. I’m looking forward to reading part 2!!
Awww, thank you so much Ange! Part 2 should be up by the weekend! I seriously can’t wait for everyone to see the rest of our kitchen.
wow this is such a great transformation! i love that you were able to do all this on a small budget it’s really amazing how much paint can transform a space.
Thank you, Jackie! I am really proud of how much we accomplished on such a small budget. Have a great week!
Tasha, You and Joe did a great job on this transformation of your kitchen. So much work, but so well worth it. It’s beautiful. Now try to relax!!!!
Thank you, Kathy! We are relaxing as I write this!
This looks amazing! We have the same color honey oak cabinets in our kitchen. I can’t stand the color of them and we’ve been wanting to do something different. I’ll definitely be showing this to my husband! It’s been fun to see your house updates!
Thanks so much, Jessica! It makes such a difference to get rid of those very yellow/orange cabinets. I am telling you, it was a lot of work, but you won’t regret it :) Love the name of your blog. Heading to check it out now!
Oh wow… I don’t even have the words for how much I love this! Totally amazing.
(and you’re right — those lights from Target are fantastic!)
Thank you, Kelly! I am soooooo in love with those lights. I am so glad I snapped up the last 3 from Target when I did!
What a fantastic job on such a small budget! The change is dramatic to say the least.
The light fixtures truly compliment the room and the floor! I think that maybe my favorite.
Can’t wait for reveal part 2!
Thanks, Chrissie :)
Your kitchen is an absolute phenomenal transformation! I know your eyes must be crossed from all that painting but is was so worth it!
I can’t wait for a tutorial on the floor. I can’t believe how awesome it looks!
{big hug} and Congrats!
~ Ashley
Hi Ashley! You are so sweet! Thank you so much. I am glad we are finally done. You are right, it was so much painting, but totally worth it! Have a happy Sunday!
Awesome makeover! One question – can you tell me where to get the adorable owl?
Hi Roe! Isn’t that owl adorable? I got it at Urban Outfitters a few years ago.