DIY Board and Batten Accent Wall: The Easiest Method
Learn how to install a board and batten accent wall the easy way! This step-by-step tutorial is simple, but gets you professional results that make a huge impact in any space!
If you follow me on Instagram, chances are you have been eagerly awaiting to learn how to install board and batten the way we did in our hallway! Accent wall treatments are such an effective way to add a ton of interest to any room or space. In our old foyer, we installed a modern DIY plank wall and it transformed the foyer from boring to awesome. And you may remember that in our old kitchen, we upcycled an old fence into a DIY herringbone accent wall (I still miss it). We have created lots of different accent walls in our homes over the years. But believe it or not, we have never installed a board and batten accent wall until now!
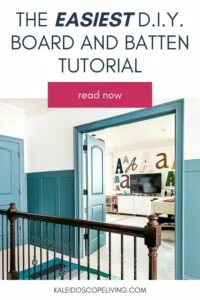
We installed board and batten in our formerly boring upstairs hallway and it TOTALLY transformed the space! Best of all, the installation process was actually far easier than I expected. It helped that we did not remove our baseboards (I highly recommend working with your existing baseboards–more on that later)! And it was incredibly affordable and cost-effective. I have alllll the details here for you, so let's dive in! You can find a source list for the hallway in our current home at the end of this post.
Thank you to DAP Products for sponsoring this post.
What is board and batten?
First up, let's make sure we are all on the same page when we use the phrase “board and batten.” Traditionally, board and batten is a siding and paneling style that places narrow strips of wood over the joints of wide boards, resulting in a really pretty and classic wall treatment. “Battens” are vertical molding pieces installed on larger “boards.” But these days most people use their wall surface as the “board” portion and simply apply “batten” strips on top of their wall to create the look of board and batten with far less work. That's what we did!
Note: if you have wall texture/textured walls, you could install thin plywood behind your battens to get the traditional look of board and batten (which is NOT textured).
An Important Note About Choosing Your Wood
There are a zillion different types and sizes of wood you can use to create a board and batten wall treatment. We chose 1/4″ plywood for a couple of very important reasons.
First, we wanted to work with our existing baseboards. The top of our baseboards is only 1/4 inch thick. If we used something like 1 x 4s to create our battens, they would overhang the baseboards. While you can cut the bottom of the battens at an angle to mitigate the overhang, I just don't like the way that looks. And we really didn't want to remove our baseboards because the millwork in our home is incredibly well done and is high-quality.
Second, we were able to complete our entire hallway using just 2 sheets of 1/4″ plywood, which made it very affordable. We spent $43.98 per plywood sheet, so all of our wood for this project cost only $88!
Last but not least, I love that since the board and batten is only 1/4″ thick, we can still easily hang things on our walls. It would be really challenging to do so if we used thicker wood because it would make everything stick out really far.
This post contains affiliate links for your convenience. Click here for my full disclosure policy.
Materials Needed for Board and Batten Accent Wall
- 1/4 inch plywood (we used two 4′ x 8′ sheets)
- Laser level (this is the exact laser level that we have and LOVE)
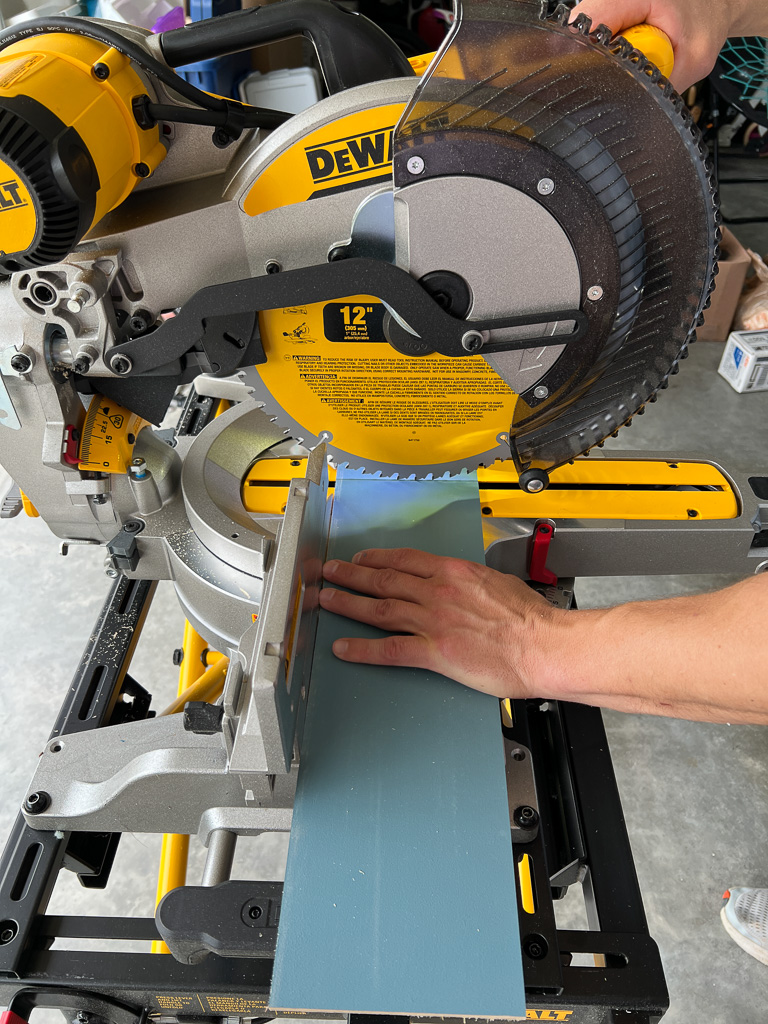
- Circular saw
- Rip-cut Circular Saw Guide
- Pin nailer/nail gun
- 1-inch pin nails
- Level
- Compressor (one of the best purchasers we have ever made is this cordless air compressor)
- Miter saw
- DAP Alex Plus Caulk (it's my favorite paintable caulk)
- Caulk gun
- DAP Plastic Wood-X
- Tape measure
- Painters tape
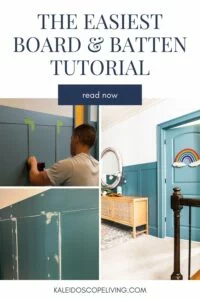
How to Install Board and Batten: A Full Tutorial
I recommend that you watch the short video below for an overview of the project before reading the detailed tutorial.
Time needed: 2 days
Follow the steps below to learn how to install a DIY board and batten accent wall.
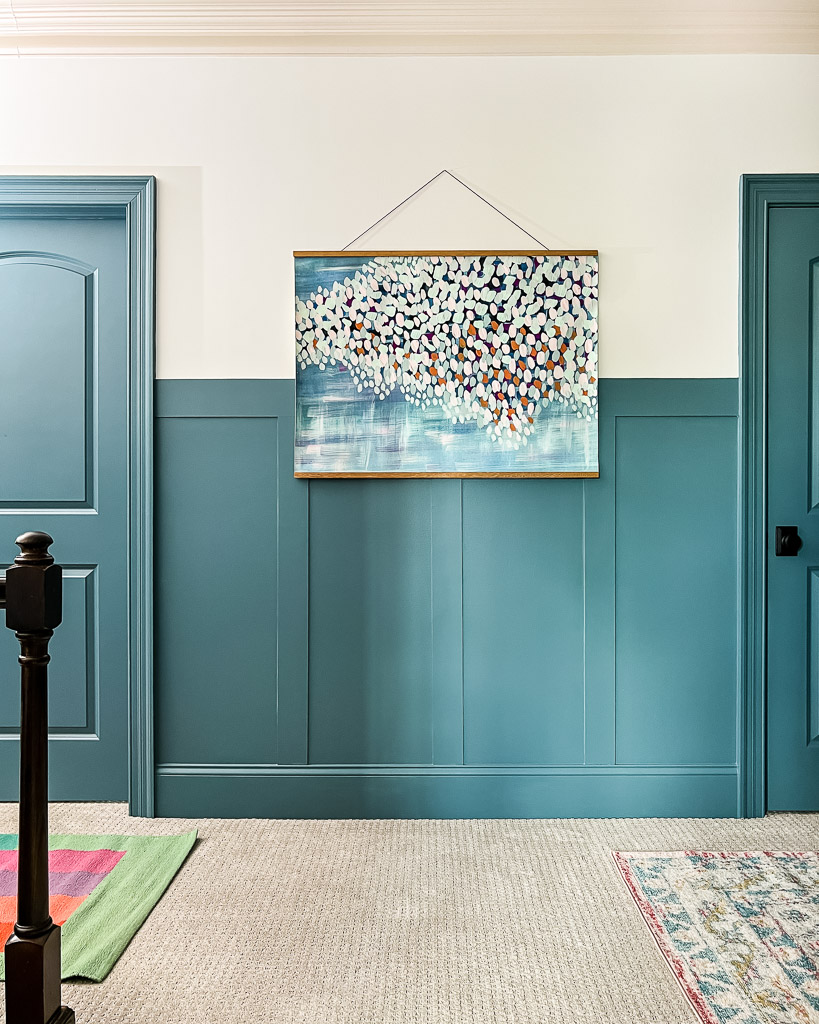
- Decide on the height of your top board
There is no magic formula for this. I simply looked at the wall and marked how high I wanted the top of our board and batten accent wall to be. I knew I wanted it to be roughly 2/3 the height of our doors. For us, that magic number was 58″ from the floor. But the height you choose is absolutely personal preference.
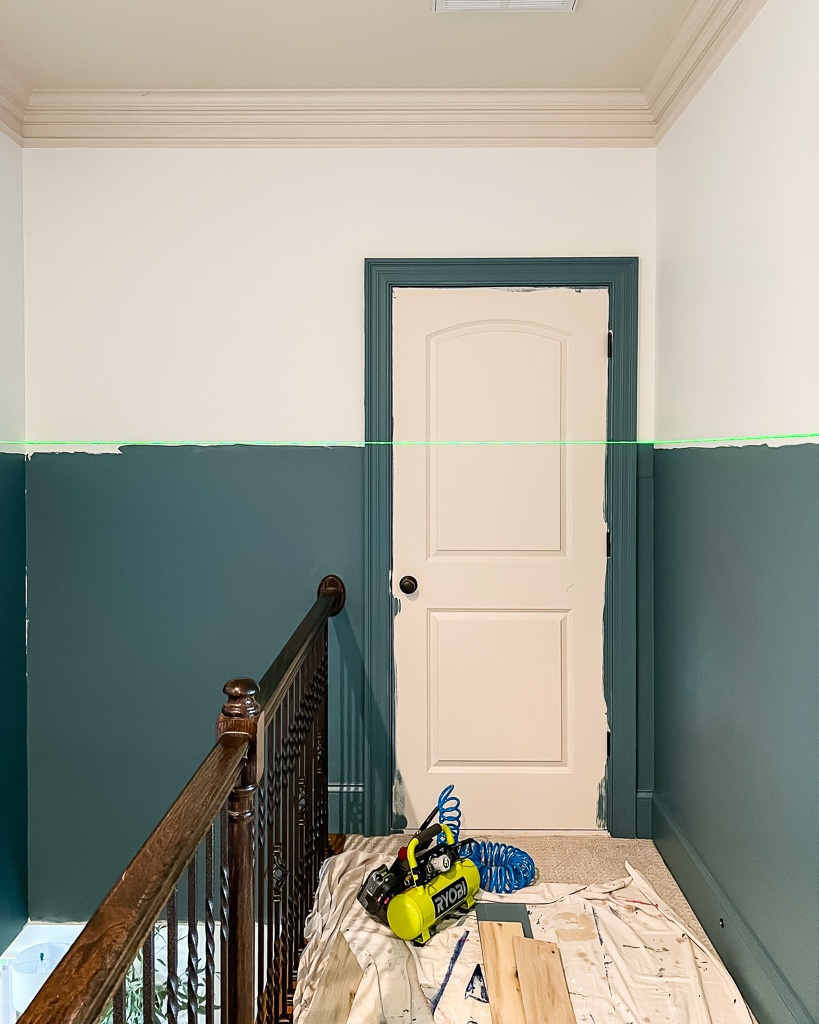
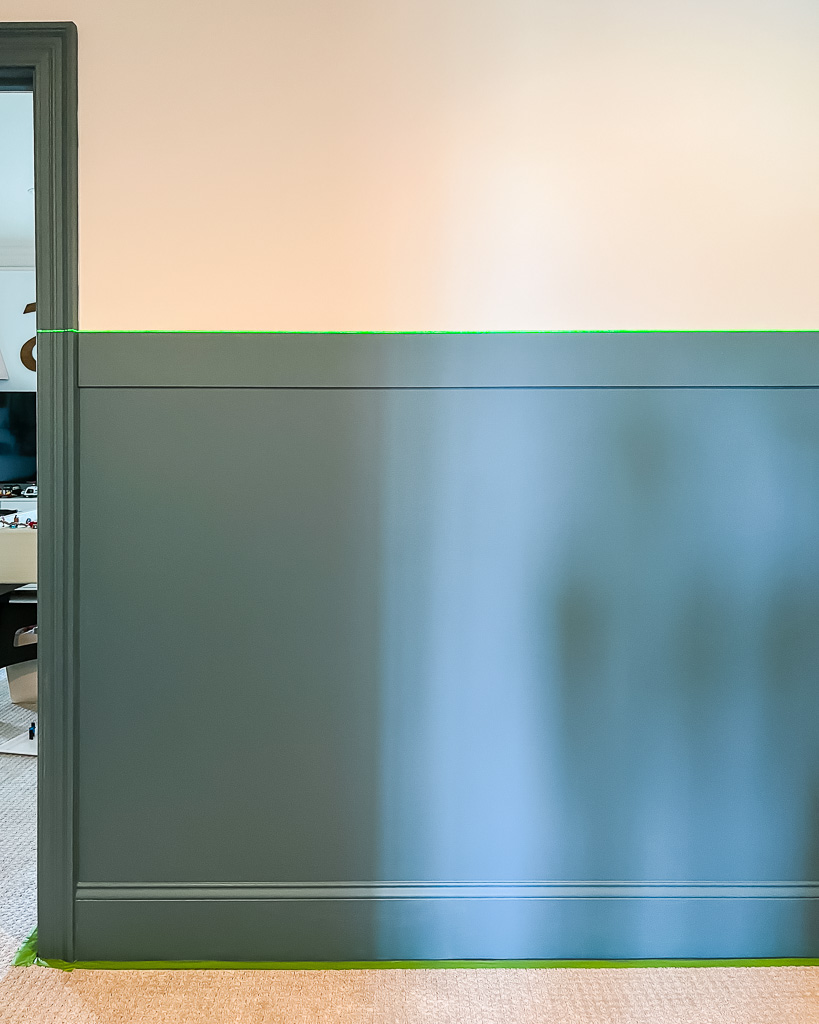
I then used a level to mark a line 57″ from the floor around the space so I would know where to stop painting (more on that next).
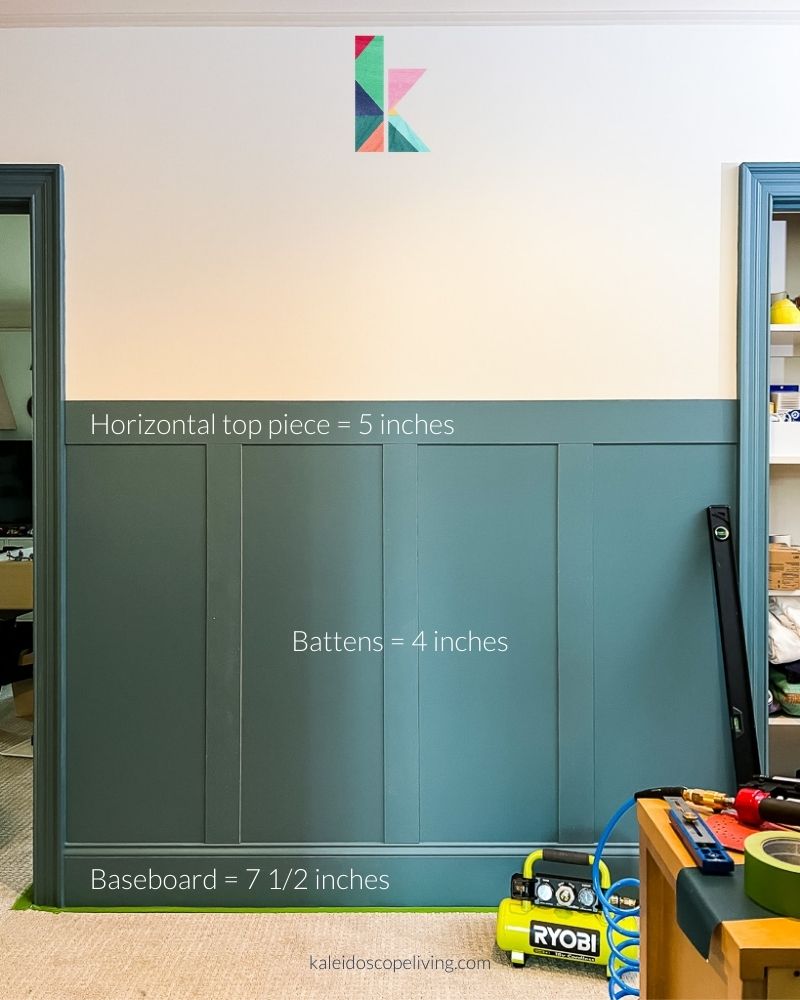
- Decide on the size of your horizontal pieces & batten pieces
Again, a lot of this comes down to personal preference. But I would say that generally, I recommend making your top horizontal trim pieces narrower than your baseboards, but thicker than your battens. You can see the measurements we decided on below.

- Paint
I highly recommend painting your walls AND plywood ahead of time. You can absolutely wait to paint everything until after it is installed, but your paint job won't look nearly as clean and professional, in my opinion.
I painted the walls where the battens would later be installed, up to the line I mentioned in step 1. I didn't try to make the paint line neat and tidy since I knew it would be covered by the horizontal trim pieces.
I also painted the sheets of 1/4″ plywood with a paint roller before we cut them to size. - Rip your plywood down to size
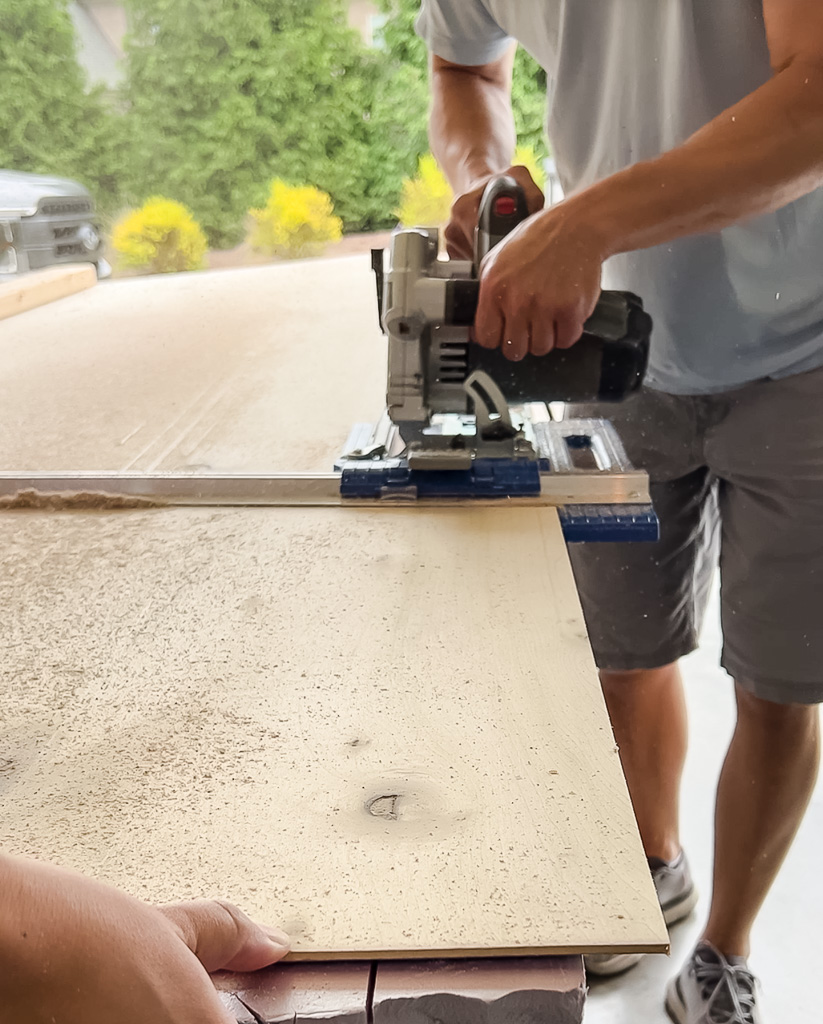
Ripping refers to cutting the wood along its grain for a lengthwise cut. This type of cut is easy to make, so don't be intimidated! All you need is a circular saw and rip-cut Circular Saw Guide. It took us less than 10 minutes to make all of our rip cuts. And I promise it's not scary, even if you are a beginner! After we ripped all of our horizontal pieces, we cut them to the correct lengths using our miter saw. Then we moved on to step 5.
IMPORTANT NOTE: To avoid “tear out” and splintering from your saw, rip your wood with the good side facing DOWN. But trim it to length with your miter saw with the good side facing up.

- Install your horizontal pieces
Next, you want to set your laser level to mark where you will be placing the top of your horizontal pieces. Use your pin nailer/brad nailer to secure them to the wall. This will cover your messy paint line :)
Note that we did not use Liquid Nails or any type of construction adhesive because it's really not necessary for 1/4″ plywood (the individual pieces aren't very heavy) and if we ever want to remove the board and batten years from now, using only pin nails will minimize any damage to the drywall. Since the wood pieces aren't very heavy, you don't need to be overly concerned about nailing into a stud or studs. We used a criss-cross nailing pattern for added strength. - Decide on the layout for your vertical pieces/battens
This is BY FAR the most difficult part of this project. And we approached it a bit differently than most people because we were installing our board and batten in a hallway.
Common spacing between battens is anywhere between 12″ – 20″. You need to know roughly how far apart you'd like your battens to be. I was aiming for around 18 inches between battens.
If you are working in a room with long walls that aren't interrupted by lots of doors, you can most likely use the same formula for your entire wall/room.
Here's the problem with using a single “formula” in a hallway…. Because you are going to have so many doors interrupting your wall space, if you try to use the exact same batten spacing between your doors, you will wind up with battens in weird places.
We avoided that problem by treating each section of wall between doorways as independent when doing the math. I highly recommend doing this if you are installing board and batten in a hallway as well. - The Spacing Formula
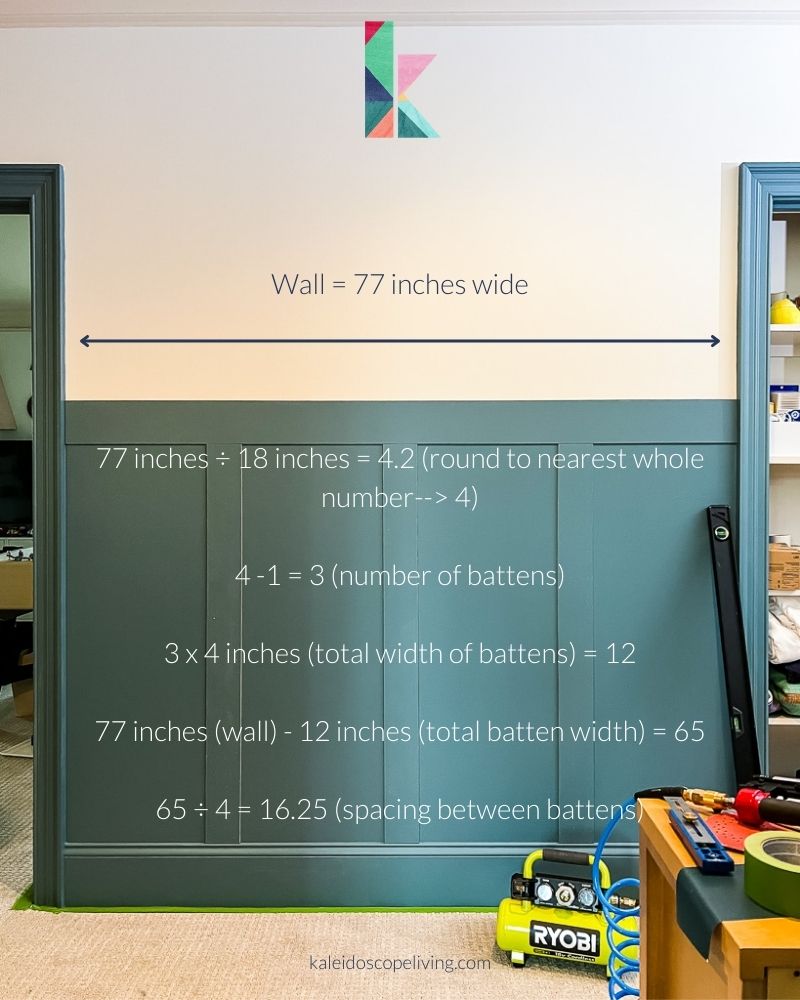
For each section, we measured the length of the wall space and divided it by 18″ (since that was our desired spacing).
We then rounded up or down to the nearest whole number to determine the number of SPACES we would have on the wall.
Subtract 1 to determine the number of battens.
Then multiply the result by 4 (the width of the battens).
We then subtracted that number from the length of the wall and divided it by the number wall spaces.
I've written out an entire example and created a graphic for you below. Don't panic.
For each section, we measured the length of the wall space and divided it by 18″ (since that was our desired spacing).
We then rounded up or down to the nearest whole number to determine the number of SPACES we would have on the wall.
Subtract 1 to determine the number of battens.
Then multiply the result by 4 (the width of the battens).
We then subtracted that number from the length of the wall and divided it by the number ofwall spaces.
I've written out an entire example and created a graphic for you below. Don't panic.
•Wall = 77 inches wide
•77 inches ÷ 18 inches (desired spacing) = 4.2 (round down to 4) –> this determines the number of “spaces” you will have on your wall.
•4 (number of spaces on wall) -1 = 3 —> this is the number of battens you will have
•3 battens x 4 inches (width of battens) = 12 inches of total batten width
•77 inches (wall width) – 12 inches of total batten width = 65 inches of wall space that will NOT be covered by battens
•65 (wall space not covered by battens) ÷ 4 (number of wall spaces) = 16.25 inches —> space between battens from edge to edge
So that means we didn't end up with 18-inch spacing on this wall, but that is OKAY!!!!! I just didn't want a span larger than 20 inches.
We repeated this formula for each section of wall. We got as close as we could to 18-inch spacing between battens in each section of wall.
Because we treated each wall independently, the spacing between battens is slightly different from wall to wall. But it's NOTHING the naked eye will ever notice!
This is far preferable to following an exact formula and winding up with a batten right next to a door frame. Or a batten 6 inches before a wall ends. We wanted each board and batten section to look nice and symmetrical and this was the best way to do it! - Install your vertical pieces/battens
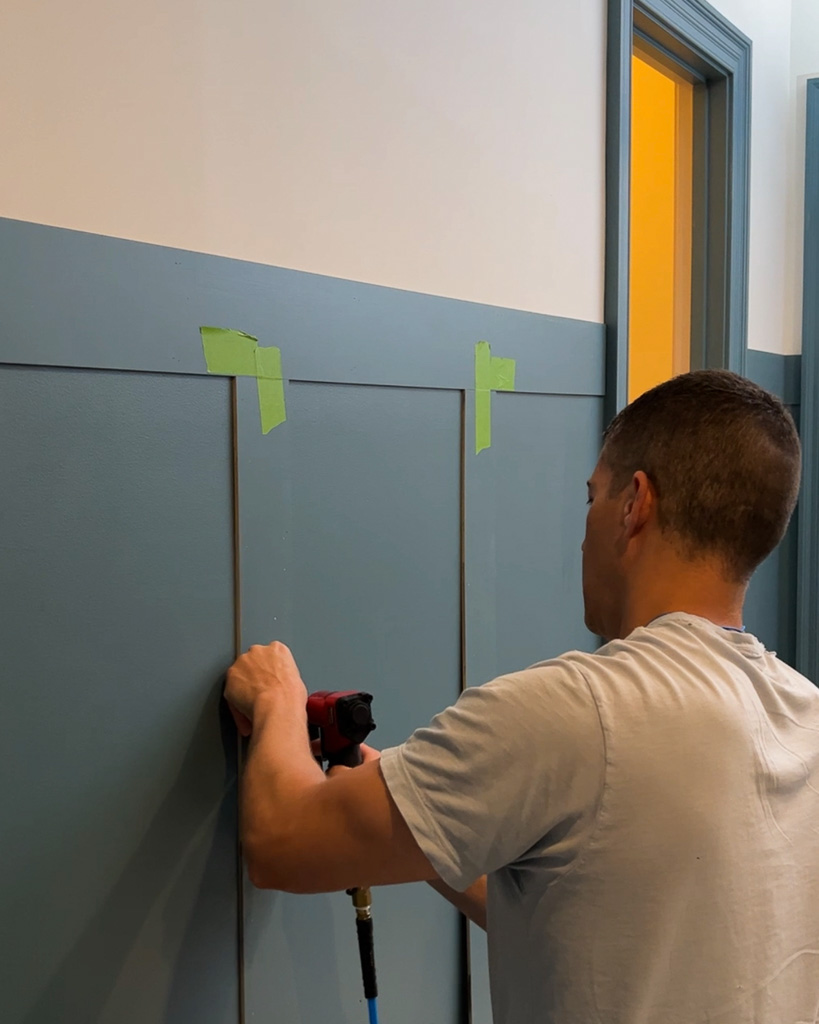
Measure the length of each vertical batten one at a time. Unless your house is MAGIC, your floors/baseboard may not be perfectly level. Because your top horizontal board WAS installed perfectly level, the length of your battens may vary slightly.
We found it helpful to tape our battens into place and double-check our measurements BEFORE nailing them into place.
Use your pin nailer to attach your vertical boards/battens to the wall. Be sure to check for level as you nail them into place! If you are doing this by yourself, put one nail in the middle, make sure it’s level, and then nail up and down the board. - Fill nail holes, caulk and touch-up paint
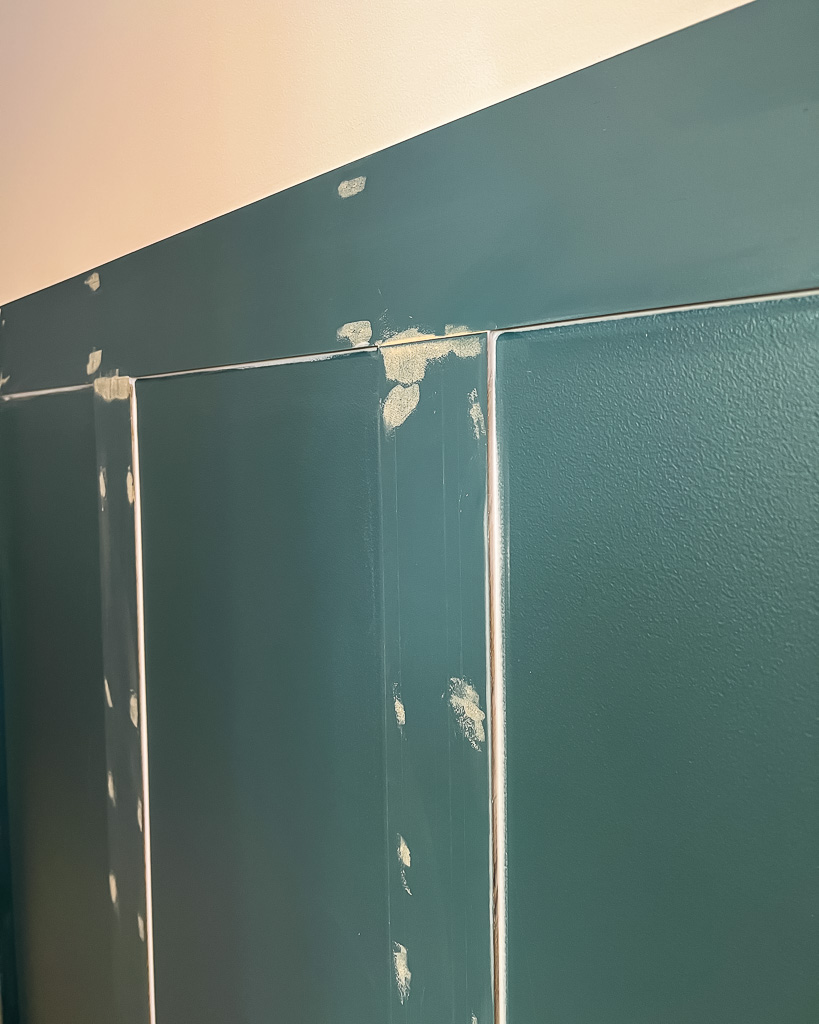
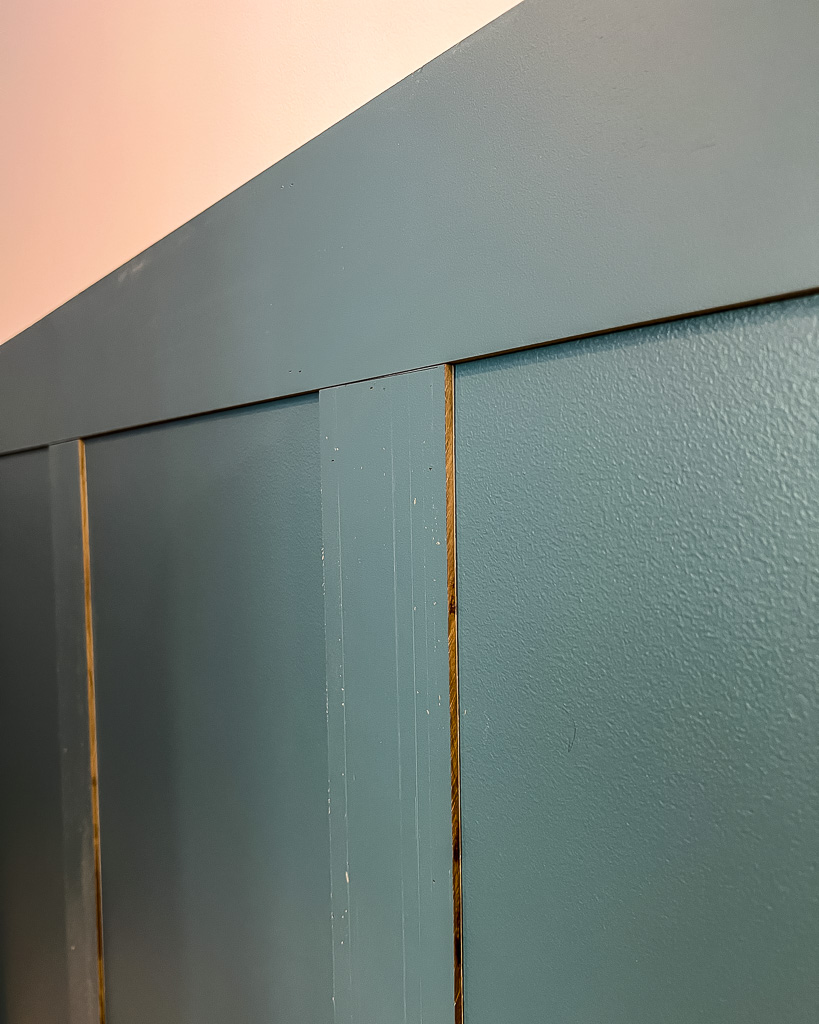
The hard part is over! All you need to do now is fill all of your nail holes with DAP Plastic Wood-X. Then let it dry and sand it smooth.
You also want to caulk all of your edges and seams with DAP Alex Plus Caulk. To caulk, run a small bead of caulk where the trim pieces meet your wall and smooth the bead of caulk down with your finger. Keep a very wet rag with you so you can clean your finger between swipes.
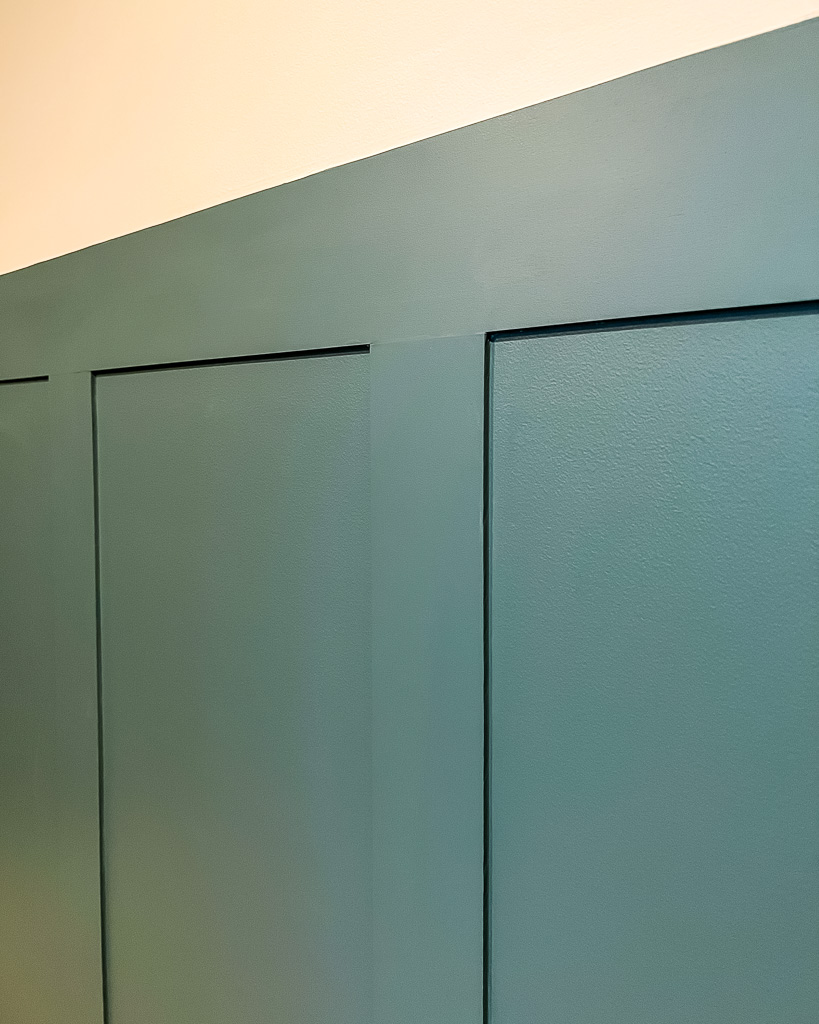
Once you've filled all your nail holes and caulked, paint over your wood filler and caulk lines. And do any other paint touch up that may be needed. These are the finishing details that will make ALL THE DIFFERENCE in the world! Don't believe me? Check out the before and after below. If you want your board and batten to look professional, don’t skip this step.
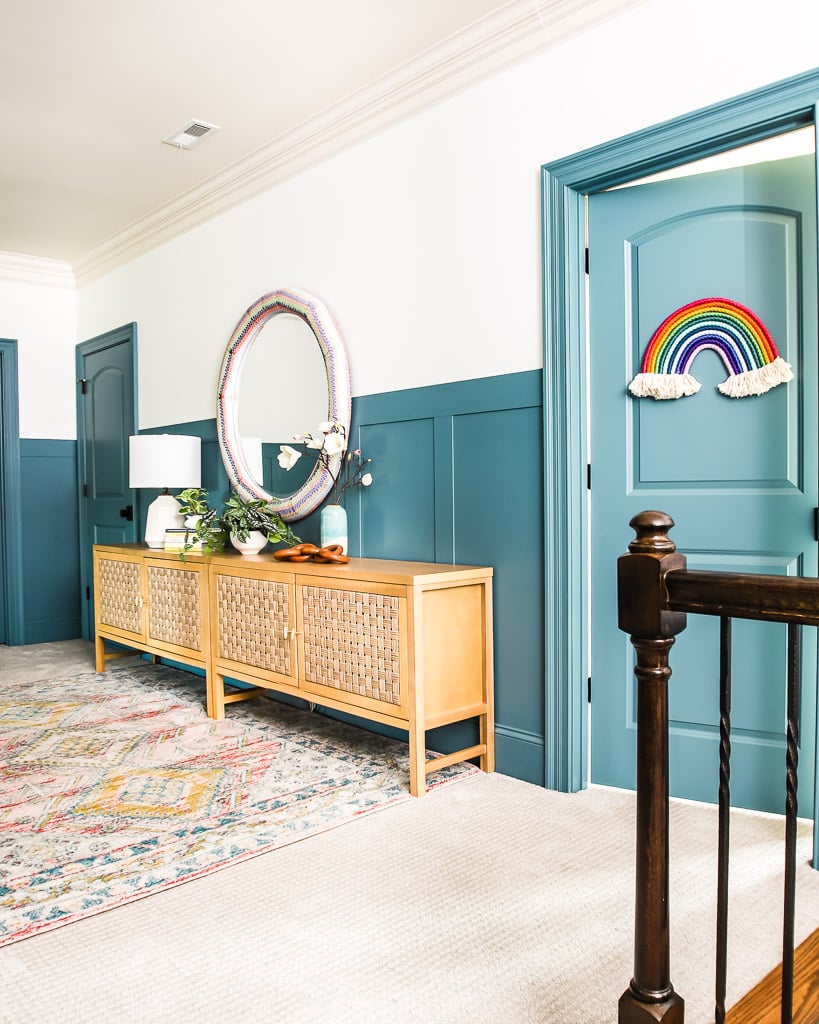
Photos of The Finished Project
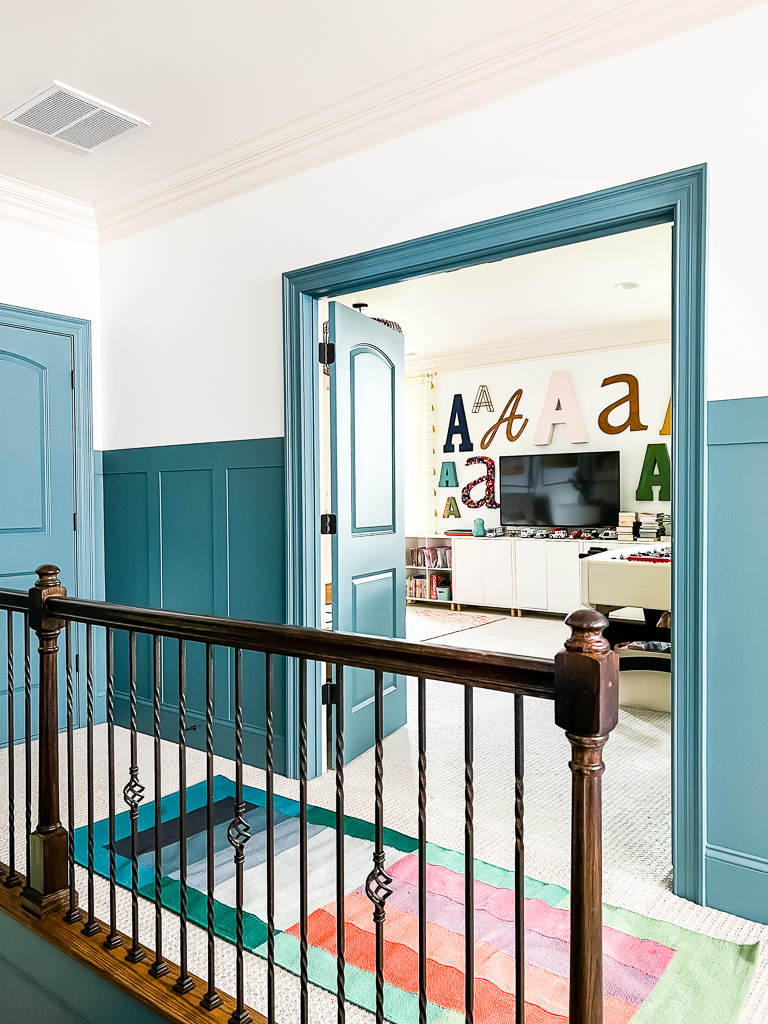
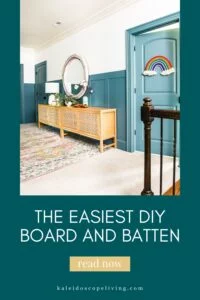
Here's how the board and batten accent wall turned out! We are so, so happy with it. And it looks even better now that we have had our Velux Sun Tunnels installed to finally get some natural light in this hallway!
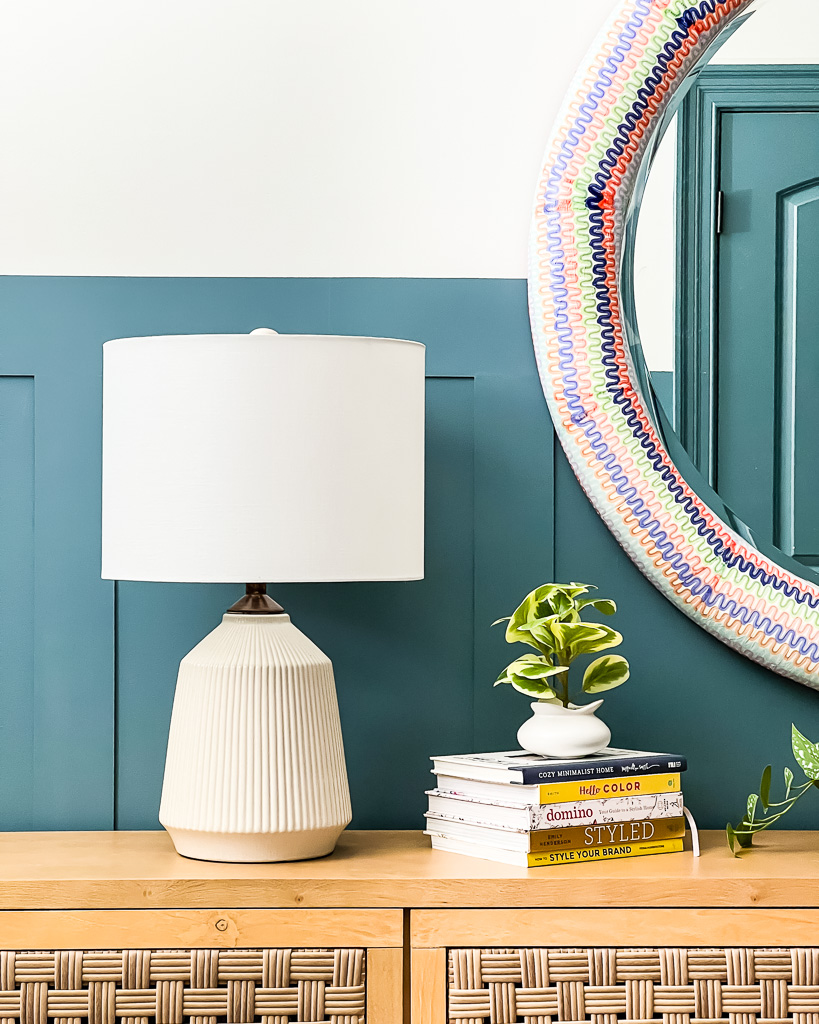
I'm THRILLED we decided to use 1/4″ plywood because it sits perfectly flush with our existing baseboards.
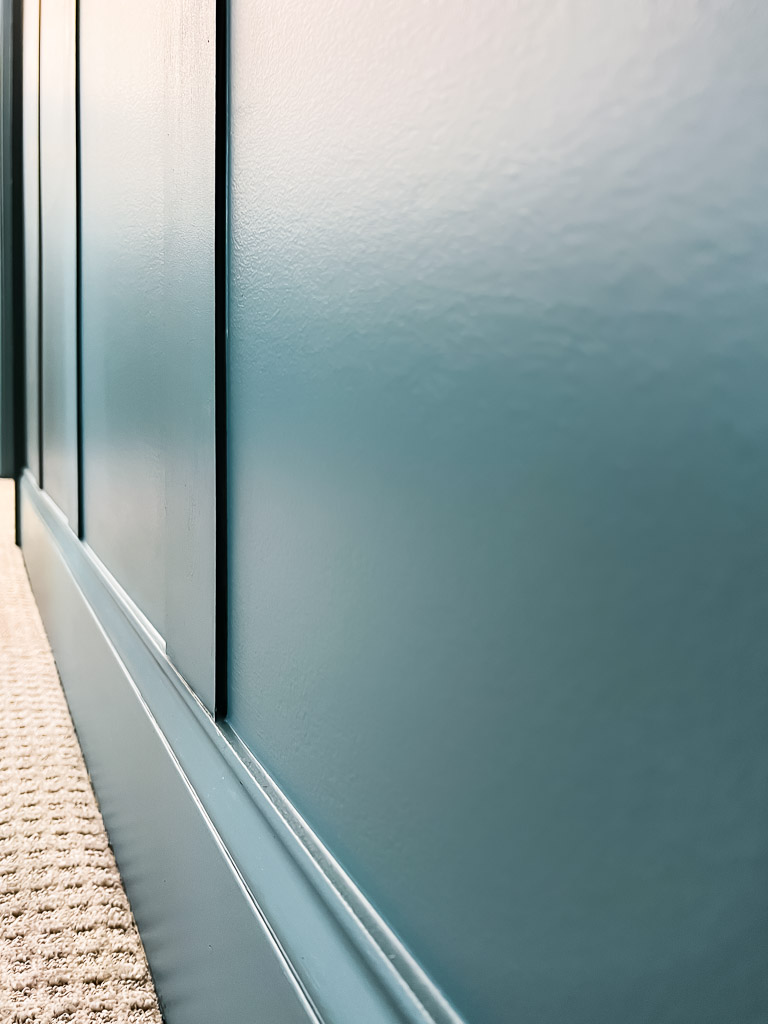
It also allows us to easily hang stuff on our walls without sticking out weirdly!
Frequently Asked Questions
This depends a lot on the width of your walls, the total size of your space and the material you choose. But our hallway is pretty large. We were able to do it for only $88 in plywood. If I add in the cost of the paint, caulk and nail filler, this project cost us about $150 total.
We chose Refuge by Sherwin-Williams and love it. Be sure to follow my tips for choosing paint colors for your home, because paint colors look drastically different depending on the lighting in a particular room/space! I also recommend Samplize for testing paint colors!
I typically prefer an eggshell finish on walls, but because we also painted our baseboard, door trim and doors the same color and the board and batten wall treatment, I used a satin paint finish for everything. If you need help deciding what paint sheen is best for your project, check out my tips for choosing a paint sheen.
Hallway Source List
I've linked what I can below. The mirror was a DIY project. You can find the tutorial for it here—> DIY Mod Podge Mirror With Napkins.

If you have any other questions, the best way to reach me is to send me a DM via Instagram :) And if you use this tutorial, I'd love to see how it turns out! Just share on Instagram and tag me @tasha.kaleidoscope!
Other posts you may enjoy:
- Our UNIQUE Hallway Decor + Makeover Reveal
- DIY Board and Batten Wall Ideas
- Stunning Accent Wall Ideas to Transform Any Room
- The Best Way to Test Paint Colors
- DIY Staircase Makeover in 2 Days: Tutorial & Reveal
- How to Replace Balusters to Update Your Stair Railing
- Easy DIY Wood Slat Wall Treatment
Wondering how I approach transforming rooms and spaces in our home? Check out Designer in a Binder®.

And if you want exclusive content and behind-the-scenes sneak peeks, be sure to subscribe before you head out!

Last Updated on February 11, 2023
Lovely! What is the creamy white wall color above the baseboard?
Thank you! It’s Pure White by Sherwin Williams.
It looks great! Are the doors a different color on the other side? I’d like to paint the trim to match our doors as well but don’t want the same color in every room.
Thank you, Chris! Our doors are painted the same color on both sides :)
This is gorgeous and I am usually not a fan of darker paint color in a hallway. I love how you left the top over the board and batten the white color. Also, the instructions are great – I am going to print them out and give to my sister for her hallway.
Thank you so much Pam!
I knew this project was going to turn out great but it’s even better than I anticipated! Looks fantastic, I love the color you chose, and I so appreciate you sharing how you made it happen!
Thank you so much Leslie! We are so happy with how it all turned out :)
Lovely. It’s amazing that’s all the same color because sometimes (like the door with the rainbow) it looks so different. But I like chameleon colors.
Yes, light affects paint colors soooooooo much. That’s why a paint color can look so different even in the same room!